How to Set Up WordPress Error Log – Step by Step Guide for Beginners [2023]
- When do you need a WordPress error log?
- How to set up WordPress error logs
- How to check error logs
- Fix error logs in your WordPress website
- Disable WordPress debug mode
- Conclusion
Setting up a WordPress error log becomes handy, since numerous issues can arise with website error codes and warnings.
These issues range from conflicts between WordPress plugins to poorly coded themes and errors in custom coding.
It is crucial to address these problems, even if you’re uncertain about their implications. The initial step involves acquiring the knowledge to establish a WordPress logs.
To put it simply, a WordPress error log is a record of error codes and their corresponding timestamps that occur on your website.
In this article, we will guide you through the process of setting up and utilizing WordPress error logs by making use of the built-in WordPress debug mode.
When do you need a WordPress error log?
It is advisable to set up a WordPress error log in the following scenarios:
- When you encounter a blank screen upon attempting to load your website.
- When a warning message accompanied by an error code (such as 401, 404, 500, etc.) is displayed.
- In the event of a complete site crash.
- When you observe sluggish website performance.
- If a plugin or theme is not functioning correctly.
- If you are curious to identify which plugins or themes are contributing to performance issues.
How to set up WordPress error log
When it comes to enabling error logging with WordPress debug mode, there are typically two approaches you can take:
- Manual Method: To begin, we’ll outline the manual method, which involves using the file manager and adding a few lines of code to your website’s wp-config.php file.
- Plugin Method: If you prefer a more straightforward option for error logging, we’ll introduce a free plugin that can efficiently handle the task.
Let’s start with the manual method…
1.) WordPress error logs in wp-config php file
If you’re unfamiliar with the wp-config.php file, it is an essential core WordPress file that stores important configuration information, including your site’s database credentials.
To access the wp-config file, you can either download and utilize an FTP client or utilize a file manager tool in your hosting account’s cPanel.
💻 How to access and edit your wp-config.php file using an FTP client:
1.) Launch your FTP client and navigate to the location of your website files.
2.) Look for the wp-config.php file, which is typically located in the root directory of your site.
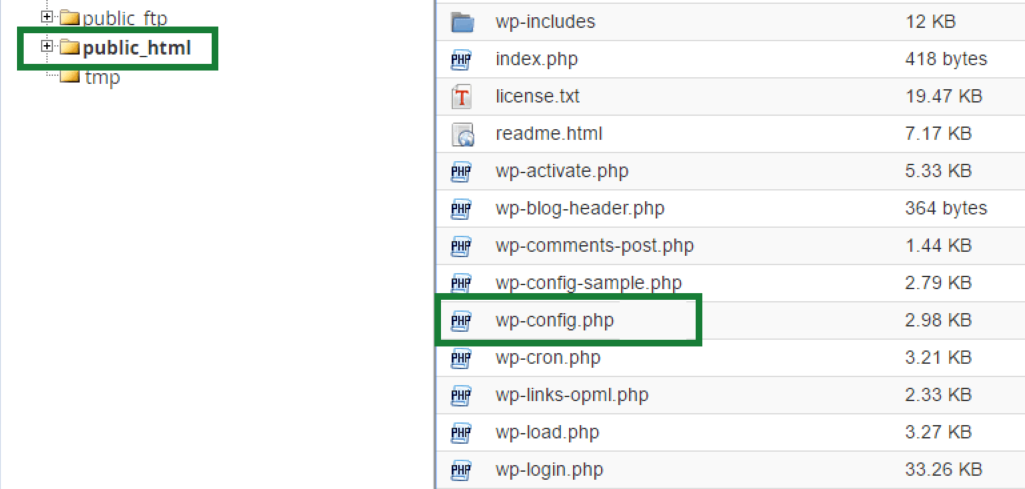
3.) Once you locate the wp-config.php file, right-click on it and choose the option to edit or view the file. You should open the file using a text editor.
💻 Add a line of code in the wp-config.php file to enable debug mode:
Within your text editor, locate the line of text that says “Stop editing! Happy blogging.”
Position your cursor on the empty line just above that line of text.
Paste the following line:
define( ‘WP_DEBUG’, true );
If you already see this line of code in the file, it might currently be set to false. In that case, modify it to true.
Once done, save the file on your computer and upload the updated wp-config.php file to your website using the FTP client.
Cool! Debugging mode is now activated for your WordPress site.
💻 Prevent errors from displaying on the frontend of your website:
If you have checked your WordPress dashboard or the frontend of your site, you may have already noticed that WordPress errors are visible for everyone.
While this may not be a concern if they appear on the dashboard, it is undesirable to have warnings displayed on the frontend.
Not only can publicly displaying WordPress errors confuse your visitors, but the PHP error log displayed can also pose a security risk by divulging detailed information about your site.
In short, enabling debugging mode on its own can be messy.
To address this, we need to log the errors in WordPress so they are recorded but not publicly shown.
1.) To log your errors, open the same PHP file in the text editor.
2.) Find the debug code you recently added to the file. Below that code, paste the following code on an empty line:
// Enable error logging to the /wp-content/debug.log file
define( ‘WP_DEBUG_LOG’, true );
// Disable display of errors and warnings
define( ‘WP_DEBUG_DISPLAY’, false );
@ini_set( ‘display_errors’, 0 );
In some cases, you might find that the debug log code is already present.
In that case, ensure that the “false” at the end of the code is changed to “true.”
The first line instructs WordPress to save error messages in a file named debug.log.
The second snippet tells WordPress to prevent error messages from being displayed publicly.
Now, your error messages will be securely saved in the log file, without being visible to you or your visitors while browsing your site.
Once again, save the wp config file in your text editor and upload it back to your WordPress website.
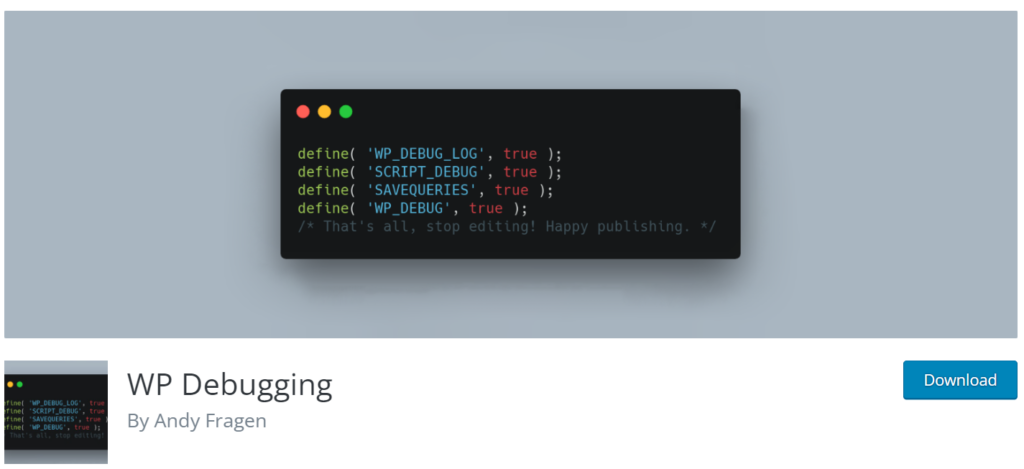
2.) How to set up WordPress error log using a plugin
If you prefer not to directly modify your site’s configuration file, you have the option to use the WP Debugging plugin for error logging, which is available for free:
| Plugin | Price | Rating |
|---|---|---|
| WP Debugging | Free | 4.9 based on 8,000+ reviews |
Upon activating the plugin, it will instantly enable WordPress debug mode and activate error logging.
You can also control whether or not to display debug error message on your site by navigating to Tools -> WP Debugging.
How to check WordPress error logs
We’re assuming that you are already aware of the WordPress page that is indicating errors.
Now that the debugging log is set up and prepared to store the errors, it is important to visit these pages.
Reconnect to your website files using the FTP client or access them through your hosting provider’s cPanel.
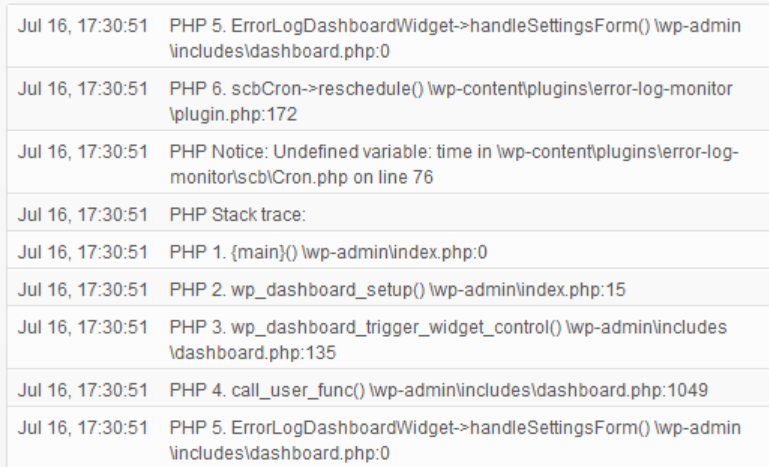
1.) Navigate to the wp-content folder.
2.) Open the folder and locate a file named debug.log
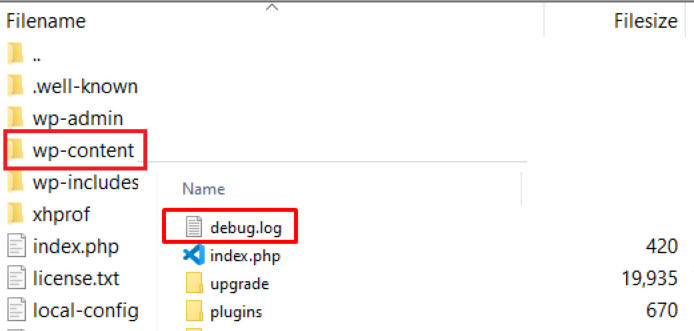
This file is the one you generated in the previous steps.
How to fix issues in WordPress error log
What to do with the debug log file?
The debug.log file can be accessed by editing, viewing, or downloading it.
Similar to the previous steps, you can either preview the file to examine its contents or open it in a file editor to make changes and save them for future reference.
It’s important to note that the debug log file is intended for reference purposes and should not be directly edited.
Instead, you need to carefully review the list of errors and warnings to determine the underlying issues with your website, theme, plugins, or code.
For most individuals, the error log codes are often perplexing and appear more like gibberish than English. Nevertheless, it is crucial not to disregard these errors.
Address the WordPress error logs:
- Identify an error within the debug log.
- Note the corresponding error code.
- Look up the meaning of the error code.
- Use a separate guide or resource to resolve the specific error.
Fix WordPress error logs
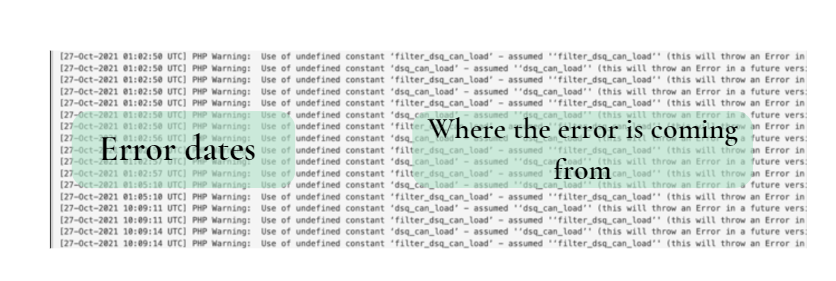
Once you have successfully accessed your WordPress error logs, you will be able to locate the error message that was logged when the issue occurred on your website.
Keep in mind that the displayed times are in UTC, not your local time zone.
Although most users may not fully comprehend the error messages, they serve as a valuable starting point to troubleshoot errors.
If you are unable to find a solution on your own, there are several resources you can turn to for assistance.
These include seeking help from the official WordPress forums, reaching out to your WordPress web hosting company’s support team, or visiting the dedicated support area for the specific plugin or theme that you are experiencing difficulties with.
Disable WordPress debug mode
After resolving the issue on your WordPress site, it is advisable to disable debug mode. Leaving it enabled can potentially slow down your website and pose a security risk by exposing unwanted information.
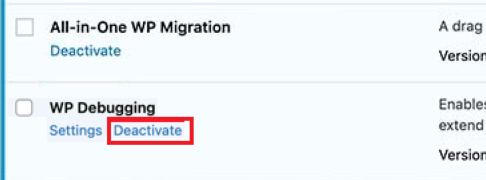
1.) If you activated debug mode using a plugin, go to “Plugins” » “Installed Plugins” in your WordPress dashboard.
2.) Locate the WP Debugging plugin and deactivate it.
1.) If you enabled debug mode using code, edit the wp-config.php file as you did previously.
2.) Locate the lines that define WP_DEBUG and WP_DEBUG_LOG, change their values from ‘true’ to ‘false‘.

By doing so, you will effectively disable debug mode and prevent any further logging of errors.
Conclusion
Even for the average WordPress user, examining pieces of code can be overwhelming.
The great news is that configuring a WordPress error log requires just two small code snippets.
If you have difficulties while enabling your WordPress logs or have any questions regarding troubleshooting, feel free to ask us in the comments section below!