How to Hide a Page in WordPress in 4 Easy Ways [2023]
- Why hide a page in WordPress?
- 4 easy steps to hide a WordPress post
- Hide a page title in WordPress
- Conclusion
Finding an answer to the question: How to hide a page in WordPress, brought you here.
Sometimes, you might want to prevent a page from showing up in Google search results for various reasons.
It could be because the page doesn’t relate to your website’s content, you want to protect your privacy, or you wish to keep unwanted users away.
In this article, we will explain how you can hide post titles or pages on your WordPress website from search engines, without negatively impacting your site’s overall search engine optimization (SEO).
Why hide your WordPress page from Google?
Search engines like Google provide a feature that allows website owners to prevent certain content from appearing in search results.
For instance, there are situations where you might want to hide specific WordPress blog posts or pages that are not relevant to the general public.
This could include pages created solely for website ownership verification purposes.
There might also be pages on your website that contain private or sensitive information, and you’d prefer to keep them hidden to safeguard your privacy and prevent unauthorized access to confidential data.
For instance, if you run a membership website, you can choose to hide the profile pages of your members from search engines.
Another scenario where hiding content from Google is useful is when your website is still being developed, and you want to provide a sneak preview to your audience without having an unfinished website indexed in Google’s search results.
In this article, we will explore various methods to hide WordPress pages from Google.
These methods include using an HTML meta tag, modifying your robots.txt file, password-protect your pages, and putting your site in maintenance mode.
4 Steps to hide your WordPress site from search engines
#1 Hide your WordPress page with AIOSEO
To hide a WordPress page from Google, you can use a WordPress plugin called All in One SEO (AIOSEO), which is highly popular and used by over 3 million websites.
This method is particularly recommended for beginners as it is simple to implement.
Check out our article to see an expert review of AIOSEO.
👩💻 1.) Firstly, you’ll need to install and activate the AIOSEO WordPress plugin.
The free version of AIOSEO also includes the feature to hide pages from Google.
👩💻 .) Once the plugin is installed and activated on your WordPress site, you can proceed to edit the specific WordPress page or post that you wish to hide from Google.
👩💻 3.) In the WordPress content editor, scroll down until you reach the AIOSEO Settings and click on the ‘Advanced’ tab.
Within this tab, you will find a ‘Robots Setting’ option accompanied by a toggle switch labeled ‘Use Default Settings’.
👩💻 4.) Simply click on the toggle switch to deactivate the robots setting.
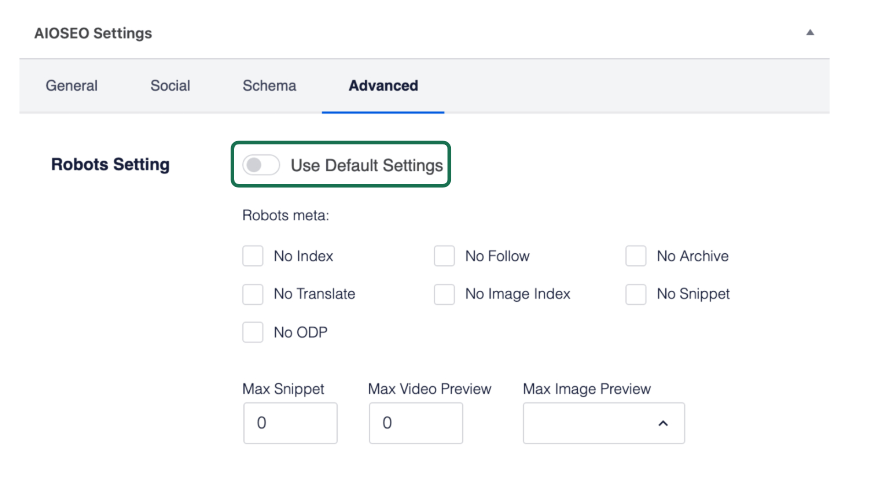
After disabling the robots setting, additional options will become visible under the ‘Robots meta’ section.
👩💻 5.) To exclude the WordPress page from showing up in Google search results, you need to select the checkbox labeled ‘No Index’.
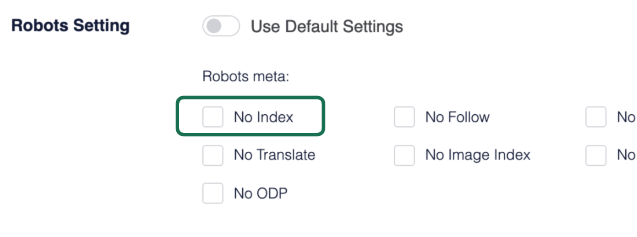
Once you have selected the ‘No Index’ checkbox, you can proceed to save or publish your page.
AIOSEO will automatically add a line of code that instructs search engines like Google not to index this particular page.
The code will appear similar to the following:
<meta name=”robots” content=”noindex”/>
This code snippet ensures that search engines understand that the page titles should not be indexed or included in their search results.
In addition to excluding individual pages, AIOSEO also provides the option to hide various content sections from appearing in Google search results.
How to hide different sections of your content
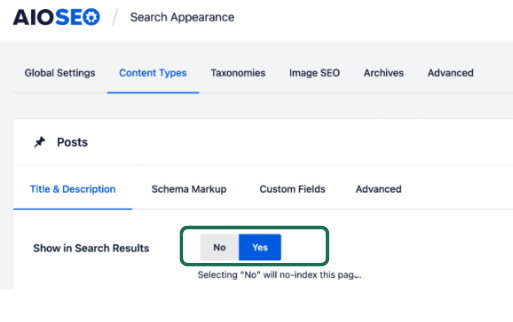
👩💻 1.) To accomplish this, navigate to the WordPress dashboard and click on “All in One SEO” and then select “Search Appearance.”
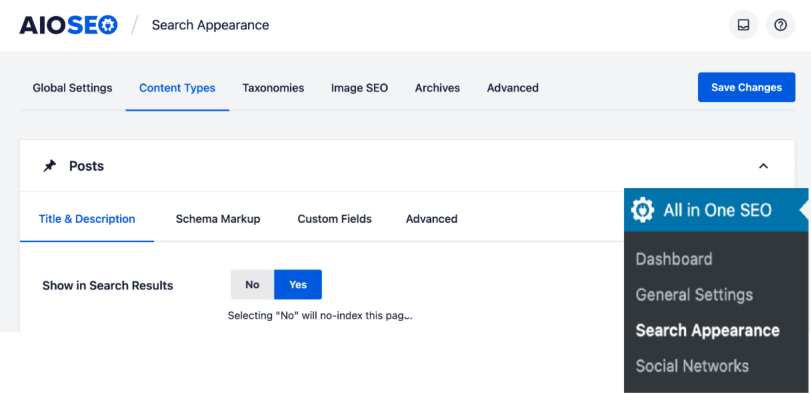
Within the “Search Appearance” section, you will find different tabs corresponding to various content sections such as Content Types, Taxonomies, Media, and Archives.
👩💻 2.) Click on any of these tabs according to the specific content section you want to modify. Then, locate the “Show in Search Results” setting and set it to ‘No’.
If you wish to hide media files from Google, you will require the AIOSEO Pro version to access the options under the ‘Media’ tab.
👩💻 3.) Then, don’t forget to click the ‘Save Changes’ button to save your modifications.
AIOSEO will automatically insert a ‘noindex’ HTML meta tag, instructing search engines not to index the specified content, therefore the content will not appear in search results.
Additionally, AIOSEO will exclude this content from your XML sitemaps, ensuring it is not included for search engine crawling.
#2 Hide WordPress pages using robots.txt file
Please note that this method involves editing the robots.txt file, which serves as a configuration file providing instructions to search engine bots. It is important to exercise caution when modifying this file, as incorrect instructions can adversely affect your site’s SEO.
Editing the robots.txt file requires accessing your website through an FTP client or file manager in your WordPress hosting cPanel.
👩💻 1.) Once you have gained access, navigate to the root directory of your website.
👩💻 2.) To hide specific pages or content from Google, you will need to add the following lines to your robots.txt file:
User-agent: *
Disallow: /your-page/
The “user-agent” line in the robots.txt file enables you to target specific bots.
By using an asterisk sign (*), we include most search engines. The subsequent line defines the portion of the URL that follows your domain name.
Let’s consider a scenario where you intend to hide a blog post with the following URL:
http://example.com/2023/07/my-blog-post/
To achieve this, you would add the following URL to your robots.txt file:
User-agent: *
Disallow: /2023/07/my-blog-post/
👩💻 3.) Remember to save your changes and upload the modified robots.txt file back to your server.
However, using the robots.txt file to hide content has some drawbacks.
Firstly, it is publicly accessible, allowing anyone to view it and potentially discover the hidden pages.
Secondly, while major search engines usually respect the robots.txt instructions, there are other bots and crawlers that may ignore them and index the restricted pages.
These malicious bots can pose security risks by spreading malware, targeting websites, or harvesting personal information like emails and phone numbers.
#3 Password protected page or post in WordPress
There’s another method you can use to control who can see a page.
Instead of asking search engines not to show it, you can simply password protect it.
This way, only users who know the password can access the page.
WordPress has a built-in feature that allows you to add passwords to posts and pages.
To do this, edit the post or page in WordPress you want to password protect.
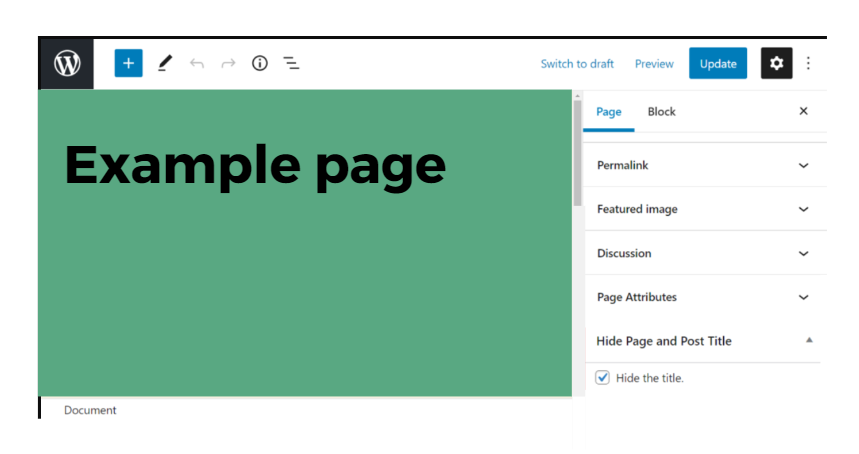
👩💻 1.) In the WordPress page editor, look for the ‘Document’ settings and find the ‘Visibility’ option. Next to it, you’ll see a link you can click.
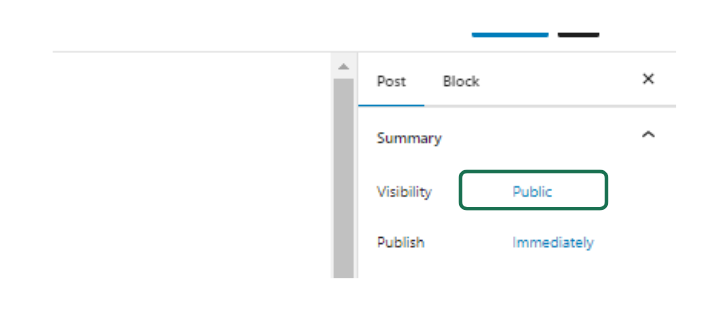
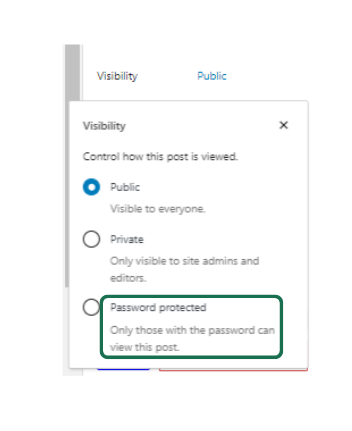
This will display the visibility options provided by WordPress, allowing you to choose the visibility settings for your post or page. These options include making it public, private, or password protected.
Private WordPress posts are restricted to logged-in users with at least an editor user role on your website.
On the other hand, password-protected posts can be viewed by any visitor who knows the password.
👩💻 2.) To password protect a post or page, click on the ‘Password Protected’ option and then enter a secure and strong password.
👩💻 3.) After publishing or updating the post or page, when visitors attempt to access it, they will be prompted to enter the password in order to view the content.
They will encounter a page that looks like this:
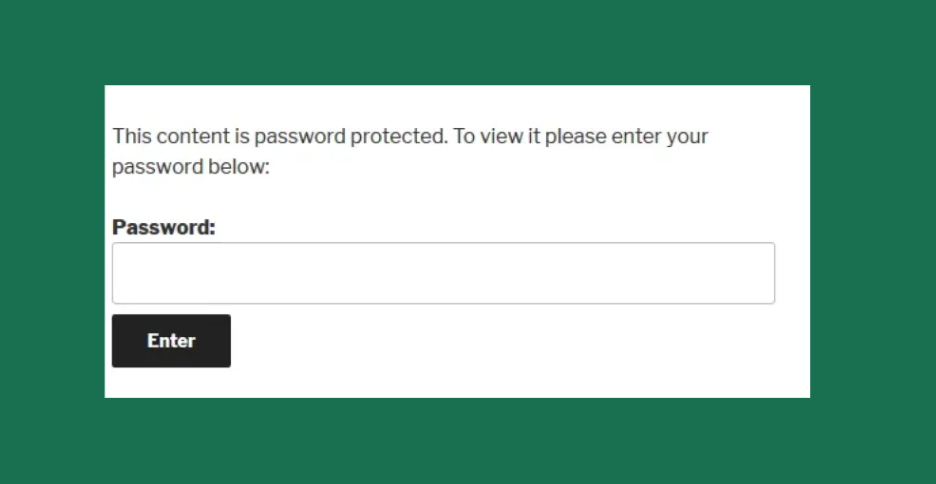
On this page, visitors will see a password entry field where they can input the correct password. Once they enter the password correctly, they will gain access to view the content of the post or page.
If you would like to learn more about website security, click here.
#4 Hide a page in WordPress while it is under maintenance
If you wish to hide your WordPress page from Google and the public during the website development, redesign, or significant theme and plugin updates, you can do so easily by enabling maintenance mode using a plugin such as SeedProd.
👩💻 1.) To begin, you’ll need to install and activate the SeedProd plugin
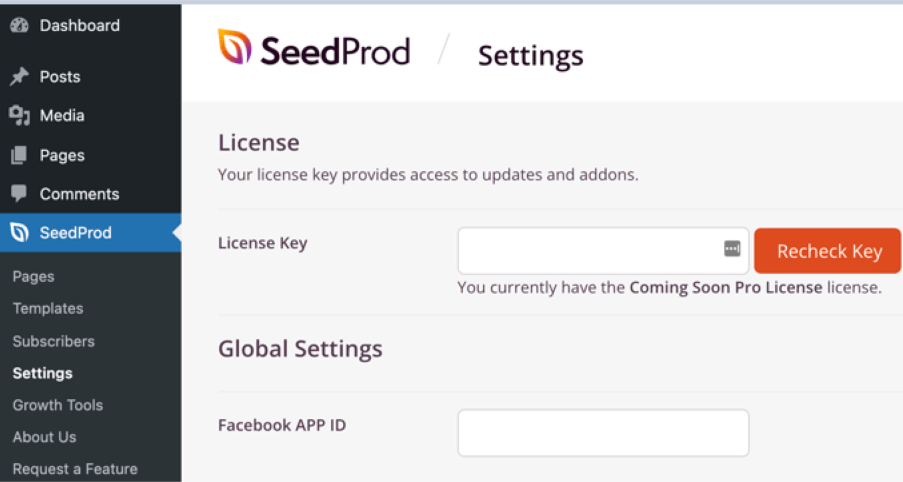
👩💻 2.) Once you have activated the SeedProd plugin, go to the SeedProd » Settings page.
On this page, you will need to enter your license key to access the full features of the plugin. You can locate this license key in your account on the SeedProd website.
👩💻 3.) After that, go to the SeedProd » Pages section in your WordPress dashboard.
In this section, locate the ‘Maintenance Mode’ page. Once you find it, you will see a toggle switch.
By default, it is set to ‘Inactive’.
👩💻 4.) To activate the maintenance mode for your website, simply switch the toggle from ‘Inactive’ to ‘Active’.

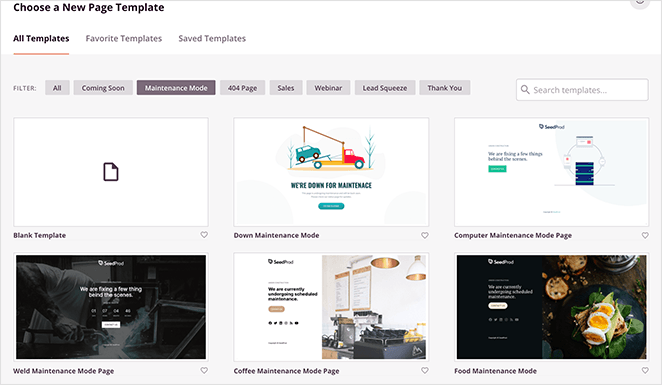
👩💻 5.) After that you need to click on the ‘Set up a Maintenance Mode Page’ button. This action will allow you to create a temporary page that visitors can see while your WordPress site remains hidden.
Upon clicking the button, you will be presented with various template options.
Select a template and modify the page
Hover your mouse over a template to see two icons associated with it.
The first icon, a magnifying glass, enables you to preview the template by clicking on it. The second icon, a red tick, allows you to select the template by clicking on it.
Once you have chosen a template, you will be directed to the SeedProd drag and drop page builder. This intuitive interface enables you to customize your maintenance mode page according to your preferences.
Within the page builder, you can easily edit the text displayed on the page. This allows you to provide relevant information or updates to your visitors during the maintenance period.
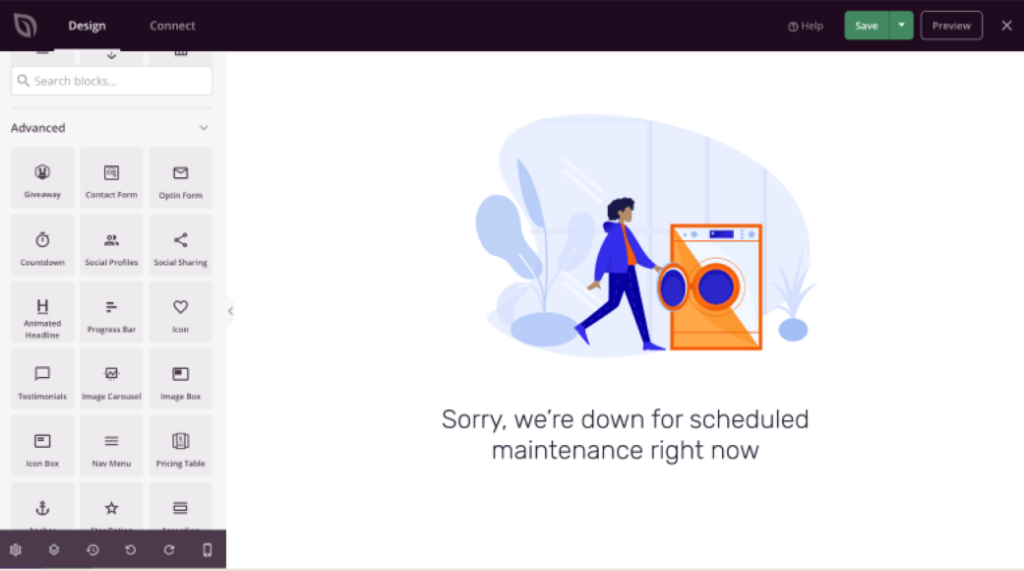
You can add new blocks from the left column. For instance, you may choose to incorporate a timer that counts down to the official launch of your website.
Once you have finalized the design of your page in WordPress and made all the desired customizations, it’s time to publish it.
👩💻 6.) To do this, click on the drop-down menu button located next to the ‘Save’ option. From the drop-down menu, select ‘Publish’ to make your maintenance mode page live and visible to your visitors.

After clicking the “Publish” button, you will receive a confirmation message indicating that your page in WordPress has been successfully published.
At this point, your website is effectively hidden from Google and the public.
Instead, visitors will only see the maintenance page you have created until you deactivate the maintenance mode and make your website publicly accessible again.

Preview hidden page
To preview your maintenance page, simply click the ‘See Live Page’ button.
When you are ready to make your website visible to the public, go back to the SeedProd » Pages section in your WordPress dashboard. Look for the Maintenance Mode page in WordPress again.
This time, you will find the toggle switch that controls the status of the maintenance mode.
To deactivate the maintenance mode and showcase your website to the world, simply switch the toggle from ‘Active’ to ‘Inactive’.
This will disable the maintenance mode, making your website accessible to visitors once again.
Hide WordPress page title
Not all pages on your website necessarily require a title.
While blog posts typically have titles, it may not always be visually appealing or necessary for other pages. What works well for blog design may not be suitable for the rest of your website.
For example, having a “Home” page title on your homepage can be unnecessary and may even appear unprofessional.
The same goes for pages like “About” or “Services” where the purpose is self-explanatory, and displaying a heading at the top might be redundant.
Moreover, the post title element may not blend seamlessly with the overall design of your website.
While you can use CSS class to style it and make it fit better, sometimes it’s best to completely remove it.
This allows you to utilize the space for a hero image or incorporate other design elements.
However, hiding the page title from a page in WordPress is not as simple as deleting an image or a paragraph of text.
Headings have an impact on SEO and how search engine bots interpret the structure of your page.
How to hide page titles
If you’re looking to hide a page title on your website while keeping the post titles visible, you can make a simple adjustment to the CSS code provided above.
Just include “.page” before the code, like this:
.page .entry-title { display: none; }
By adding “.page” in front of the code, you can specifically target and hide the titles of all pages on your WordPress site while leaving the post titles unaffected.
Implementing this modification should promptly hide a page title as desired.
Now you know how to hide a page in WordPress
If your web pages are still under development or you want to restrict access to certain users, WordPress offers default privacy options. However, you can enhance these options further by using plugins.
By leveraging the functionalities of the aforementioned plugins, you can effortlessly hide pages or hide posts in your WordPress website according to your specific needs.