How to Edit Footer in WordPress in 4 Easy Steps [2023]
- What is a WordPress footer
- How to edit footer in WordPress
- 4 Benefits of editing the footer in WordPress
- Conclusion
Want to know how to edit footer in WordPress?
The footer is the area that is placed at the bottom of every page of your WordPress site.
Well, you’re in luck! We’re here to guide you through the process of editing it, step by step.
By the end, you’ll be able to customize your footer and make it more useful for your website visitors. So, let’s get started!
What is a WordPress footer?

The WordPress footer is like the finishing touch at the bottom of your website.
It sits below the main content area and can be found on every page of your WordPress site.
While some beginners tend to overlook this valuable space, it actually holds great potential to enhance your visitors’ experience.
In fact, you can leverage the footer menu to boost your WordPress SEO and promote your business effectively.
For instance, most popular WordPress themes provide a specific footer widget area. It’s super simple to edit and customize.
With just a few tweaks, you can add footer widgets, remove unwanted links, insert code, and even create unique footers for different pages.
Let’s explore the possibilities and take your WordPress footer to the next level!
How to edit footer in WordPress in 4 steps
Step1: Add footer widgets to your WordPress footer
The best WordPress themes often come equipped with handy widget areas located in the footer.
These footer widget areas present a fantastic opportunity for you to enrich your website with valuable content such as text, images, and essential links to pages like your privacy policy and legal disclaimers.
Thankfully, the process of adding text and images to the WordPress widgets is a breeze.
Just follow these simple steps:
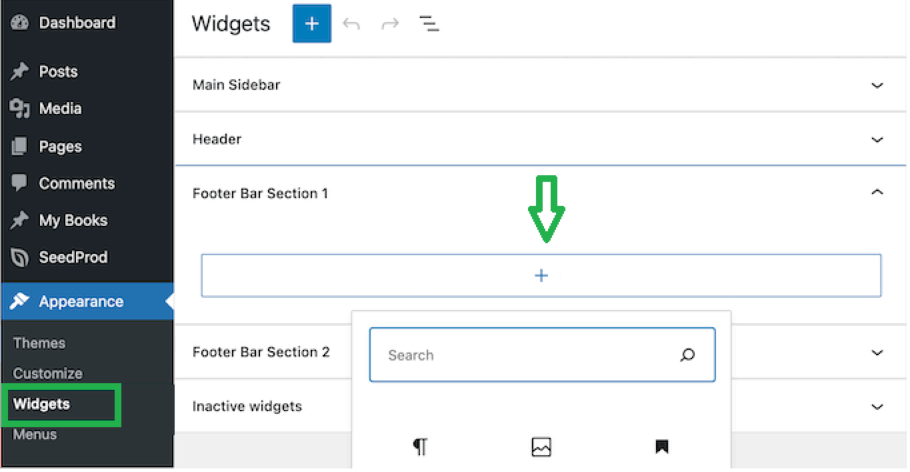
- Head over to “Appearance” in your WordPress dashboard.
- Click on “Widgets.”
- Look for the “Footer Sidebar” section and click the “+” add block icon.
- From there, you can easily insert your desired text and images
To add a WordPress footer widget to your website, a simple click is all it takes for it to seamlessly appear.
It is worth noting that various themes offer multiple footer widget areas, each serving a unique purpose.
Once you have added your preferred footer WordPress widgets, take a moment to preview your website and make sure they are displayed right where you want them.
Attach links to the WordPress footer widgets area
You might also find it valuable to include links to different pages, posts, and categories in your website’s footer menu.
To edit the footer, follow these steps:
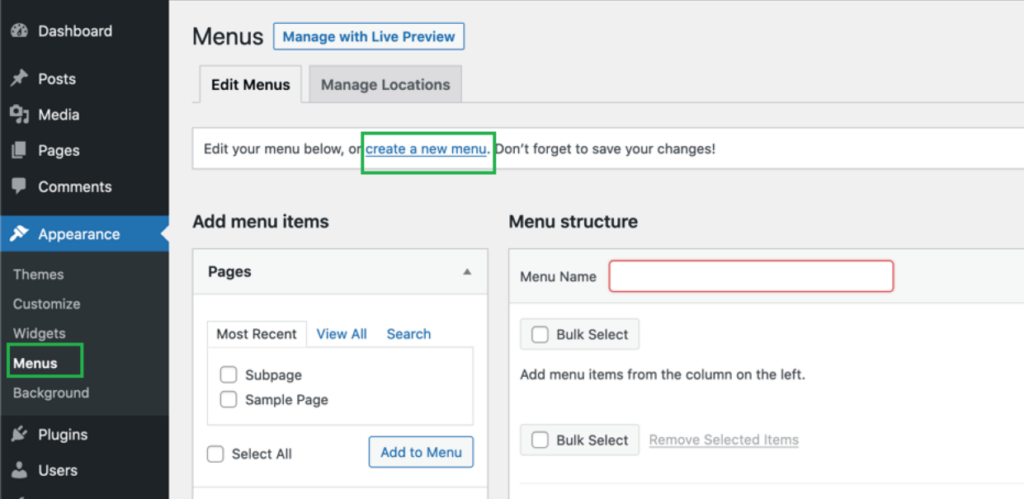
- Go to the “Appearance” section in your WordPress dashboard.
- Click on “Menus” to access the menu management page.
- Look for the “Create new menu” link and give it a click.
When working with WordPress, you will be prompted to assign a name to your newly created footer menu.
Choose a name that you will easily recognize for this menu.
- Afterward, select the appropriate footer location, and finalize the process by clicking the ‘Create Menu’ button.
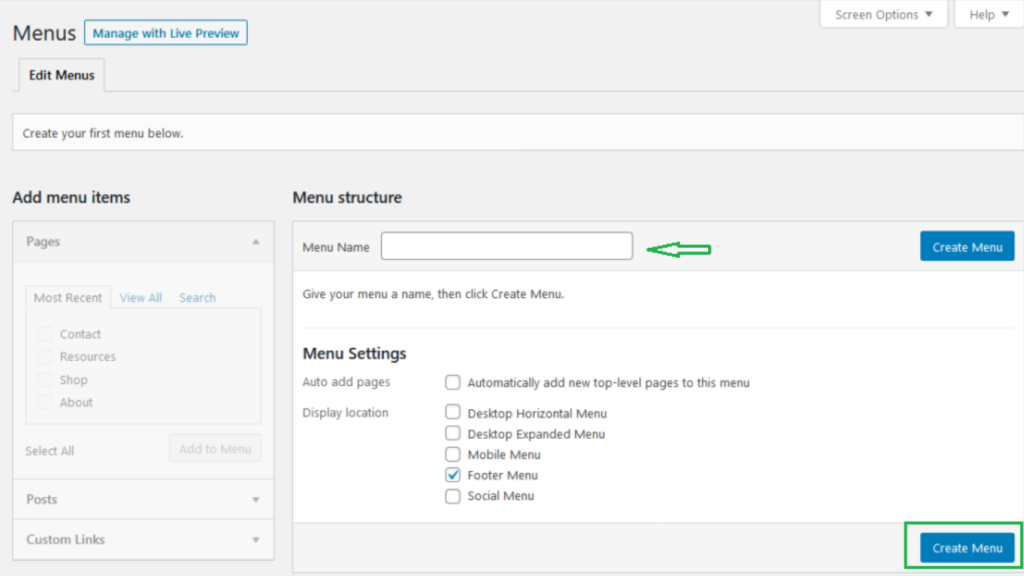
Your menu is now set up and ready to go, allowing you to begin adding links to it effortlessly.
To add links, all you need to do is select the desired pages, posts, or categories from the column on the left-hand side.
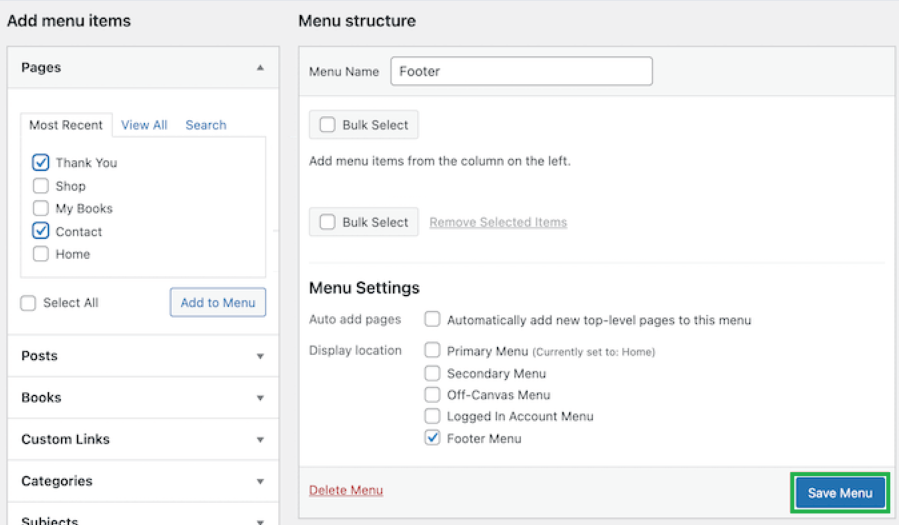
- Once you have finished customizing your menu, don’t forget to save your changes by clicking the ‘Save Menu’ button.
Now that your menu is ready, it’s time to add it to the WordPress footer widget area.
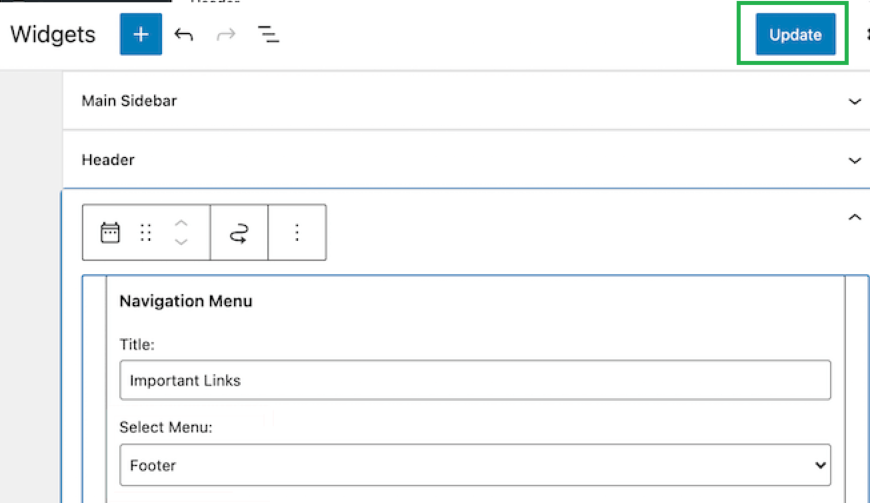
- Navigate to the “Appearance » Widgets” page in your WordPress dashboard.
- Click on the ‘Plus’ icon, search for the term ‘Menu’, and select the ‘Navigation Menu’ block.

- Following that, choose your footer navigation menu widget from the provided options in the ‘Select Menu’ drop-down.
If desired, you can also assign a title to your WordPress footer widget, which will be displayed above the menu within your footer area.
- Once you have made these selections, finalize the process by clicking the ‘Update’ button to save all your modifications.
Now it’s time to witness your footer links in action! Visit your website to see how the links have been integrated into the footer section.
If you need an additional set of links, simply follow the same steps once again.
Step2: Remove the text “Powered by WordPress” from the footer
When you set up WordPress for the first time, you might notice a ‘Powered by WordPress’ link displayed in a footer bar at the bottom of your website.
Unlike a widget that can be easily modified, changing or customizing this link is not as straightforward and can be a bit confusing.

Any WordPress theme customizer can add the ‘Powered by WordPress’ text and links to their own content.
In such cases, you can typically edit the footer text by accessing the WordPress theme customizer.
To edit the custom footer, follow these steps:
- Go to the “Appearance” section in your WordPress dashboard.
- Click on “Customize” to access the theme customizer.
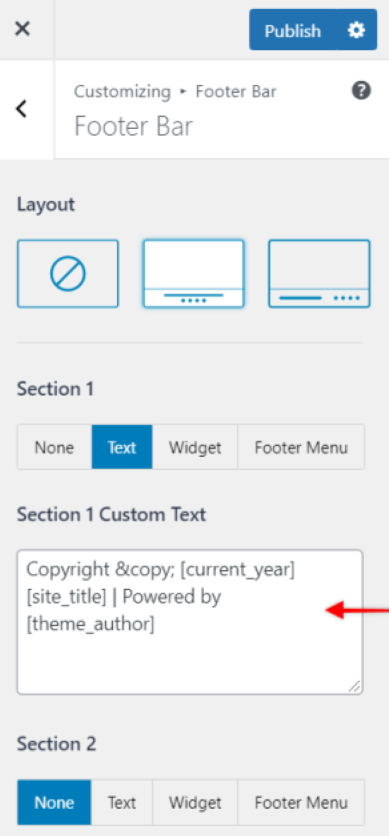
- Next, search for a section labeled as ‘Footer‘ or a similar heading.
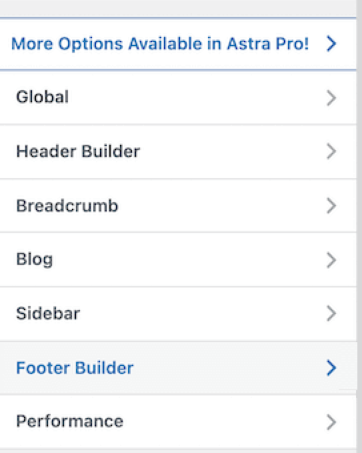
In this example, we will be using the Astra theme.
- For Astra users, locate and click on the ‘Footer Builder’ option within the theme customizer.
By doing so, you will be directed to a dedicated screen where you can access various customization options.
- From here, you can edit the footer text, incorporate social media links, and explore additional possibilities.
- To replace the custom footer text, simply click on the ‘Copyright’ button and proceed with entering your desired replacement text.
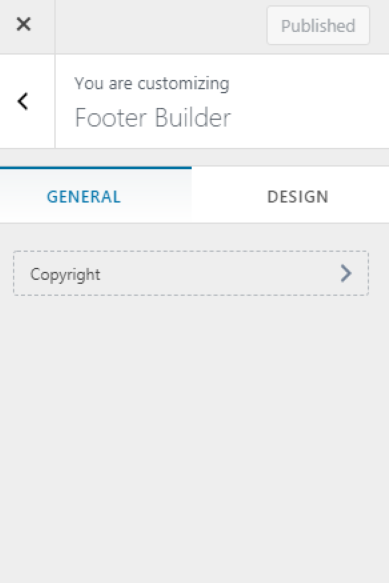
After accessing the footer customization options, you have the ability to delete the current text and input your own personalized message.
- Once you have completed the desired edits to the footer, ensure to click the ‘Update’ or ‘Publish’ button located at the top of the screen of the footer builder.
This action will save your modifications of the footer area and make them visible on your live website.
Manually edit footer text
What if your theme footer lacks the option to edit the footer text through the customizer?
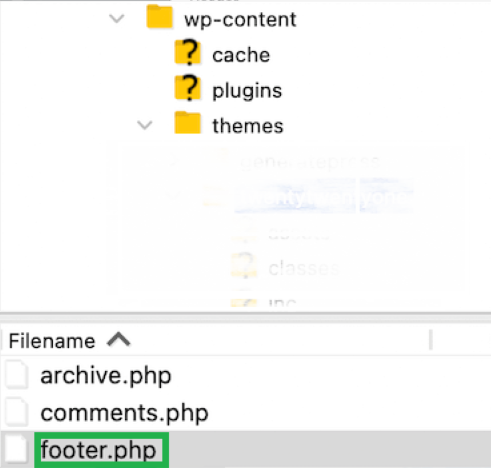
Don’t worry, there’s an alternative method that involves directly editing the footer.php file.
This php file, located in your WordPress theme folder, controls the display of the footer area specific to your chosen theme.
Please note that manually editing the theme footer file requires some advanced knowledge of PHP code to make the necessary changes.
To proceed with this method, you’ll need to use an FTP client to establish a connection with your WordPress hosting account.
Let’s go through the step-by-step process:
- Start by downloading the footer.php file from your theme folder.
- Locate the specific line of code within the file that contains the ‘Powered by WordPress’ text.
- At this point, you can either delete or modify the text to your desired content.
- Once you have made the necessary changes, upload the updated footer.php file to your WordPress theme folder.
Step3: Create different footers for your WordPress site
Landing pages play a crucial role for small business websites as they serve the purpose of driving leads, generating sales, and expanding email lists.
Unlike regular web pages, landing pages have a specific objective.
To cater to the unique requirements of individual pages such as the checkout page, thank you page, 404 page, and home page, among others, you can create distinct WordPress footers.
The most effective way to accomplish this is by using WordPress footer plugins.
For example SeedProd, a renowned drag and drop WordPress page builder trusted by over 1 million websites.
With SeedProd, you can effortlessly design high-converting pages without the need for coding skills.
How you can create a unique footer area:
- Begin by installing and activating the SeedProd plugin.
Note: While there is a free version of SeedProd available, this tutorial will focus on the Pro version, which offers enhanced capabilities for creating various WordPress pages.
- After activation, navigate to SeedProd » Settings and enter your license key to access the plugin’s features and functionalities.
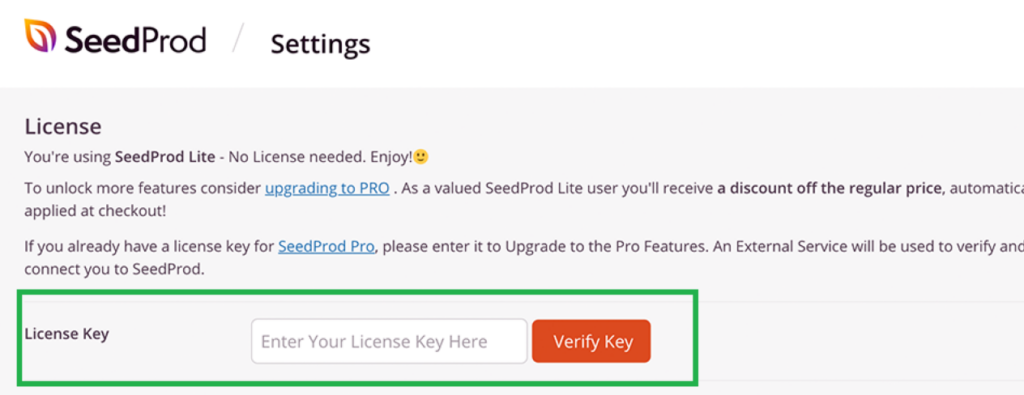
- To access this information, simply log in to your SeedProd account on their official website.
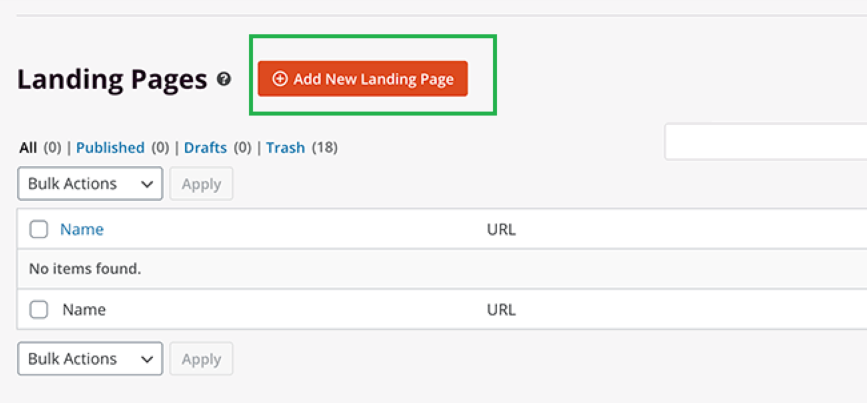
- Navigate to SeedProd » Pages, and then click on the ‘Add New Landing Page’ option to initiate the creation of your first page.
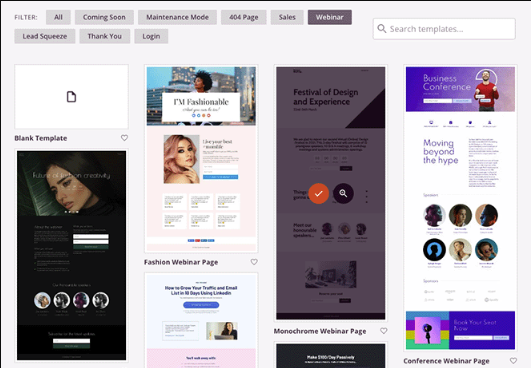
On the subsequent screen, you will be presented with a wide array of templates to choose from.
Select a template
- To select, hover your cursor over the desired template, and then click on the ‘Checkmark’ icon.
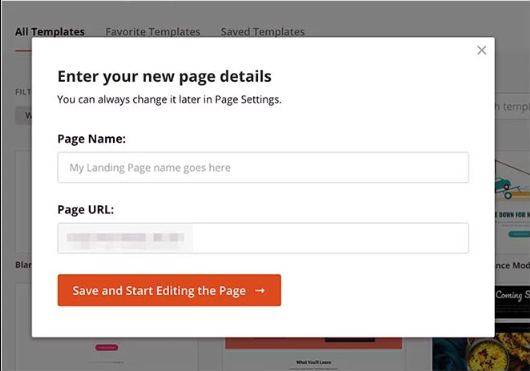
- Following that, you will have to choose the name and URL for your page.
- Once you have entered the desired name and URL, proceed by clicking the ‘Save and Start Editing the Page’ button.
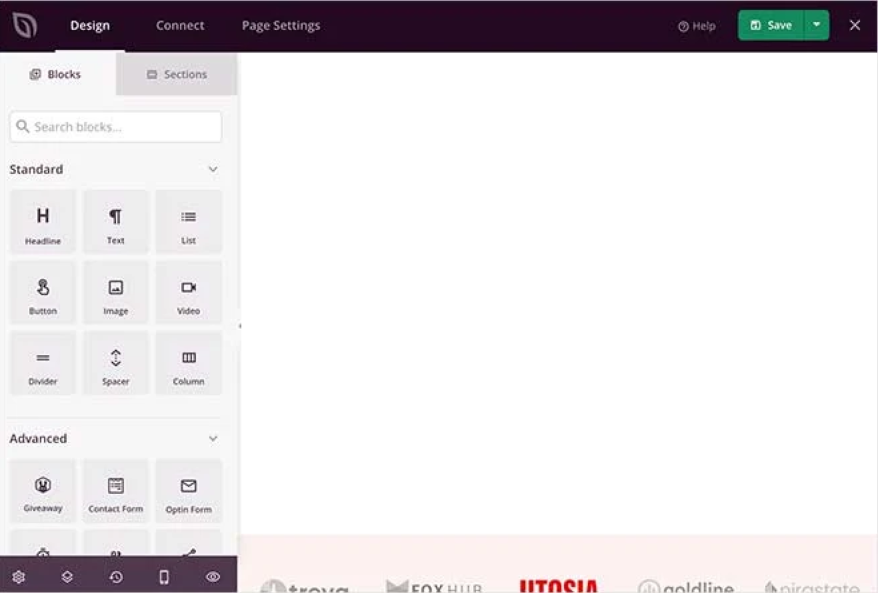
By doing so, you will be directed to the user-friendly drag-and-drop builder interface.
Here, you will have a live preview of the template you previously selected.
- To modify various elements, simply point and click on any item within the page.
Utilize the options provided in the left-hand column to add new blocks, sections, and make desired changes to the layout and content.
- Next, click on the ‘Sections’ tab.
You will see a menu of premade sections you can use to build your page.
- Next, locate and click on the ‘Footer‘ option within the builder interface.
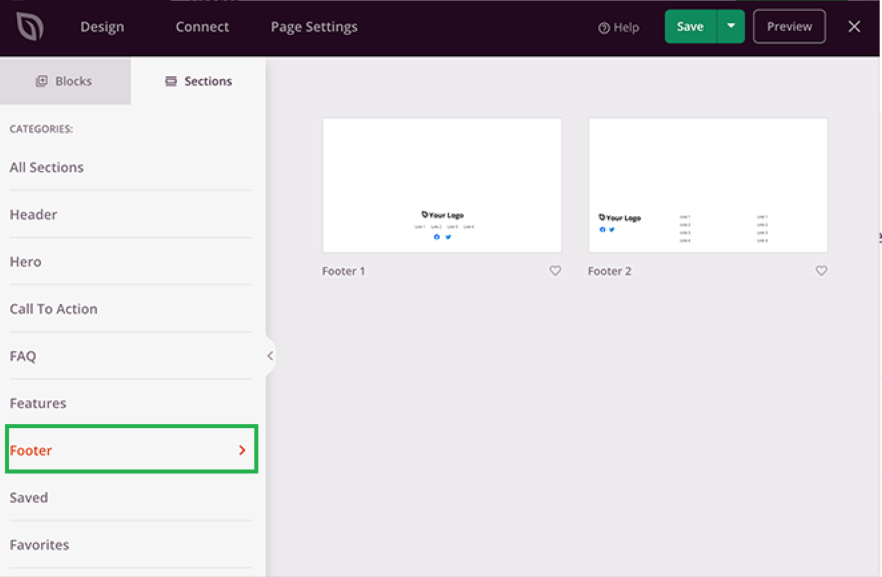
This action will redirect you to a section showcasing various pre-designed footer area layouts.
To get a closer look at a specific footer template, simply click on the magnifying glass icon for a preview.
- When you have found the perfect template for your site’s footer, click on the ‘Plus‘ icon to add it to your page.
Design the WordPress footer
This will seamlessly integrate the custom WordPress footer into your overall page design.
With the drag-and-drop editor, you have full control to edit the footer.
Change background colors, add images, links, and more to create a unique and nice footer area design.
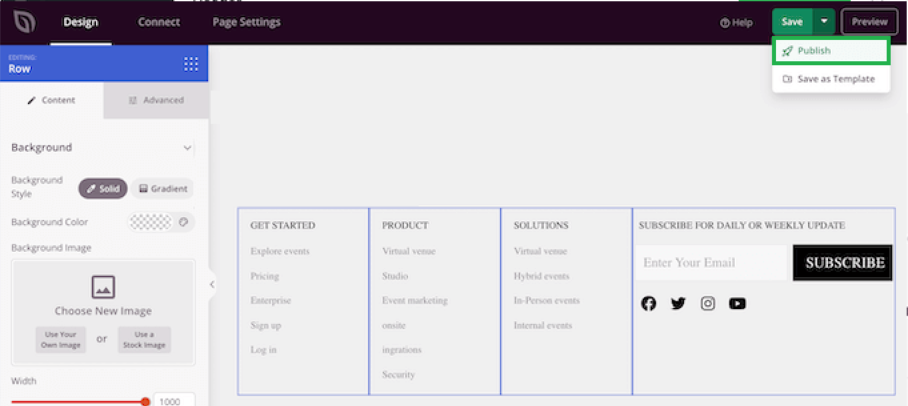
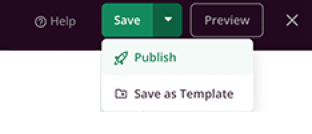
- Once you have finished customizing your page, remember to click the ‘Save’ dropdown menu and select the ‘Publish’ button to make your page live.
This ensures that your changes are saved and your customized page is visible to your website visitors.
You can include WordPress themes & templates
By following these steps, you can redesign the footer content of your WordPress website consistently across all pages.
- To begin, install and activate the SeedProd Pro plugin on your WordPress site.
- Once activated, navigate to SeedProd » Theme Builder from your WordPress dashboard. On the Theme Builder page, locate and click the ‘Themes’ button.
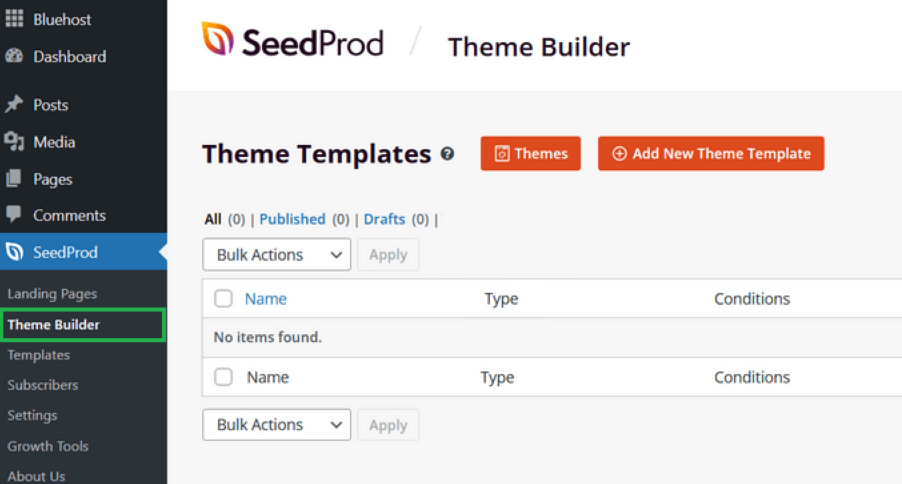
In the Theme Builder section, you can choose from SeedProd’s 28+ pre-built themes for your customization.
- Simply hover over a theme and click the checkmark to select it.
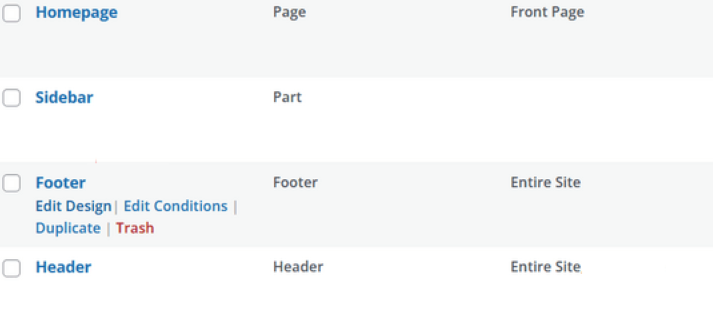
Once you have selected a theme, SeedProd will generate all the necessary components of the theme, such as the header, footer, homepage, sidebar, and more, automatically.
- To modify the footer, simply click on the ‘Edit Design’ link.
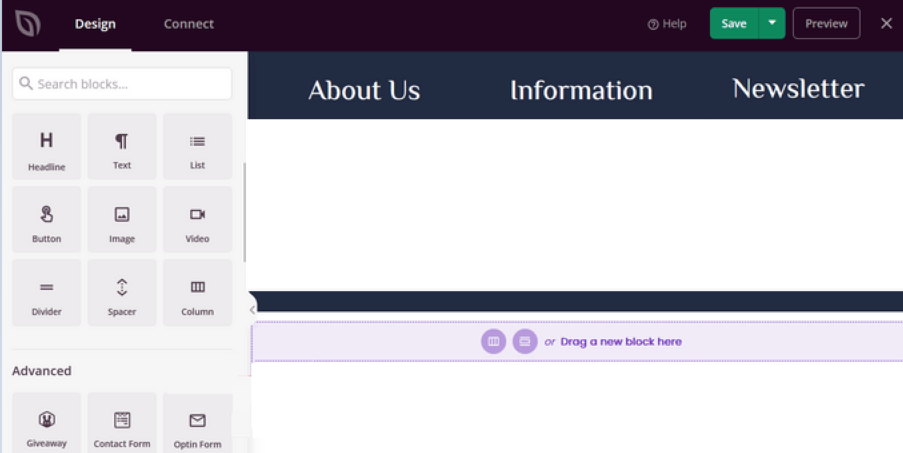
Upon clicking the ‘Edit Design’ link, you will be directed to SeedProd’s intuitive drag-and-drop theme builder, providing you with the flexibility to customize your footer.
Once you have finalized the design of your footer and are satisfied with the changes, click the ‘Save’ button and select the ‘Publish’ button to apply the modifications and make your updated footer live on your website.
Since you are done, you can exit the editor interface now.
Step4: Edit footer in WordPress with code snippets
At times, you may find it necessary to incorporate code snippets into the footer of your WordPress website.
This is typically done to establish connections with external applications or plugins.
For instance, you might need to insert a script in the header or footer of your WordPress site to enable analytics tracking, such as Google Analytics.
To learn more about this process, refer to our beginner’s guide on installing Google Analytics in WordPress.
If you require the addition of additional code to your WordPress footer, the simplest approach is to utilize the WPCode plugin.
- To get started, activate and install the WPCode plugin following our step-by-step guide on installing WordPress plugins.
- Once activated, access the Code Snippets » Header & Footer section in your WordPress admin panel. Here, you can conveniently insert your desired code into the designated ‘Footer’ box.
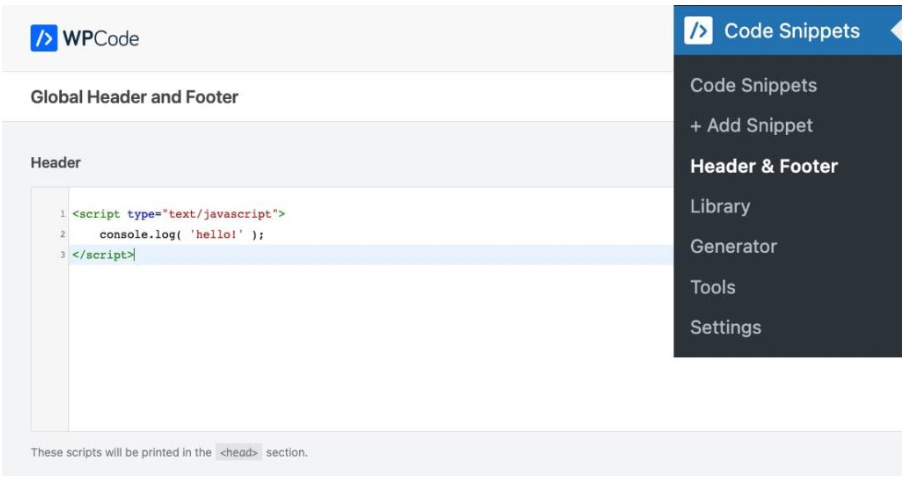
Afterward, don’t forget to click the ‘Save Changes’ button located in the top-right corner of the screen to preserve your modifications before proceeding further.

Common Mistakes to Avoid When Editing a Footer in WordPress
When it comes to editing any aspect of your website, it’s crucial to proceed with caution.
Even a minor mistake can have significant consequences, potentially causing your entire website to go offline temporarily.
To help you navigate the process smoothly, here are a few common mistakes to steer clear of when editing your footer.
1.) Using CSS to hide links
One method that some may consider is utilizing CSS code to hide the links within the footer.
This involves adding the following code snippet to the CSS editor:

While this approach may seem convenient, it’s important to note that hiding links was once employed as a deceptive technique known as black hat SEO (search engine optimization).
Such practices aimed to manipulate search engine rankings, which Google now considers a violation of its website guidelines.
Engaging in this practice could lead to penalties and negatively impact your website’s visibility.
Therefore, it’s highly recommended to avoid using this method altogether.
2.) Not reviewing license documentation
When using third-party themes, it’s crucial to thoroughly examine the associated license agreements.
These agreements may include specific provisions that restrict the removal of copyright notices or other attribution requirements in the footer.
It’s advisable to involve your legal team in reviewing the license documentation and addressing any questions or concerns you may have with the theme developer.
By steering clear of these common mistakes, you can ensure a smooth and compliant editing process for your WordPress footer.
4 Benefits of editing the footer in WordPress

The footer section plays a significant role on every page of your WordPress website. It’s a valuable space that should not be wasted with irrelevant links or default content from your theme.
Now that you know how to edit footer in WordPress, you can reap several benefits that enhance your website’s appearance, brand image, and SEO performance.
1.) Highlight essential links
Unlike the header, the footer provides an opportunity to showcase important links that may not fit in the primary navigation. Take advantage of this space to feature key pages or resources that you want visitors to easily access.
2.) Strengthen brand image
The footer presents an excellent chance to reinforce your brand identity and leave a lasting impression. By adding your logo, a brief introduction to your brand, or a captivating tagline, you can enhance your brand recognition and create a memorable experience for visitors.
3.) SEO considerations
The footer holds SEO significance as it appears on every page of your website. However, it’s crucial to use this space responsibly. Avoid keyword stuffing or adding excessive internal links solely to boost page authority. Instead, include relevant and useful links that serve your audience’s needs or fulfill legal requirements.
4.) Easy editing options
Most WordPress themes offer dedicated options to customize the footer, eliminating the need for manual code modifications in the footer.php file. It’s highly recommended to avoid tinkering with footer.php directly, as any errors in the code can lead to website malfunctions. Utilizing the theme’s built-in footer editing features provides a safer and more user-friendly approach.
Edit WordPress footer – Now you are a pro!
There are several effective methods to customize the footer in WordPress.
While starting with the built-in options in the WordPress Customizer is recommended, some themes like SeedProd offer additional footer customization features through widgets, theme settings, and menus.
If your theme lacks flexibility, you can also use different plugins to create a fully customized footer.
By leveraging these methods, you can optimize your website’s footer design and functionality to serve your audience better and enhance your overall online presence.
Frequently Asked Questions
Footer editing options in WordPress can typically be found in the WordPress Customizer, theme settings, or widget areas.
To add links or social media icons to the footer in WordPress:
1. Go to the WordPress Customizer or theme settings.
2. Look for the footer customization options.
3. Add links or social media icons using the provided fields or settings.
4. Save your changes to update the footer with the new links or icons.
Note: The exact steps may vary depending on your theme or customization options available.
Yes, you can add custom HTML or JavaScript code to the footer in WordPress.