Trustindex Rich Snippet: A Comprehensive Guide
Rich snippet is a way to make your website’s search results more eye-catching and informative, potentially driving more traffic to your site.
In the ever-evolving world of search engine optimization (SEO), staying ahead of the curve is crucial.
One powerful tool that can help you achieve this is the rich snippet.
In this guide, we will delve into what rich snippets are, how they work, and provide a step-by-step guide on how to insert them into your web content.
What are Rich Snippets?
Rich snippets are enhanced search results that go beyond the typical blue link and brief description you see in search engine results pages (SERPs).
They provide users with additional information about a webpage before they even click on it.
This extra information can include images, ratings, reviews, product details, event dates, and more.
Essentially, rich snippets offer a sneak peek into the content of a webpage, making it easier for users to find exactly what they are looking for.
How Do Rich Snippets Work?
Rich snippets are generated by adding structured data markup to your website’s HTML.
This structured data is essentially a set of code that provides search engines with context about the content on your page.
Search engines, like Google, use this structured data to better understand the information on your site and present it in a more visually appealing and informative way.
When a search engine crawls your website and detects structured data, it can create rich snippets for your web pages.
The search engine decides whether the rich snippet meets all the requirements to display the extra info, it does not depend on us, but on whether the search engine accepts it.
These snippets can then appear in search results when your page is relevant to a user’s query.
This additional information can make your listing stand out and attract more clicks.
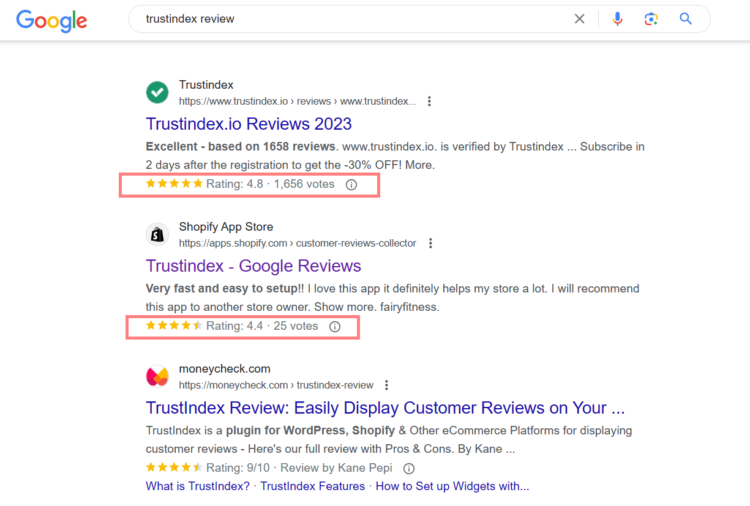
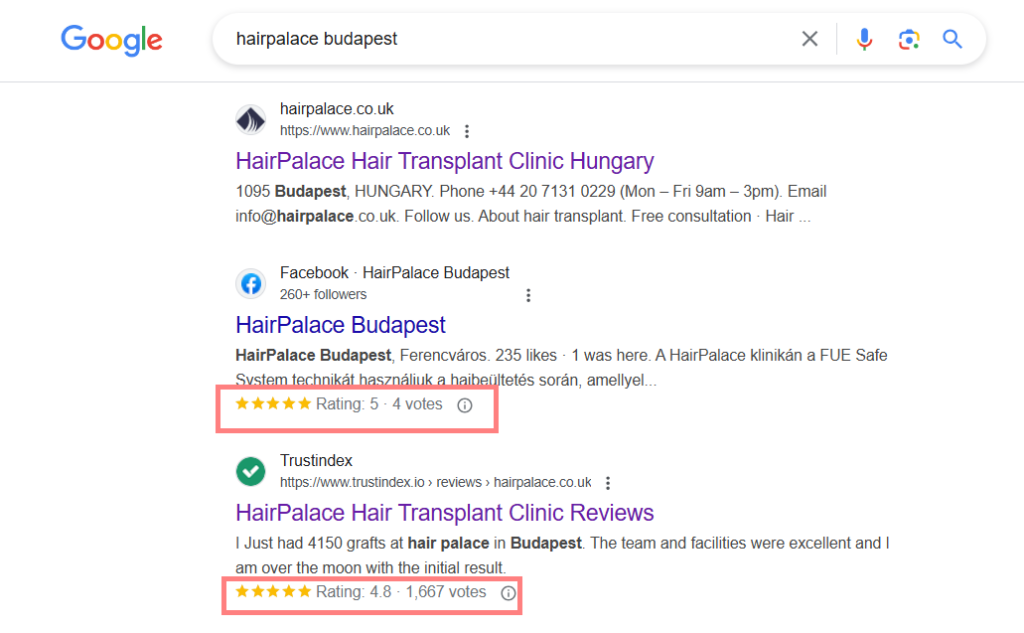
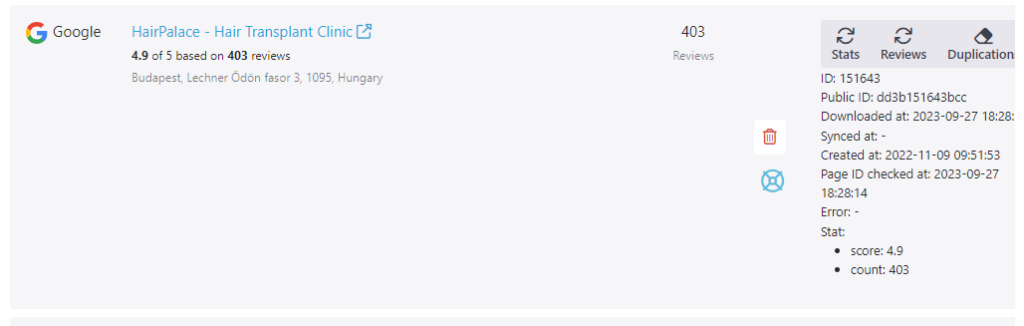
Rich snippets are most commonly seen on search engine results pages under the URL’s, such as Google, Bing, Yahoo and also under the Review Summary Page in Trustindex.
When you perform a search query, certain results may include rich snippet elements like images, star ratings, prices, and descriptions.
Benefits of Using Rich Snippets
1. Increased Visibility: Rich snippets make your search listings more eye-catching and informative, increasing the chances of clicks.
2. Higher Click-Through Rates (CTR): Users are more likely to click on rich snippets because they provide a glimpse of what to expect on the webpage.
3. Enhanced User Experience: Rich snippets help users find the information they need more quickly and easily.
4. Improved SEO: Better CTR and user engagement can lead to improved search engine rankings over time.
Conditions for Rich Snippets
Certain conditions must be met, so the Rich snippet can function properly:
1. Become a subscriber.
2. Fill out the entire data sheet for your Company information

3. Make sure that your Platform URLs are connected.
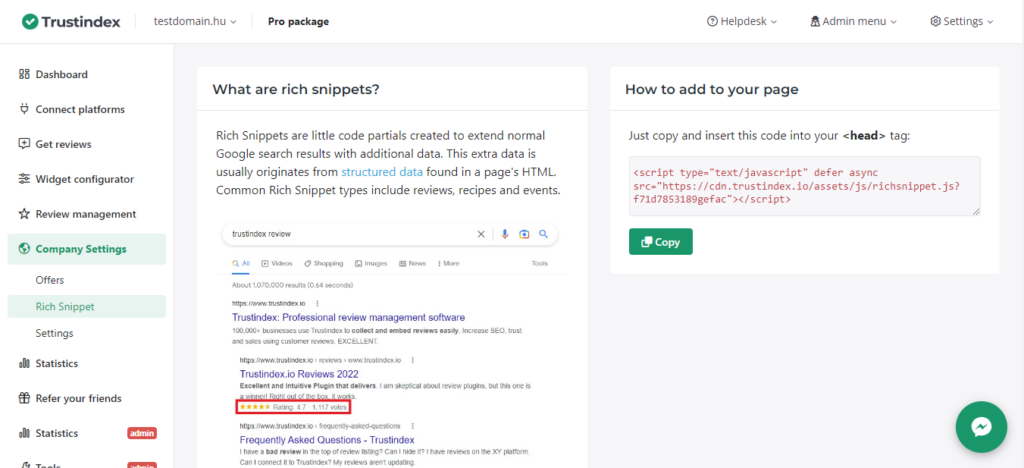
If these conditions are met, the code will appear in the Rich Snippets menu.
How to Get Rich Snippets? – with Widgets
The simplest way to enable the Rich Snippets is by using Trustindex review widgets.
Step 1
After logging in to your Trustindex account, go to Review widgets. Feel free to create a new review widget or click on Edit on an already existing widget of yours.
Step 2
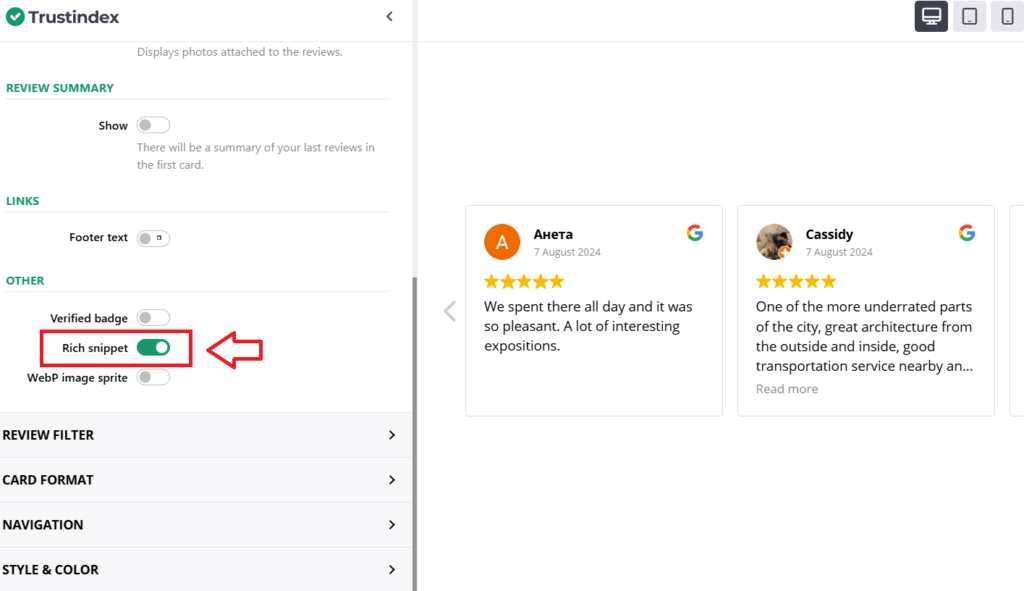
There is a specific Rich Snippets setting that can be turned on in the Widget Editor that enables the Rich Snippets feature for your webpage.
Step 3
Once you’re done configuring the widget, click on Save.
Copy the provided HTML code and paste it into the desired location on your website. This could be on your homepage, product page, or any other relevant section.
Step 4
After embedding the widget, it’s important to validate the schema markup to ensure search engines can read it properly.
Use Google’s Rich Results Test tool to check if your page is eligible for Rich Snippets. Simply enter the URL of the page where the widget is embedded, and the tool will analyze it.
If the test returns no errors, your page is ready to potentially display Rich Snippets in search results.
How to Get Rich Snippets? – Manually
Step 1
Copy the code: Paste the HTML code in its original form into the head tag. (It is important that it is not a header tag, but head)
Step 2
Use 1 rich snippet code, because more than that can interfere with each other. (An exception may be the case when you may also need information such as FAQ, but in this case it is mandatory to run the official test!)
Step 3
After pasting, check if Google sees the code.
Step 4
If you use a cache plugin, exclude the Trustindex code. Some of the best cache plugins include WPRocket, WP-Optimize, W3 Total Cache.
Step 5
Meet Google’s requirements as seen on Googles Quality Guidelines
- Follow the spam policies for Google web search.
- Provide up-to-date information. We won’t show a rich result for time-sensitive content that is no longer relevant.
- Provide original content that you or your users have generated.
- Don’t mark up content that is not visible to readers of the page. For example, if the JSON-LD markup describes a performer, the HTML body must describe that same performer.
- Don’t mark up irrelevant or misleading content, such as fake reviews or content unrelated to the focus of a page.
- Don’t use structured data to deceive or mislead users. Don’t impersonate any person or organization, or misrepresent your ownership, affiliation, or primary purpose.
- Content in structured data must also follow the additional content guidelines or policies, as documented in the specific feature guide. For example, content in
JobPostingstructured data must follow the job posting content policies. Content in Practice problems structured data must follow the Practice problems content guidelines.
After correct, successful insertion, it will eventually look like this:

If you have any questions, please contact support: support@trustindex.io (attach a screenshot of the problem and the URL of the website).
How to Add HTML Code into your Website?
WordPress
- Log into Your WordPress Dashboard:
- Go to your website’s URL, followed by “/wp-admin” (e.g., www.yourwebsite.com/wp-admin).
- Enter your login credentials to access the WordPress dashboard.
- Edit or Create a Page/Post:
- In the dashboard, navigate to “Pages” or “Posts” on the left-hand menu.
- Choose the page or post where you want to add the HTML code or create a new one.
- Switch to HTML Editor:
- While editing the page or post, look for the “Text” or “HTML” tab (usually located above the content editor).
- Click on it to switch from the visual editor to the HTML editor.
- Add Your HTML Code:
- Paste your HTML code into the editor where you want it to appear on the page.
- Click “Update” or “Publish” to save your changes.
Shopify
- Login to Your Shopify Admin:
- Go to your Shopify admin page and log in.
- Access the Theme Editor:
- In the Shopify admin, go to “Online Store” and then click on “Themes.”
- In the right upper corner, click “Actions” and then select “Edit Code.”
- Find the Right Template:
- Depending on where you want to add your HTML, locate the appropriate template file. For example, if you want to edit the homepage, look for
index.liquid. - If you want to add code to a specific product page, locate
product.liquid, and so on.
- Depending on where you want to add your HTML, locate the appropriate template file. For example, if you want to edit the homepage, look for
- Edit the HTML Code:
- In the code editor, you can add your HTML code wherever you need it.
- Be careful while editing code, as incorrect modifications can break your site. Always make a backup before making changes.
- Save Your Changes:
- After you’ve added your HTML, click the “Save” button to save your changes.
- Preview Your Store:
- After saving, preview your store to see how the changes appear.
- You can use the “Preview” button in the Theme Editor to see how your store will look before making changes live.
- Publish Changes:
- If you are satisfied with the changes, click the “Publish” button to make your changes live on your Shopify store.
Wix
- Log into Your Wix Account:
- Go to the Wix website and log in to your account.
- Access the Wix Editor:
- Choose the website you want to edit and click “Edit Site.”
- Add an HTML Element:
- In the Wix Editor, click on “Add” on the left-hand menu.
- Under “Embeds,” select “HTML iframe.”
- Insert Your HTML Code:
- Drag and drop the HTML element to the desired location on your page.
- Click on the element to open its settings.
- Paste your HTML code into the provided field.
- Click “Apply” or “Update” to save your changes.
- Preview and Publish:
- Preview your site to make sure the HTML code appears as expected.
- If everything looks good, click “Publish” to make the changes live.
Unas
- Log into Your Unas Account:
- Access your Unas admin panel by visiting the login page and entering your credentials.
- Edit or Create a Page/Section:
- Navigate to the page or section of your website where you want to insert the HTML code.
- Access the HTML Editor:
- Look for an option that allows you to edit the page’s HTML source code. This option is usually labeled as “HTML,” “Source,” or “Code.”
- Insert Your HTML Code:
- Paste your HTML code into the HTML editor where you want it to appear.
- Save or Update:
- Save or update the page to apply your changes.
- Preview and Publish:
- Preview your page to ensure that the HTML code is rendering correctly.
- If everything looks good, publish the page to make it live.
Please note that the specific steps for adding HTML code may vary depending on the theme, template, or version of the platform you are using.
Always remember to back up your website before making significant changes and test the HTML code to ensure it functions as intended.
Free workshop for more success
If you’d like to get to know more about Trustindex’s other features, then sign up for our free, 20-minute workshop where our Expert will show you:
- Why Google Reviews are important for your business success
- How to rank higher on Google Maps and search results with the help of reviews
- How to manage your online reputation with the Trustindex system
- Modern, automatic solutions for review management
- And how to collect 15+ new reviews every day.