![How to Send a Mass
Email in Gmail
[Beginner’s Guide]](https://www.trustindex.io/wp-content/uploads/2023/06/how-to-send-mass-email.png)
How to Send a Mass Email in Gmail [Beginner’s Guide]
You might be asking how to send a mass email in Gmail, as it is probably the most well-known email service provider. In this article, we will discuss how you can send a mass email in Gmail.
About Mass Email
Mass emails, also known as bulk emails, are messages that are sent to a large number of recipients simultaneously. They play a critical role in a comprehensive email marketing campaign.
By employing this strategy, you can effectively target users at different stages of the sales funnel, aiming to enhance conversions and maximize profits.
Mass emails provide a means to distribute newsletters and make important announcements without the need to contact each individual separately. This allows for efficient communication with your audience on a broader scale.
Advantages of Sending Mass Emails from a Gmail Account
Although various tools exist for sending bulk emails, Gmail provides distinct advantages.
Firstly, if you are already accustomed to using Gmail for your personal email, you will find its interface familiar and user-friendly, simplifying the navigation process.
Furthermore, you have the option to upgrade to Google Workspace, which offers expanded functionalities for sending mass emails. This makes Gmail an excellent choice for small businesses seeking an efficient solution.
However, it is important to note that there are certain limitations.
With a standard (free) Gmail account, you can send emails to a maximum of 500 recipients per day. On the other hand, Google Workspace allows you to contact up to 1,500 recipients daily, providing a higher capacity for mass emailing.
2 Ways to Use Gmail for Bulk Email Campaigns
1. Use Your Free Gmail Account
Step 1
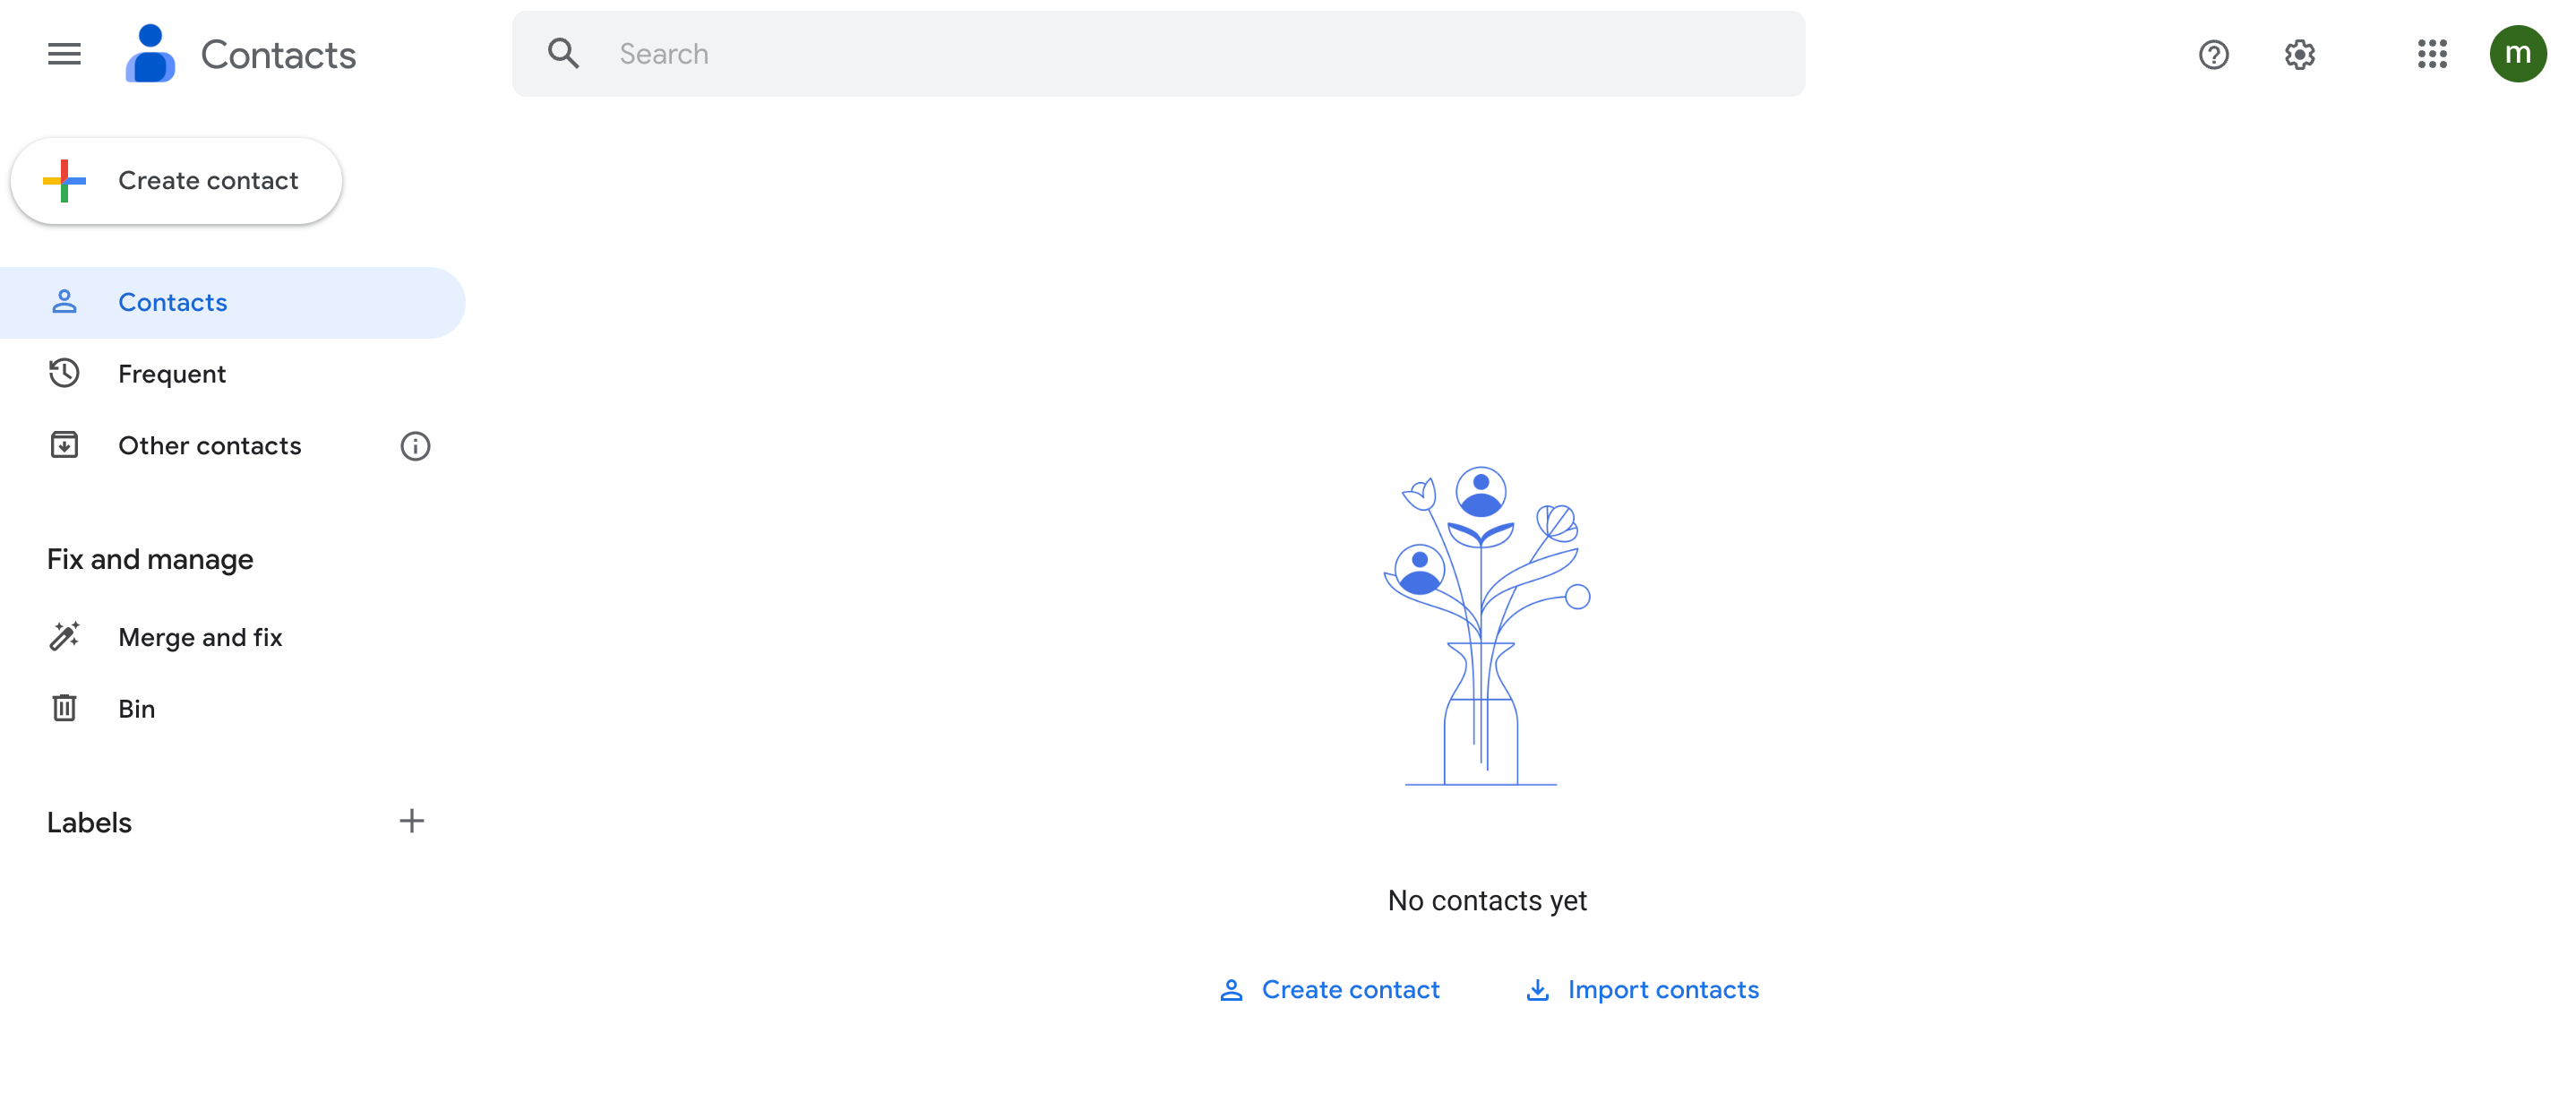
Once you have logged into your Gmail account, type “contacts.google.com” into the URL bar.
Alternatively, you can access the Google Contacts app by clicking on the Google apps grid icon located in the top-right corner of your main Gmail screen.
By doing so, you will be directed to the following screen:
Afterward, you have several choices for adding contacts. You can click on “Create contact” and then select “Create a contact.”
This will take you to a new page where you can enter the necessary details for each contact. We recommend providing at least the recipient’s first name, last name, and email address.
However, if you have numerous addresses to input, manually adding them one by one can be a time-consuming task. In such cases, it is advisable to utilize the “Create multiple contacts” option instead.
Furthermore, if you have your email addresses saved in a different file format, you can simplify the process by clicking on “Import” in the left-hand panel. This allows you to import the contacts directly from a contacts file.
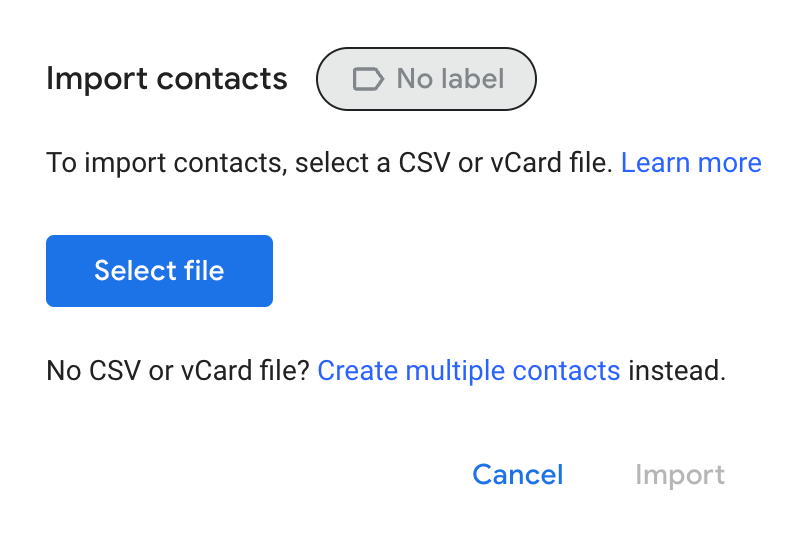
Here, you can add a vCard or CSV file.
Step 2
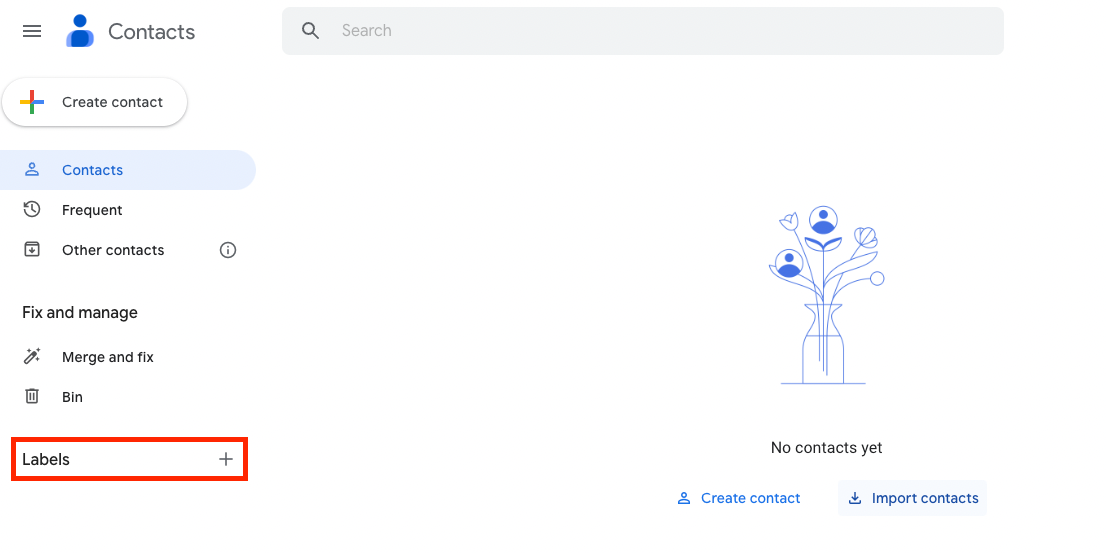
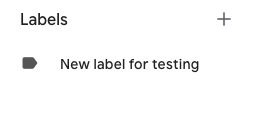
The next step involves creating a “Label” for your contacts, which helps in organizing specific groups of contacts, making it more convenient to send mass emails.
To proceed, navigate to the left-hand menu and click on “Labels.” Then, select the “+” icon to create a new label. (If you import contacts from a file you can select a label before you click on the import button.)
Choose a descriptive name for your Label.
Once you have done that, you will notice your newly created Label listed below the Labels drop-down menu on the left side.
It is possible to create multiple Labels for different segments of your audience, but for the purpose of this tutorial, we will focus on using just one Label.
Now, go to your Contacts list. Hover over each contact that you want to include in your Label, and select the checkbox located on the left side.

The Label you created will function as the mailing list for your mass emails. It’s important to note that on the free Gmail plan, you can only use this Label for a maximum of 500 contacts.
Step 3
Now, you are ready to write your mass email! However, before you proceed, you might want to enable a lesser-known Gmail feature: templates.
To activate this feature, click on the settings gear icon located in the upper-right corner of your screen. Then, select “See all settings” and navigate to the Advanced tab. By default, all advanced settings are usually disabled. Go to templates and click on “Enable”
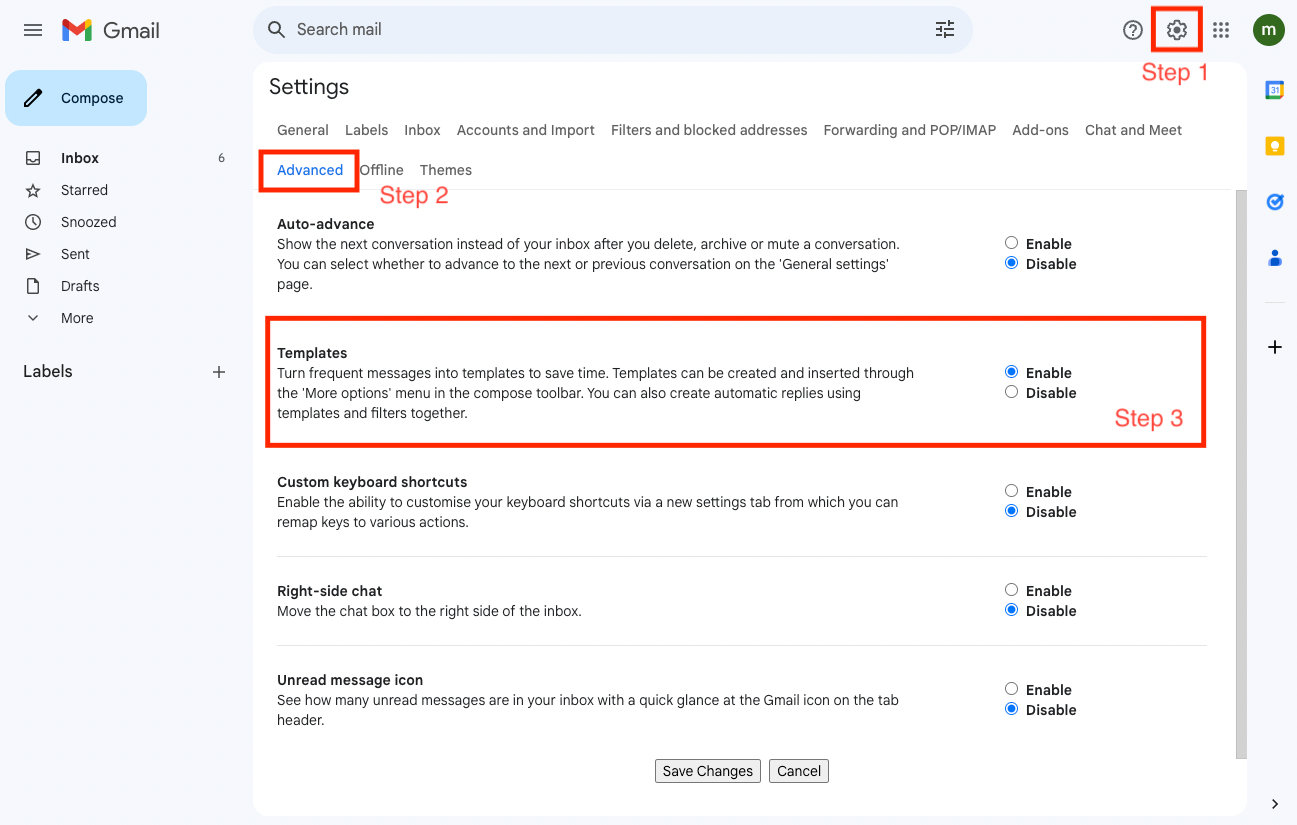
Make sure you Save Changes before leaving this page.
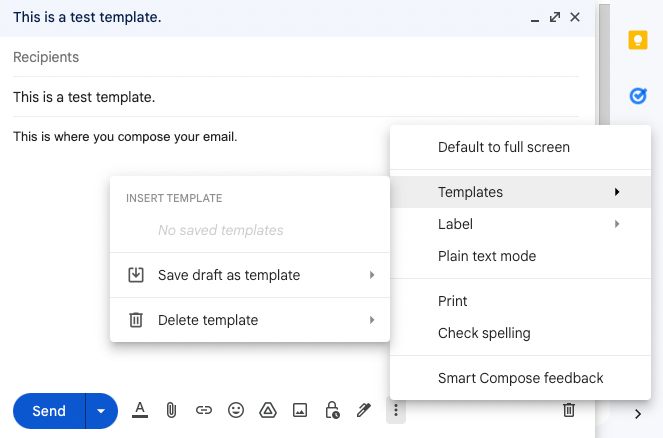
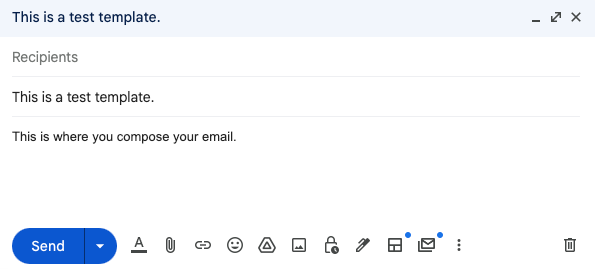
Now go back to the main page of your Gmail account, and click open the Compose window, by clicking the “Compose” button in the top left corner, under the Gmail logo.
Upon opening the new email draft, proceed to compose your email in the usual manner or select a pre-existing template if desired.
To save a draft as a template or import a pre-existing template, click on the three-dot menu. From the options presented, select “Templates” and choose either “Save draft as template” or “Insert Template” if you already have a template available.
The Gmail email composer functions similarly to your personal Gmail account, allowing you to format the email and import images or videos as needed. Once you have finished composing your email or modifying the Gmail template, it is highly recommended to proofread it carefully to ensure there are no typos or errors included.
Taking this step will help ensure the professionalism and accuracy of your email content.
Step 4
Adding recipients to your mailing list, considering you have created a Label to identify them, is a straightforward process. To do so, click on “Bcc” in the “To” field. Next, start typing the name of your Label, and it should automatically appear as a suggestion.
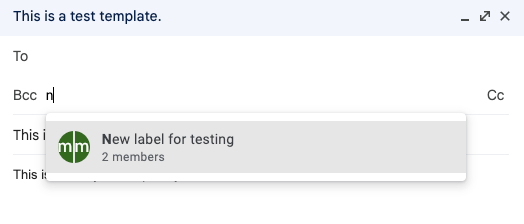
You will be able to see the number of members listed under the mailing list Label. After selecting the group, all the recipients will automatically populate the Bcc field.
It’s important to remember to use the Bcc (Blind Carbon Copy) field instead of the To or Cc fields. This ensures that the email addresses in your list remain private and are not disclosed to all recipients. And that you are not violating the GDPR
Once you are ready, click on the Send button or the arrow next to it. You can also schedule the email if you wish.
2. Use Google Workspace
To utilize this method of sending mass emails in Gmail, you will need to upgrade to a Google Workspace Individual plan. Alternatively, you can opt for the Business Standard plan or above for team plans.
Upgrading allows you to access the multi-send feature, enabling you to send up to 1,500 emails per day. Be aware that this is a paid service with a 14-day trial, after that it is priced at $9.99 per month for an individual plan.
Step 1
Go to the website of Google Workspace.
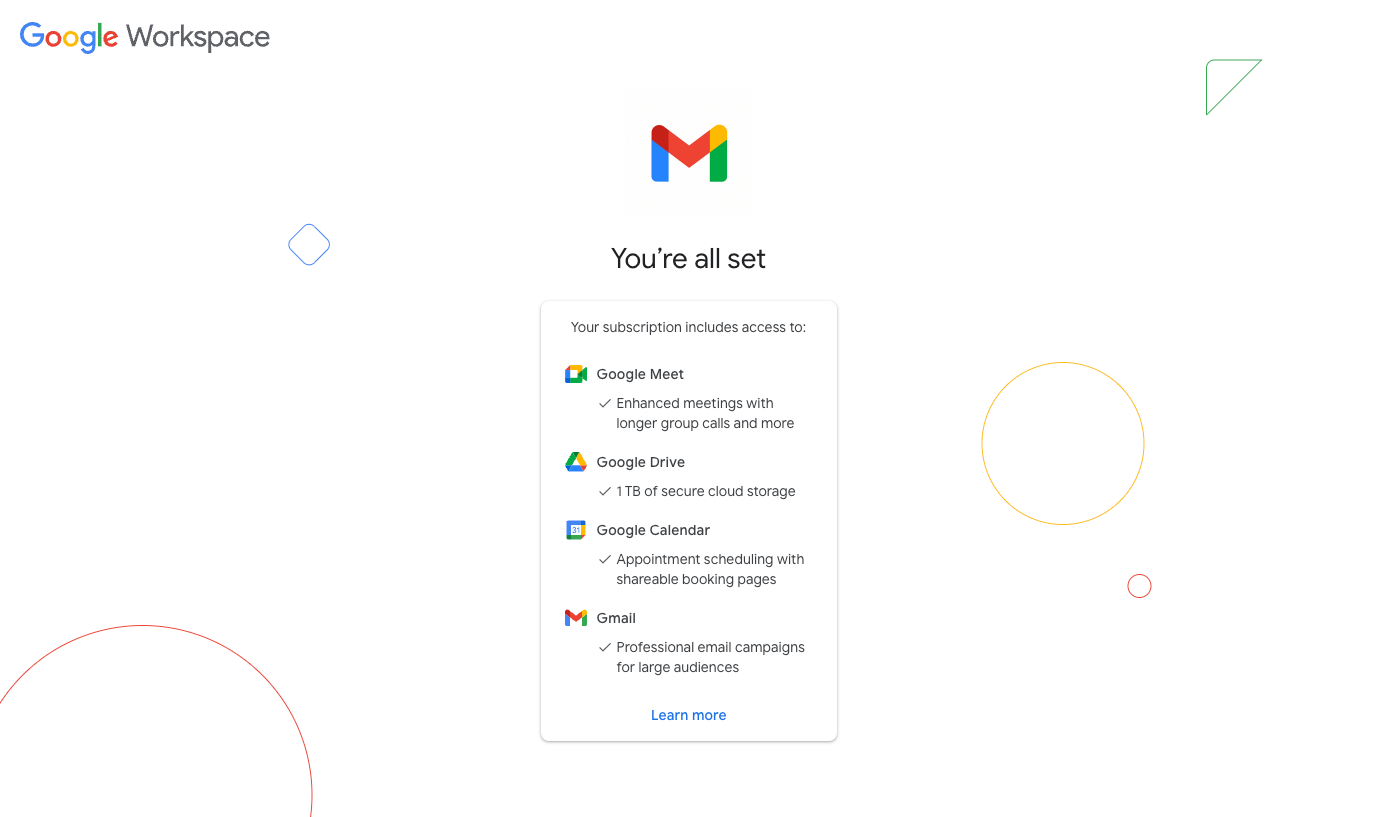
Workspace is a great tool for small businesses. By committing to a plan you can have premium video calling in Google Meets, have appointment booking via Google Calendar, you can have 1 TB of storage on Google Drive, and last but not least can use the Mail Merge tool, to send engaging mail campaigns.
Let’s focus on the last one:
During the upgrade process, you will be prompted to provide your first name, last name, and current email address. Following that, you will need to select the type of account that best describes how you will be using it.
If you are running a small business, choose the “Just me” option. Next, you will need to specify the email type you would like to use with Google Workspace. Select the “Gmail” option.
On the order summary page, click on “Subscribe.” You might be required to set up or verify your payment method. Once that is completed, you will see a confirmation screen indicating that the process is successful.
This means you are now prepared for the next step in sending mass emails through Gmail.
Step 2
Now, it is time to activate the multi-send mode, which allows you to send a mass email in Gmail. To proceed, go to your Gmail account and click on “Compose.”
This will open a draft where you will notice two new email actions in the horizontal menu located next to the Send button. These actions are marked with blue dots for first by default as you can see below.
Upon hovering over these new elements, you will notice that the first one allows you to “Choose layout,” while the second one is “Toggle multi-send mode.” For now, select the second option.
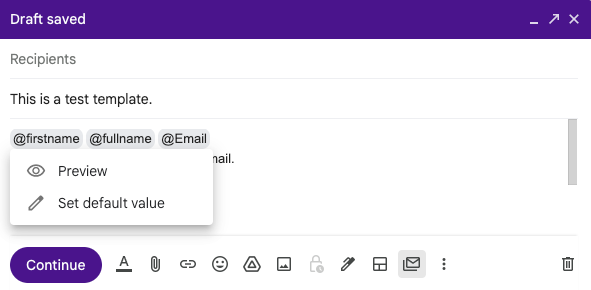
Select “Turn on” to enable mass emails in Gmail. Once you do this, your email draft will undergo a transformation, featuring purple design elements and a “Continue” button instead of the usual “Send” button.
It also lets you know that there are mail merge features, for instance, you can use merge tags for personalized content for your audience.
Step 3
Now, you are all set to create your mass email. While you can build the message from scratch, it would be beneficial to take advantage of additional perks offered by Google Workspace.
One of the new email actions is the “Choose layout” function, which provides a library of layout options to help you get started with your email design.
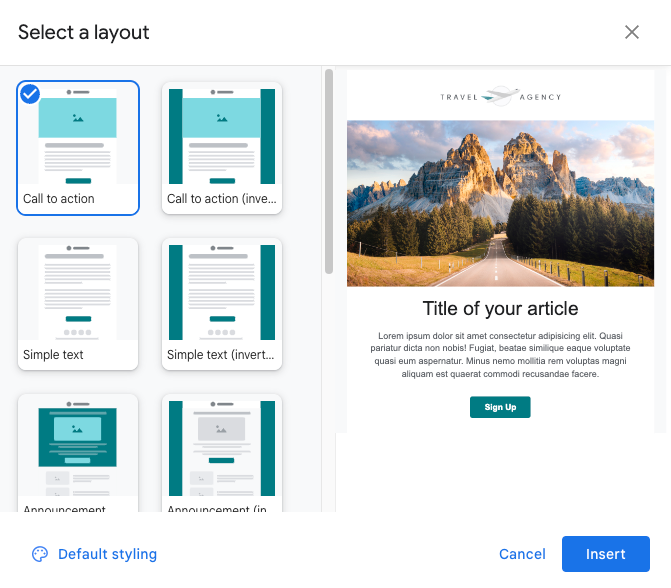
You have the option to choose from various layouts such as Call to Action, Simple Text, Announcement, Newsletter, and more. For the purpose of this guide, let’s select the classic Newsletter layout.
Before inserting your chosen layout, you have the option to modify its appearance. To proceed, click on “Default styling” located next to the palette icon in the bottom-left corner.
This action will open the “Edit layout preferences” screen. You can change the logo, color, fonts, footer, and you can also add links.
If you made the changes you wished, click on “Save Changes” and press “Insert”.
Proceed with customizing the different elements of your email. Remove all placeholder information and replace it with your own content. Additionally, ensure that you add a descriptive subject to your email.
To add a personal touch, consider utilizing mail merge tags to include the details of each recipient. With mail merge, you can use tags like “@firstname” and “@lastname” to automatically address users by their respective first and last names.
Step 4
Once you have finished customizing your mass email, it’s time to select its recipients. Simply add all the email addresses of intended recipients in the “To” field of your mass email draft.
Alternatively, you can utilize a Label, as we broke it down previously, to specify the recipients. However, do keep in mind that the maximum number of recipients on a standard plan is 1,500.
In the multi-send mode, you can use the “To” field, and each recipient will receive a separate copy of the mass email by default. This ensures that recipients are hidden, similar to when you use the Bcc field.
It’s important to note that in multi-send mode, you can only add a maximum of one person in the Cc or Bcc field. Anyone added to these fields will receive a copy of each individual outgoing message.
Lastly, consider using groups or lists to streamline your workflow when sending a mass email in Gmail. This can help you manage and organize your recipients and mass email campaigns more efficiently.ű
Step 5
Start your email marketing, and send your mass email.
When performing this action for the first time, you will likely encounter an alert regarding email best practices. At this point, you have the option to click on “Learn more” to gain further information or select “Don’t show again” to dismiss the alert.
Conclusion
In conclusion, mastering the art of sending mass emails in Gmail can greatly enhance your marketing strategy and help you efficiently connect with your audience.
Whether you run a small online business or want to communicate important announcements to a large group, Gmail offers user-friendly features that simplify the process.
By creating a mailing list using Labels, customizing email templates, and utilizing mail merge tags, you can personalize your mass emails and deliver targeted messages to your recipients. Remember to use Bcc for recipient privacy and consider scheduling your emails for optimal timing.
While the standard Gmail plan has limitations on the number of recipients, upgrading to Google Workspace unlocks additional benefits, such as multi-send mode and higher daily email limits.
By following the step-by-step instructions outlined in this guide, you can effectively send mass emails in Gmail and leverage the power of email marketing to convert customers and boost engagement.
Take advantage of these tools and strategies to maximize the impact of your email campaigns and achieve your business goals with ease.
If you want to get a free email domain click here, if you want to find the best email marketing services read this article.
FAQ
The number of recipients you can include depends on your Gmail plan. With a standard (free) Gmail account, you can send emails to up to 500 recipients per day.
If you upgrade to Google Workspace, you can contact up to 1,500 recipients daily with the individual plan or more with higher-tier team plans.
Yes, you can personalize mass emails in Gmail, if you have a Google Workspace subscription. By using mail merge tags such as “@firstname” and “@lastname” in your email content, you can automatically address recipients with their respective first and last names.
While Gmail doesn’t have specific content restrictions for mass emails, it’s important to adhere to email marketing best practices.
By doing so your email doesn’t go straight to the spam folder of your recipient’s inbox. Avoid sending spam, ensure you have proper permission from recipients, provide an option to unsubscribe, and create engaging and relevant content to improve the effectiveness of your mass emails.