
Installing WordPress: A Comprehensive Guide for Beginners

What is WordPress?
Installing WordPress – All You Need to Know
3 Reasons Why WordPress is a Popular CMS
4 Things to Look for in a Web Hosting Provider
Top 4 Web Hosting Providers
Conclusion
If you’re new to WordPress and installing WordPress on your website, this guide will help you get started.
WordPress is a popular content management system (CMS) used by millions of website owners worldwide.
It is an easy-to-use platform that allows anyone to create and manage their website without any technical knowledge.
In this article, we will cover everything you need to know to install WordPress, from choosing a web hoster to setting up your website.
We’ll go through the steps involved in installing WordPress, including downloading and installing the software, configuring your database, and customizing your site.
By the end of this guide, you’ll have a fully functional WordPress website up and running.
What is a WordPress website?

WordPress is a free and open-source content management system that allows you to create and manage your website.
It is a popular platform used by millions of people worldwide, from bloggers to business owners.
The platform is user-friendly, with a wide range of themes and plugins available to customize your site to your liking.
It is very easy to install WordPress, especially with a guide.
In this guide, we will take you through the steps involved in installing WordPress, from choosing a web hoster to setting up your site.
Whether you’re new to WordPress or looking to install it on your existing site, this guide will provide you with all the information you need to get started.
Installing WordPress – All You Need to Know
Requirements for WordPress
Before you can install WordPress, there are some requirements that your web hoster must meet.
These requirements include:
- PHP version 7.4 or greater
- MySQL version 5.6 or greater OR MariaDB version 10.1 or greater
- HTTPS support
- Mod_rewrite module for Apache
Most web hosters meet these requirements by default, but it’s always a good idea to double-check before you start to install WordPress.
Downloading the WordPress Software
Once you have chosen your web hoster and confirmed that it meets the requirements for installing WordPress, the next step is to download the WordPress software.
You can download the latest version of WordPress from the official WordPress website at wordpress.org.
Once you have downloaded the software, extract the files to your computer.
You will see a folder named “wordpress” containing all the files needed to install WordPress.
Uploading the WordPress Files to Your Server

The next step is to upload the WordPress files to your remote web server or hosting server.
You can do this using a file transfer protocol (FTP) client such as FileZilla or through the file manager provided by your web hoster.
To upload the files using FTP, you will need to connect to your web hoster server using the FTP login credentials as provided by your hoster.
Once connected, navigate to the root directory of your website and upload the “WordPress” folder that you extracted earlier.
Creating a Mysql Database for WordPress Website

Before you can install WordPress, you need to create a MySQL database and user name for it.
A database is where all the data for your site is stored, including posts, pages, and user information.
Most web hosters offer a tool called phpMyAdmin that allows you to create a database easily.
To create database using phpMyAdmin, log in to your web hoster account or control panel and locate the phpMyAdmin icon.
Click on it, and you will be taken to the phpMyAdmindashboard.
From the dashboard, click on the “Databases” tab and enter a database name, for your new database.
Click on the “Create database name” button, and your new database name will be created.
Configuring WordPress Settings
Before you can install WordPress, you need to configure some settings.
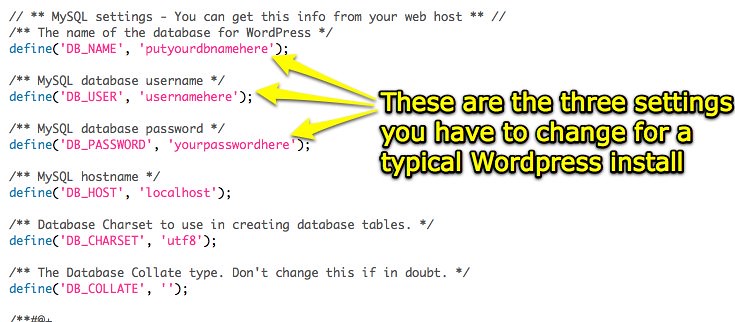
This involves creating a wp-config.php file, which contains information about your own MySQL database name, password and username.
To create the wp-config.php file, navigate to the “wordpress” folder that you uploaded earlier and locate the file named “wp-config-sample.php”.
Rename this file to “wp-config.php” and open it in a text editor.
In the file, you will see several lines of code that need to be edited.
Look for the lines that contain the database user, host, username, and password.
Save the file and close it.
Installing WordPress
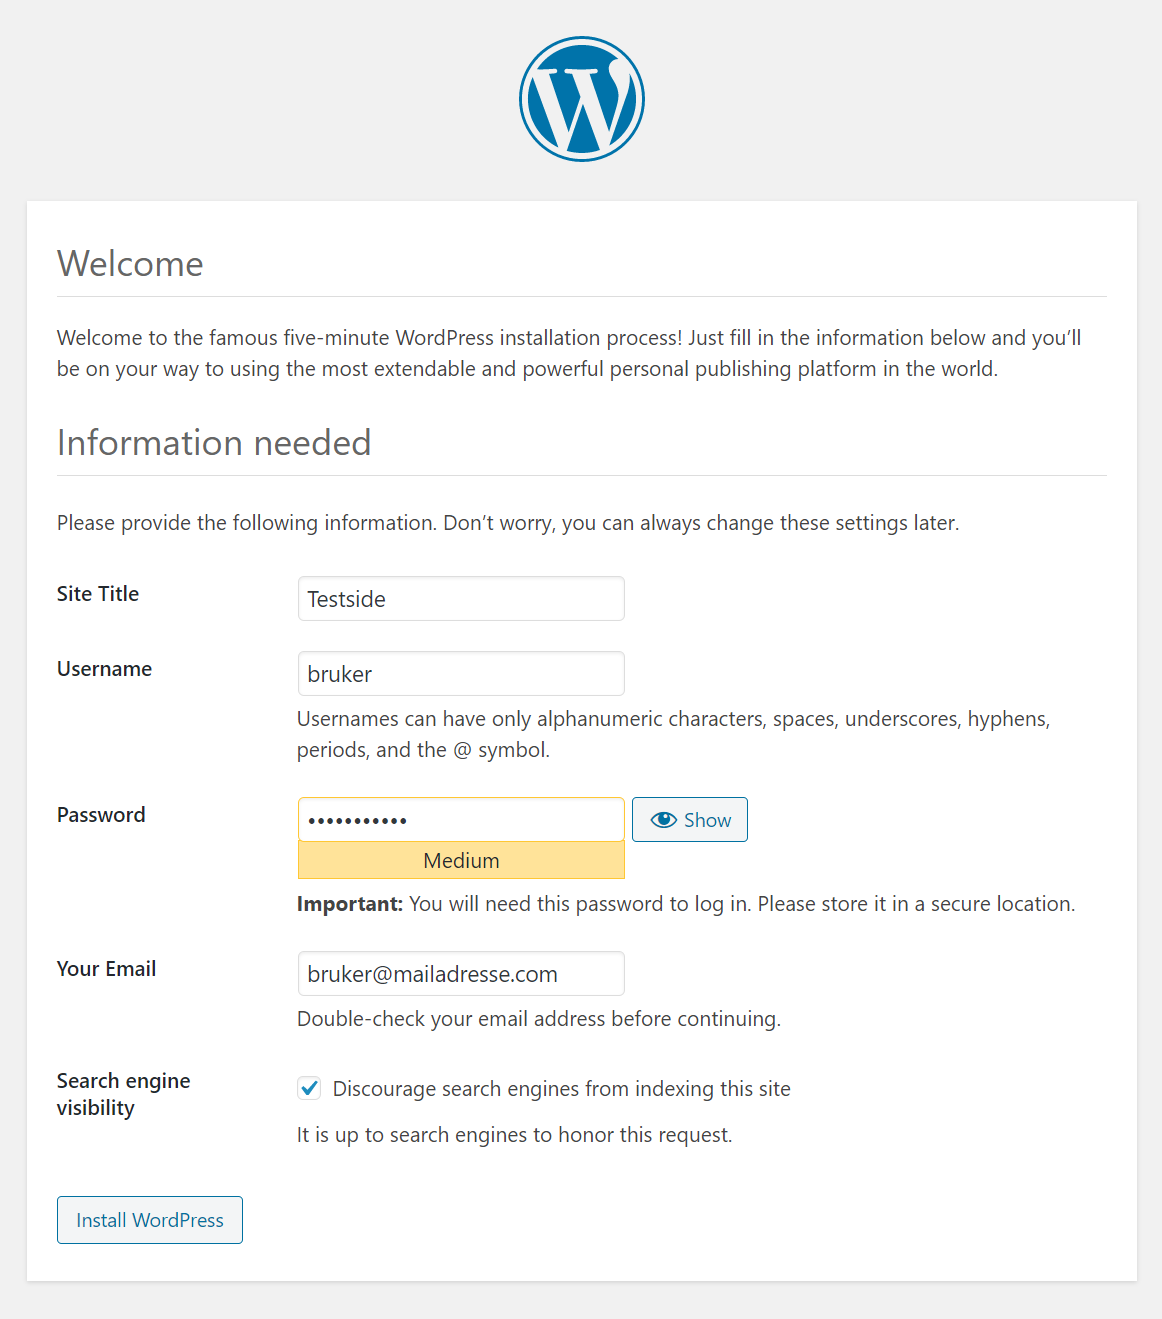
Now that you have uploaded the WordPress files and created a database, you’re ready to install WordPress.
To do this, navigate to your website’s URL in your web browser.
You should see the WordPress installation wizard.
Follow the steps in the installation wizard, which include selecting your language, entering your WordPress site, domain name and admin username and password, and choosing whether to allow search tools to index your site.
Once you have completed the installation wizard, you should see a message confirming that WordPress has been installed successfully.
Logging In to the WordPress Dashboard

After the WordPress installation is complete, you can log in to the dashboard.
The dashboard is where you will manage your WordPress site, create content, and customize the appearance of your site.
To log in to the dashboard, navigate to your website’s URL followed by “/wp-admin”.
This will take you to the WordPress login page.
Enter the username and password that you set during the WordPress installation to log in to the dashboard.
Customizing the Appearance of Your WordPress Site

One of the great things about WordPress is that you can easily customize the appearance of your site using themes.
Themes are templates that determine the layout, color scheme, and typography of your site.
To customize the appearance of your site, go to the “Appearance” menu in the dashboard and select “Themes”.
Here, you can browse and install different themes for your site.
You can also customize the theme settings to change the appearance of your site.
Adding Content to Your WordPress Site
Once you have customized the appearance of your site, it’s time to start adding content.
WordPress makes it easy to create and publish content, including blog posts, pages, and media.
To create a new blog post, go to the “Posts” menu in the dashboard and select “Add New”.
Here, you can enter the title and content for your post, as well as add images, videos, and other media.
To create a new page, go to the “Pages” menu in the dashboard and select “Add New”.
Here, you can enter the title and content for your page, as well as customize the page settings.
Installing Plugins to Extend Functionality
In addition to themes, WordPress also supports plugins, which are add-ons that extend the functionality of your site.
There are thousands of plugins available for WordPress, ranging from social media sharing tools to e-commerce platforms.
To install a plugin, go to the “Plugins” menu in the dashboard and select “Add New”.
Here, you can search for plugins by keyword or browse popular plugins.
Once you find a plugin that you want to install, click “Install Now” and then “Activate” to activate the plugin.
Creating Custom Menus

WordPress allows you to create custom menus for your site, which can be used to organize your content and make it easier for visitors to navigate your site.
To create a custom menu, go to the “Appearance” menu in the WordPress dashboard and select “Menus”.
Here, you can create a new menu and add links to your pages, posts, and other content.
You can also customize the menu settings to change the appearance and behavior of the menu.
Managing Comments
WordPress also includes a built-in commenting system that allows visitors to leave comments on your blog posts and pages.
You can manage comments through the dashboard, where you can approve, edit, and delete comments.
To manage comments, go to the “Comments” menu in the dashboard.
Here, you can view all the comments that have been left on your site and take action on them.
Optimizing Your Site for Search Engines

Search engine optimization (SEO) is the process of optimizing your site to rank higher in search engine results pages.
WordPress includes several built-in features that can help you optimize your site for search tools.
To optimize your site for search tools, go to the “Settings” menu in the dashboard and select “General”.
Here, you can enter the site title and tagline, as well as customize other settings that affect your site’s SEO.
You can also use plugins to enhance your site’s SEO.
Popular SEO plugins for WordPress include Yoast SEO and All in One SEO Pack.
Backing Up Your Site

Backing up your site is essential to ensure that you don’t lose your content and settings in case something goes wrong.
WordPress includes a built-in tool that allows you to create backups of your site, but you can also use third-party plugins to create backups.
To create a backup of your site using the built-in tool, go to the “Tools” menu in the dashboard and select “Export”.
Here, you can export your site’s content, including posts, pages, and media, to an XML file.
You can then use this file to import your content into another site.
To create a backup of your site using a plugin, you can search for backup plugins in the WordPress plugin repository.
Popular backup plugins for WordPress include UpdraftPlus and BackupBuddy.
Managing User Roles

WordPress allows you to assign different user roles to different users, depending on the level of access you want them to have.
There are several built-in user roles in WordPress, including administrator in the WordPress admin dashboard, editor, author, and contributor.
To manage user roles, go to the “Users” menu in the dashboard and select “All Users”.
Here, you can view and edit the user roles for each user on your site.
Securing Your Site

Security is a major concern for any website owner, and WordPress is no exception.
Fortunately, there are several steps you can take to secure your site and protect it from hackers and other security threats.
To secure your site, you can start by using strong passwords for all your user accounts and keeping your WordPress software and plugins up to date.
You can also use security plugins, such as Wordfence Security or iThemes Security, to monitor and protect your site.
Monitoring Your Site’s Performance

Monitoring your site’s performance is important to ensure that it loads quickly and provides a good user experience.
WordPress includes several built-in tools that allow you to monitor your site’s performance, including the Site Health feature and the Query Monitor plugin.
To access the Site Health feature, go to the “Tools” menu in the dashboard and select “Site Health”.
Here, you can view information about your site’s performance and security, as well as troubleshoot any issues.
To use the Query Monitor plugin, you can search for it in the WordPress plugin repository and install it.
Once installed, the plugin will display detailed information about your site’s performance, including queries, hooks, and PHP errors.
3 Reasons Why WordPress is a Popular CMS

WordPress is a popular CMS for several reasons.
1. It is free and open-source
Which means you don’t have to pay anything to use it.
2. It is easy to use
With a user-friendly interface that allows anyone to create and manage their website.
WordPress installation is very easy if you know the correct steps.
3. It is highly customizable
With a wide range of themes and plugins available to add functionality to your site.
WordPress is also highly scalable, which means it can grow with your business.
Whether you’re just starting out or have a large website with thousands of visitors, WordPress can handle it.
Finally, WordPress is highly secure, with regular updates and a dedicated community of developers working to keep it safe from hackers.
4 Things to Look for in a Web Hosting Provider
Before you can install WordPress, you need to choose a hosting provider.
A web hoster is a company that provides the technology and services needed for your website to be accessible on the internet.
There are many web hosters to choose from, each with their own strengths and weaknesses.
When choosing a web host and provider, there are several factors to consider.
1. You need to consider the cost.
Web hosters can range from a few dollars a month to hundreds of dollars, depending on the features and services provided.
2. You need to consider the uptime and reliability of the hosting provider.
You want a provider that has a high uptime and can guarantee that your website will be accessible at all times.
3. You need to consider the speed and performance of the hoster.
A slow website can be frustrating for users and can also affect your search engine rankings.
4. You need to consider the customer support provided by the hoster.
You want a provider that has a responsive and knowledgeable support team that can assist you in case of any issues.
Some popular web hosters that support WordPress include Bluehost, SiteGround, and HostGator.
These providers offer WordPress-specific hosting plans that are optimized for performance and security.
They also provide one-click installations of WordPress, which makes it easy for beginners to get started.
Top 4 Web Hosting Providers
| Hosting Providers | Reviews | Price | Users |
| Bluehost | ⭐⭐⭐⭐⭐ | 5.45$/month | 440000+ |
| HostGator | ⭐⭐⭐⭐ | 3.50$/month | 174000+ |
| SiteGround | ⭐⭐⭐ | 14.99$/month | 10000+ |
| A2 Hosting | ⭐⭐⭐ | 5.99$/month | 40000+ |
There are many web hosting providers available, each with its own strengths and weaknesses.
However, based on factors such as performance, reliability, customer support, and pricing, here are four of the top web hosters:
Bluehost

Bluehost is one of the largest web hosters and is recommended by WordPress itself.
They offer a wide range of hosting options, including shared, VPS, and dedicated hosting, as well as a user-friendly control panel and 24/7 customer support.
With Bluehost it is very easy to install WordPress.
They also offer a 30-day money-back guarantee and free domain name registration for the first year.
HostGator

HostGator is another popular web hoster, known for its affordable pricing and user-friendly control panel.
They offer a variety of hosting options, including shared, VPS, and dedicated hosting, as well as a 45-day money-back guarantee and 24/7 customer support, it also helps to install your own WordPress theme and plugins.
They also offer free website hosting account migration for new customers.
SiteGround

SiteGround is a web hoster that focuses on performance and security.
They offer a range of hosting options, including shared, VPS, and dedicated hosting, as well as a user-friendly control panel and 24/7 customer support.
They also offer free website migration, a 30-day money-back guarantee, and free SSL certificates.
SiteGround uses cutting-edge technology, such as SSD drives and the latest PHP versions, to ensure fast website loading times.
Their security measures include advanced server monitoring, a custom firewall, and daily backups, providing peace of mind for website owners.
SiteGround is a trusted web hoster, hosting over 2 million domains worldwide and receiving numerous industry awards for its outstanding performance and customer support.
A2 Hosting

A2 Hosting is a web hoster that offers fast and reliable hosting solutions.
They offer a variety of hosting options, including shared, VPS, and dedicated hosting, as well as a user-friendly control panel and 24/7 customer support.
They also offer a 30-day money-back guarantee and free website migration for new customers.
It’s important to note that these are just a few of the many web hoster available, and it’s important to research and compare different providers to find the one that best meets your specific needs and budget, it also helps to install your own WordPress theme and plugins.
With the help of these hosters, it is a breeze to install WordPress.
Conclusion

Installing WordPress is a straightforward process that can be completed in just a few steps.
After WordPress installation, you can customize the appearance of your site, create and publish content, install plugins to extend local site and functionality, and more.
By following best practices for security and performance, you can ensure that your site is secure and provides a great user experience for your visitors.
In summary, we have covered the process of installing WordPress and the basic steps involved in setting up a hosting account for a new site.
We have also looked at some of the key features and functionalities of WordPress, including customizing your site’s appearance, creating and managing content, managing the WordPress admin dashboard, installing plugins, managing user roles, securing your site, and monitoring your site’s performance.
As you continue to work with WordPress, you may want to explore more advanced features and functionalities, such as custom post types, custom taxonomies, and custom fields.
There are also many resources available online to help you learn more about WordPress, including tutorials, forums, and online communities.
Remember to keep your site updated and secure by regularly installing updates and monitoring for security threats.
By following best practices and staying up-to-date with the latest developments in WordPress, you can ensure that your site remains a valuable asset for your business or personal brand.
If you liked this article How to Install WordPress, you might also like another about WordPress here.
FAQ
The requirements for WordPress installation, your web hoster needs to support PHP version 7.4 or greater and MySQL version 5.6 or greater. Additionally, WordPress recommends at least 512 MB of RAM on your web server and 1 GB of storage space on your web hosting account.
Yes, you can easily install WordPress manually.
Here are the steps to do it:
1. Download the latest version of WordPress from the official website.
2. Upload the downloaded files to your web server via FTP.
3. Create a MySQL database and user for WordPress to use.
4. Rename the wp-config-sample.php file to wp-config.php and edit the database details.
5. Run the WordPress installation script by visiting the domain name in your web browser.
6. Follow the on-screen instructions to complete the WordPress installation process.