
How to Export WordPress Site – Comprehensive Guide
Prepare Your WordPress Site for Export
Export WordPress Site with the Duplicator Plugin
Save and Store Your Exported Site
How to Export a WordPress Website Using the Built-in Export Tool
Exporting your WordPress site is the way to go, if you’re looking to migrate your WordPress site to a new hosting provider, back it up for safekeeping, or even transfer it to another content management system.
WordPress has emerged as a popular platform for creating websites and blogs, offering users a wide range of features and customization options.
In this article, we will provide you with a step-by-step guide on how to export your WordPress site efficiently.
Prepare Your WordPress Site for Export

Before you initiate the export process, it’s essential to ensure that your WordPress site is up-to-date and in good working condition.
Here are a few recommended steps to take before exporting:
1) Update Plugins and Themes

Ensure that all your plugins and themes are updated to the latest versions.
Outdated plugins or themes may cause compatibility issues during the export process.
2) Remove Unnecessary Content

It’s a good practice to remove any unwanted content, such as unused plugins, themes, or media files, as it will help reduce the size of the export file.
3) Check Database for Errors

Use a plugin like WP-Optimize to clean up and optimize your WordPress database.
This process can improve the performance of your website and make the export process smoother.
Install an Export Plugin

To simplify the export process, you can use a WordPress plugin designed specifically for exporting sites.
The most popular plugin for this purpose is “All-in-One WP Migration.“
Here’s how to install and activate the plugin:
- Log in to your WordPress dashboard.
- Go to “Plugins” in the sidebar and click on “Add New.”
- Search for “All-in-One WP Migration.”
- Click “Install Now” and then “Activate.”
Export Your WordPress Site
Once you have installed the export plugin, follow these steps to export your WordPress site:
- Navigate to “All-in-One WP Migration” in the sidebar and click on “Export.”
- Choose “Export to File” from the options provided.
- The plugin will start creating a backup file of your entire WordPress site, including the database, themes, plugins, media files, and settings.
- Once the export process is complete, you will be prompted to download the backup file (usually in the form of a .wpress or .zip file).
Export WordPress Site with the Duplicator Plugin

The process of migrating a WordPress site to a new hosting provider or domain can seem daunting, but with the help of the Duplicator plugin, it becomes a straightforward task.
The Duplicator plugin allows you to easily package your entire WordPress site, including files, database, plugins, and themes, into a single archive file.
Install and Activate the Duplicator Plugin

To begin, you need to install and activate the Duplicator plugin on both your source (existing) and destination (new) WordPress installations.
Here’s how to do it:
- Log in to your WordPress dashboard on the source site.
- Navigate to “Plugins” in the sidebar and click on “Add New.”
- Search for “Duplicator” in the plugin search bar.
- Click “Install Now” next to the Duplicator plugin and then click “Activate.”
Repeat the above steps on your destination site.
Create a Duplicator Package

Once the Duplicator plugin is activated on both sites, follow these steps to create a package of your source site:
- On the source site, go to the Duplicator menu in the WordPress sidebar.
- Click on “Packages” and then “Create New.”
- The Duplicator plugin will run a scan of your site to ensure everything is in order. If any issues or warnings are detected, address them before proceeding.
- Click on “Build” to create the package. This process may take a few moments, depending on the size of your site.
Download the Package Files

After the package is created, you need to download the archive file and the installer file:
- Once the package is built, click on the “Installer” and “Archive” buttons to download the installer and archive files, respectively.
- Save these files to a location on your local computer.
Upload Files to the Destination Site

Now it’s time to transfer the package files to your destination site. Follow these steps:
- Connect to your destination site via FTP or the file manager in your hosting control panel.
- Upload both the installer.php and the archive file to the root directory of your destination site. This is typically the public_html or www folder.
- Note down the URL where you uploaded the installer.php file, as you will need it in the next step.
Run the Duplicator Installer

With the package files uploaded to the destination site, it’s time to run the Duplicator installer to complete the migration:
- Open a web browser and navigate to the installer.php file using the URL you noted down in the previous step.
- The Duplicator installer screen will appear, guiding you through the migration process.
- Follow the on-screen instructions, providing the necessary information when prompted. This includes entering the database details for your destination site.
- Once you have entered all the required information, click on the “Next” button to proceed.
- The Duplicator plugin will extract the archive and import the database to the destination site. This process may take a few minutes.
- After the migration is complete, you will be prompted to update any necessary URLs or paths. Follow the instructions carefully to ensure proper functionality of your migrated site.
- Finally, test your migrated site thoroughly to make sure everything is working as expected.
Migrating your WordPress site using the Duplicator plugin simplifies the complex process of transferring your entire site to a new hosting provider or domain.
By following the step-by-step guide outlined above, you can successfully migrate your site using the Duplicator plugin.
Remember, migrating a WordPress site involves transferring sensitive data, so always ensure you are following best practices for security, such as using secure FTP connections and keeping your plugins, themes, and WordPress core updated to the latest versions.
By utilizing the power of the Duplicator plugin, you can efficiently migrate your WordPress site to a new hosting provider or domain with ease.
Save and Store Your Exported Site

After you have successfully exported your WordPress site, it’s crucial to store the backup file securely.
Here are a few recommended practices:
Local Storage

Save a copy of the backup file on your local computer or an external hard drive.
This ensures that you have a local backup of your site.
Cloud Storage

Upload the backup file to a cloud storage service like Google Drive, Dropbox, or Amazon S3.
Storing your backup files in the cloud provides an extra layer of protection against hardware failures or other unforeseen events.
Remote Servers
Consider using remote servers or offsite backup services for additional redundancy.
These services specialize in securely storing backup files and offer features like automatic backups and versioning.
How to Export a WordPress Website Using the Built-in Export Tool

WordPress offers a convenient built-in export tool that allows users to export their entire site’s content, including posts, pages, comments, custom post types, and more.
This feature is particularly useful if you want to create a backup of your site, migrate it to a new server, or transfer it to another WordPress installation.
Access the Export Tool
To begin the export process, you need to log in to your WordPress dashboard.
Once logged in, follow these steps:
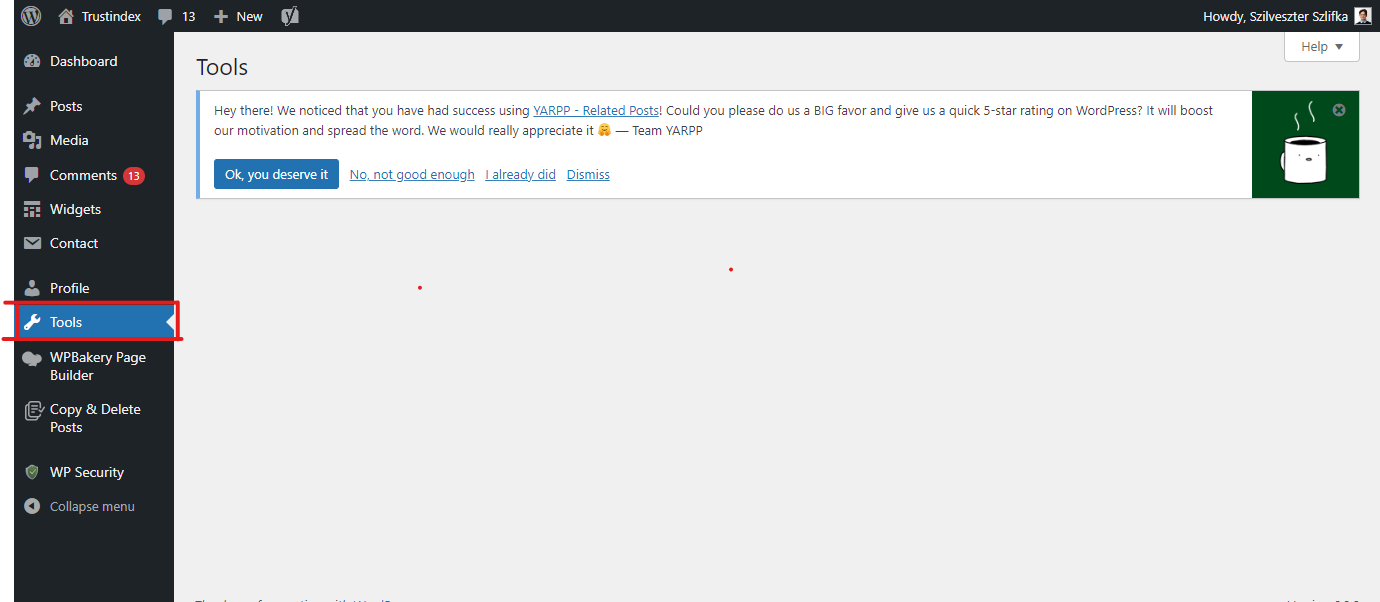
- Navigate to the “Tools” section in the left sidebar of your WordPress admin panel.
- Click on “Export” from the submenu that appears.
Choose What to Export

In the export screen, you will be presented with two options: “All content” or “Specific content.”
Here’s what each option means:
All content
Selecting this option will export all your site’s content, including posts, pages, comments, categories, tags, custom post types, and more.
This is ideal if you want to create a complete backup of your site or migrate it to another WordPress installation.
Specific content
Choosing this option allows you to export only specific types of content or specific authors.
You can select individual post types, categories, authors, or date ranges based on your requirements.
This option is useful if you want to export a subset of your site’s content.
Select the option that suits your needs and click on the “Download Export File” button to proceed.
Save the Export File
After clicking the “Download Export File” button, WordPress will generate an XML file containing your selected content.
A dialog box will appear, prompting you to save the export file to your computer.
Choose a location on your computer where you want to save the file, and click “Save.”
Completing the Export

Once the export file is saved, WordPress will inform you that the export process is complete.
You can now use the exported file for various purposes, such as creating backups, migrating your site, or importing the content into another WordPress installation.
Media Files
It’s important to note that the built-in export tool does not export media files (e.g., images, videos) by default.
However, it does include references to those files within the exported content.
To ensure you have a complete backup, consider separately downloading your media library or using a backup plugin to include media files.
Importing the Exported File
To import the exported file into another WordPress site, you can use the built-in import tool available in the destination WordPress installation.
It allows you to select the exported file and import the content, including posts, pages, and other supported elements.
Exporting your WordPress site using the built-in export tool is a straightforward process that provides a convenient way to create backups or migrate your site to a different WordPress installation.
By following the steps outlined in this guide, you can efficiently export your site’s content and ensure its safe preservation or seamless transfer.
Remember to regularly export your site’s content to keep your backups up to date and maintain data security.
Conclusion
Exporting your WordPress site is a vital step in ensuring the safety and portability of your website.
By following the steps outlined in this guide, you can efficiently export your site and have a backup ready in case of any emergencies.
Remember to periodically export your WordPress site to keep your backups up to date.
With a well-organized backup strategy, you can have peace of mind and confidently manage your WordPress site without the fear of losing valuable data.
If you liked this article, consider reading another about Headless WordPress here.
FAQ
The easiest way to export a WordPress site is by using a plugin like “All-in-One WP Migration” or the built-in export tool.
These tools simplify the process by allowing you to export your site’s content, including posts, pages, media files, and settings, with just a few clicks.
Include Product Data: Ensure that your export process includes WooCommerce product data, such as product details, variations, images, and inventory.
This ensures a comprehensive export of your online store.
Export Orders and Customer Data: If you want to retain order history and customer data, consider using a WooCommerce-specific export plugin or functionality to include these details in the export file.
Simplicity and Automation: BlogVault provides a user-friendly interface and automates the export process, making it quick and hassle-free.
It eliminates the need for manually configuring settings, archiving files, and exporting the database, saving you time and effort.
Comprehensive Backup: BlogVault ensures a comprehensive backup by including not only your site’s content but also databases, themes, plugins, media files, and other crucial elements.
It provides a complete snapshot of your site, reducing the risk of missing any essential data during the export process.