DNS Server Unavailable – 5 Ways to Fix the Error [2023]
- How DNS servers work
- What is the ‘DNS server not responding’ error message
- How to fix your server error
- Possible causes of the error
- Tips to avoid the issue
- Conclusion
Are you struggling with the notorious ‘DNS server not unavailable’ error on your WordPress website?
Don’t worry, you’re not alone. This pesky issue can occur for a multitude of reasons, leaving you scratching your head in search of a quick fix.
But fear not! In this article, we’ve got you covered with simple, jargon-free solutions to troubleshoot and resolve the ‘DNS server not responding’ error in WordPress.
We’ll guide you step-by-step, ensuring that even the most tech-challenged individuals can follow along and get their website back on track.
Say goodbye to frustration and hello to a smoothly functioning WordPress site!
How DNS servers work
DNS servers translate domain names into IP addresses, allowing computers to understand and access websites.
When a user enters a domain name, the local DNS resolver checks its cache for the corresponding IP address first. If not found, it queries root servers, then TLD servers, and finally authoritative name servers for the domain.
The authoritative name server provides the IP address, which is then cached and returned to the user’s browser.
This process enables the browser to establish a connection with the web server hosting the website. DNS servers are vital for facilitating website accessibility.
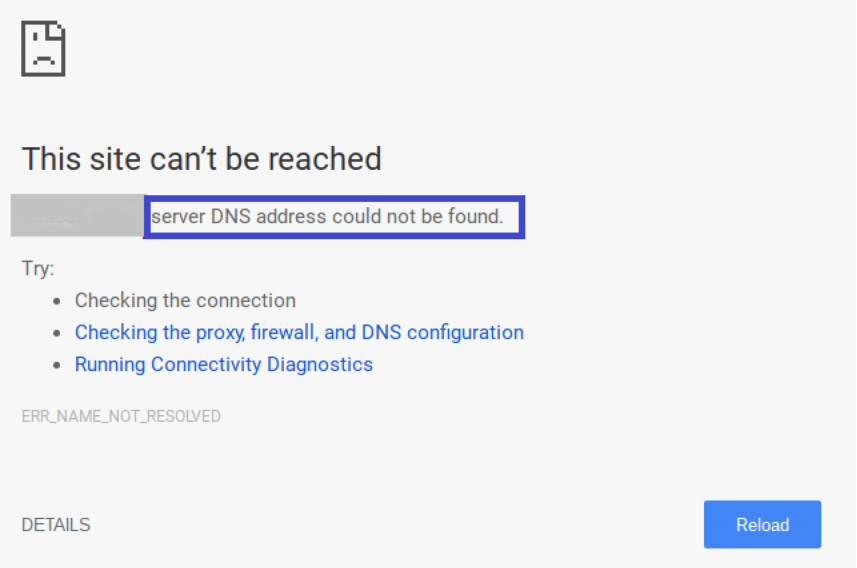
What does “DNS server not responding” error mean?
The “DNS server not responding” error in WordPress is an issue that occurs when the Domain Name System server fails to respond or resolve the domain name of your website.
The DNS is responsible for translating human-readable domain names (like www.trustindex.io) into IP addresses that computers can understand.
When you encounter this error, it means that your computer or network is unable to establish a connection with the DNS server responsible for resolving the domain name of your WordPress site.
As a result, you are unable to access your website, and visitors may also experience difficulties reaching your site.
This error can arise due to various reasons, including incorrect settings, DNS server issues, problems with your internet connection, or misconfigurations with your domain or hosting settings.
It’s important to troubleshoot and fix the error promptly to ensure that your WordPress website is accessible to both you and your visitors.
5 solutions for the error: DNS server unavailable
Overview of the ways you can troubleshoot and fix the issue:
- Verify your internet connection
- Experiment with a different web browser or use incognito mode
- Temporarily disable your firewall or antivirus software
- Adjust the server address
- Clear your DNS cache
Now let’s look at the troubleshooting steps in the next sections.
#1 Verify your internet connection
The first step to troubleshoot the ‘DNS server not responding’ error message is to ensure that your network connections are active. Make sure you are currently connected to the internet.
If your network connection is established but the error persists, you can try restarting your internet connection. To do this, you can either power off and on your computer or disconnect the power supply to your router. Wait for at least a minute, and then reconnect the router.
Once you’ve performed the above steps, visit your WordPress blog to check if the ‘DNS server not responding’ error has been resolved.
The network connection is one of the most common issues to deal with. Therefore always check your network connection as the first step of solving the problem.
Using a network adapter driver
A network adapter driver, also known as a network interface card (NIC) driver, is a software component that enables communication between the operating system and the adapter hardware. It acts as a bridge between the physical adapter and the software applications that require network connectivity.
The adapter facilitates the transmission and reception of data packets between the computer and the network. It handles tasks such as establishing network connections, managing network protocols, and handling data transfers.
#2 Experiment with a different web browser or use incognito mode
Sometimes, the ‘DNS server not responding’ error can be related to issues with your default web browser. To troubleshoot this, you can try accessing your WordPress site using an alternative browser, such as Mozilla Firefox or Microsoft Edge.
For instance, if you usually use Google Chrome and encounter the ‘DNS server not responding’ error, attempt to access your website using Mozilla Firefox or another browser.
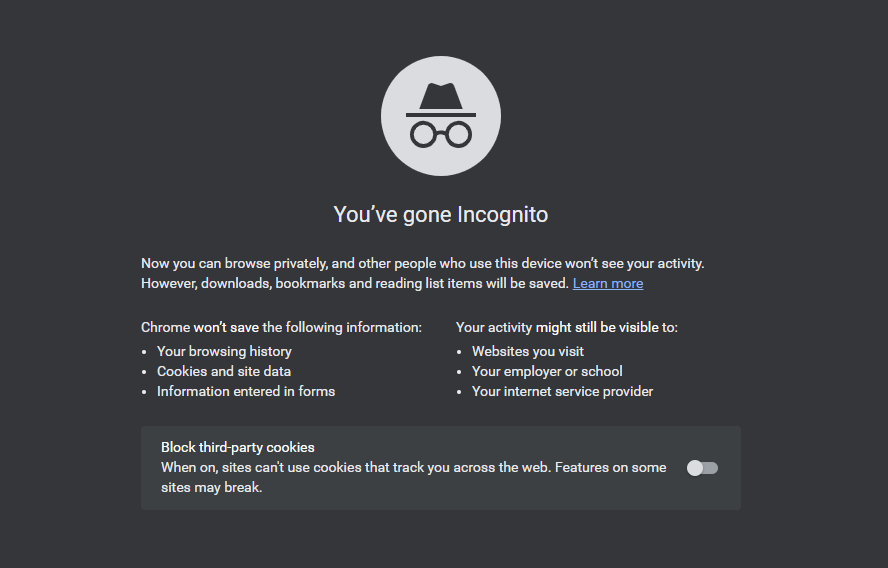
Alternatively, you can open the website in a private or incognito tab, which is available in browsers like Google Chrome.
If you can successfully access the website using another browser or in private mode, it indicates that the problem lies with your default web browser.
In such cases, you can attempt to resolve the issue by clearing the cache of your browser. If that doesn’t resolve the problem, reinstalling the default browser again might be a viable solution.
#3 Temporarily disable your firewall or antivirus software
Firewalls and antivirus programs play an important role in protecting your computer against malware and other threats. However, in some cases, these programs can mistakenly block legitimate websites due to strict settings or internal issues.
To determine if the ‘DNS server not responding’ error is caused by your firewall or antivirus software, it’s recommended to temporarily disable them.
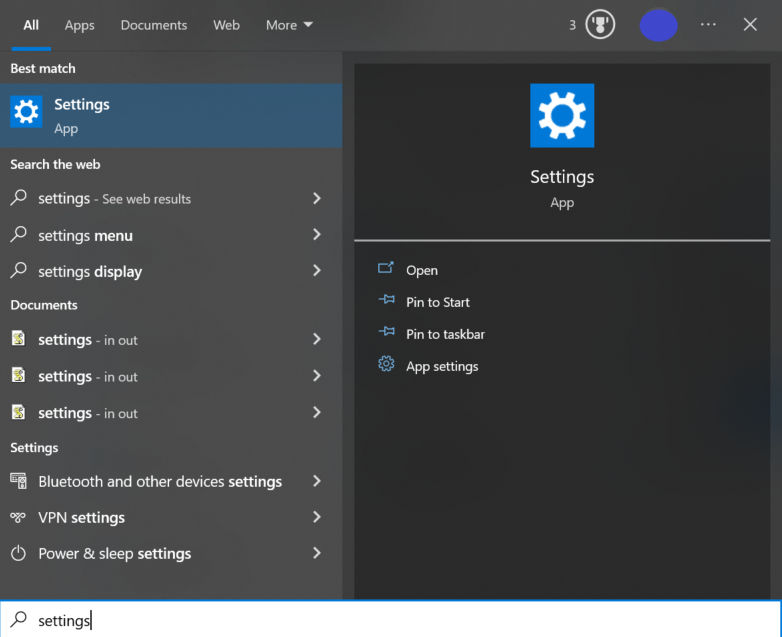
If you’re using Windows, you can easily disable the firewall and antivirus programs by following these steps:
1.) Open the ‘Settings’ app from the Start menu.
2.) Select ‘Windows Security’ in the Privacy and Security’ tab
3.) On the ‘Privacy and Security’ page, choose the ‘Firewall & network protection’ option from the list.
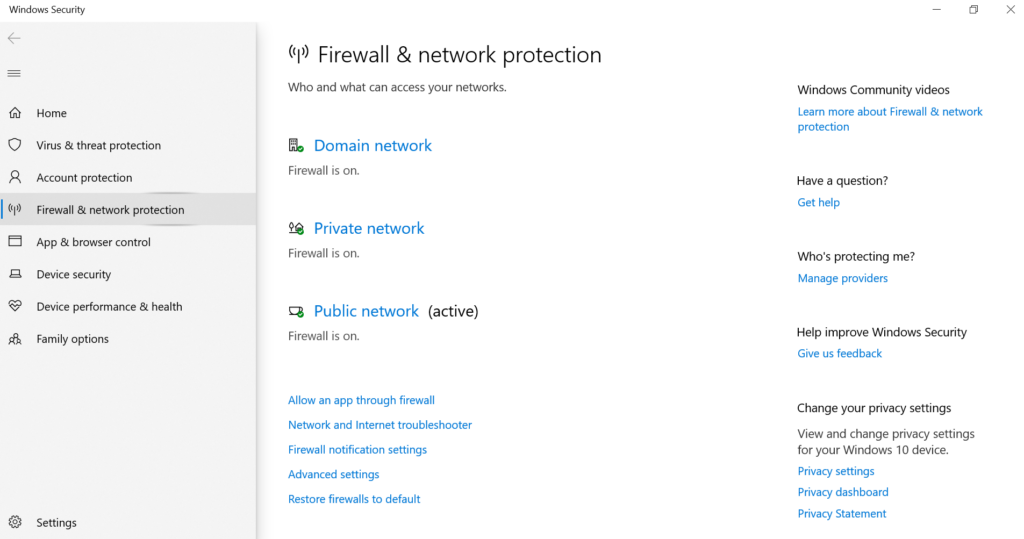
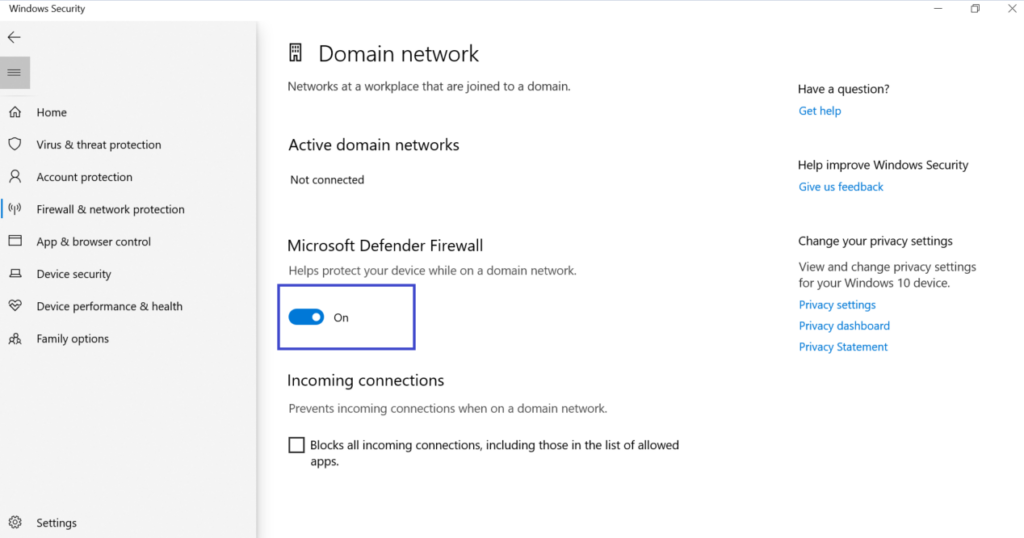
4.) Toggle the switch below the ‘Microsoft Defender Firewall option to turn it off.
It’s important to note that disabling your firewall and antivirus programs temporarily leaves your computer vulnerable to potential threats. Therefore, remember to re-enable them after troubleshooting the issue.
If disabling the firewall and antivirus programs resolves the error, you may need to adjust the settings of these programs or consult their respective documentation for further guidance.
In case you are using Mac:
If you are using a Mac, follow these steps to disable the firewall:
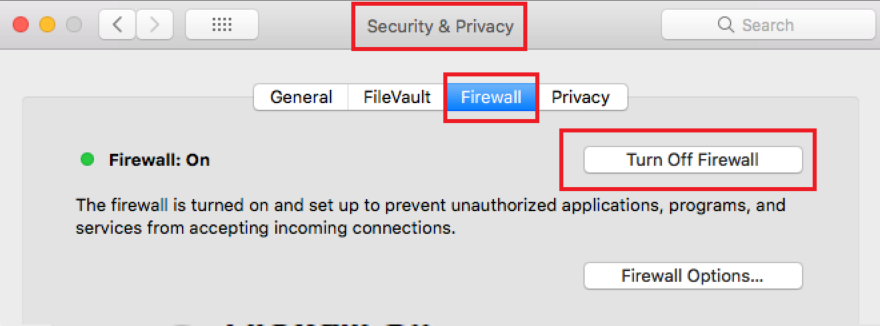
1.) From the Apple toolbar, go to ‘System Preferences’ and select ‘Security and Privacy’.
2.) This will open the ‘Security and Privacy’ window.

3.) In the ‘Security and Privacy’ window, navigate to the ‘Firewall’ tab.
4.) Simply click on the tab and turn off the firewall.
By following these steps, you have now successfully disabled the antivirus and firewall programs on your Mac.
After disabling the firewall, visit your site to check if the ‘DNS server not responding’ error has been resolved.
#4 Adjust the DNS server address
The ‘DNS server not responding’ error can occur if the DNS server assigned by your internet service provider is unavailable or contains incorrect information.
To resolve this issue, you can switch to a different public DNS server, such as Cloudflare or Google Public DNS, both of which offer free DNS address services.
For Windows users, follow these steps to access the Network Connections page:
1.) Go to the Windows Search Box located on the taskbar.
2.) Type ‘ncpa.cpl’ in the search box and press Enter.
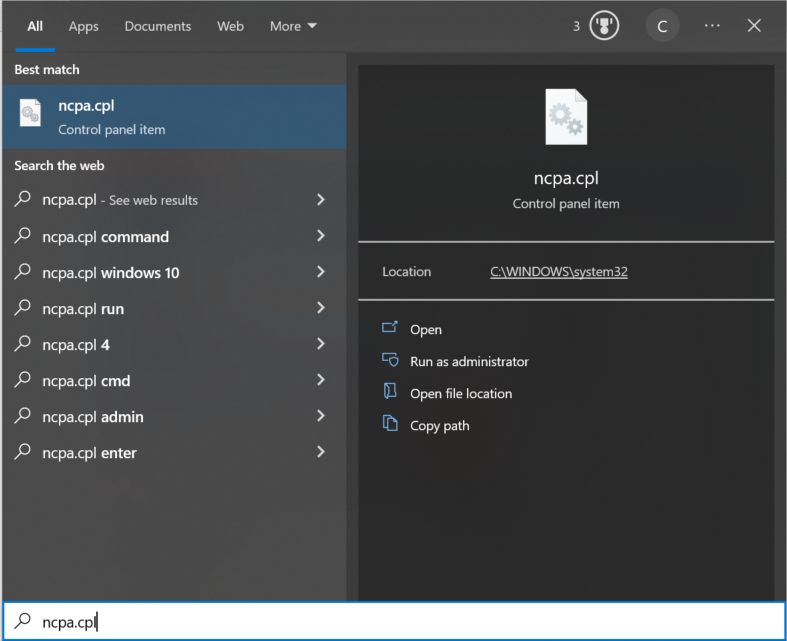
This will open the Network Connections page.
By following these steps, you can access the Network Connections page on Windows and proceed with configuring the alternative DNS server and network settings there.
After accessing the ‘Network Connections’ page, follow these steps to make changes to your internet connection properties:
3.) Right-click on the internet access that you are currently using.
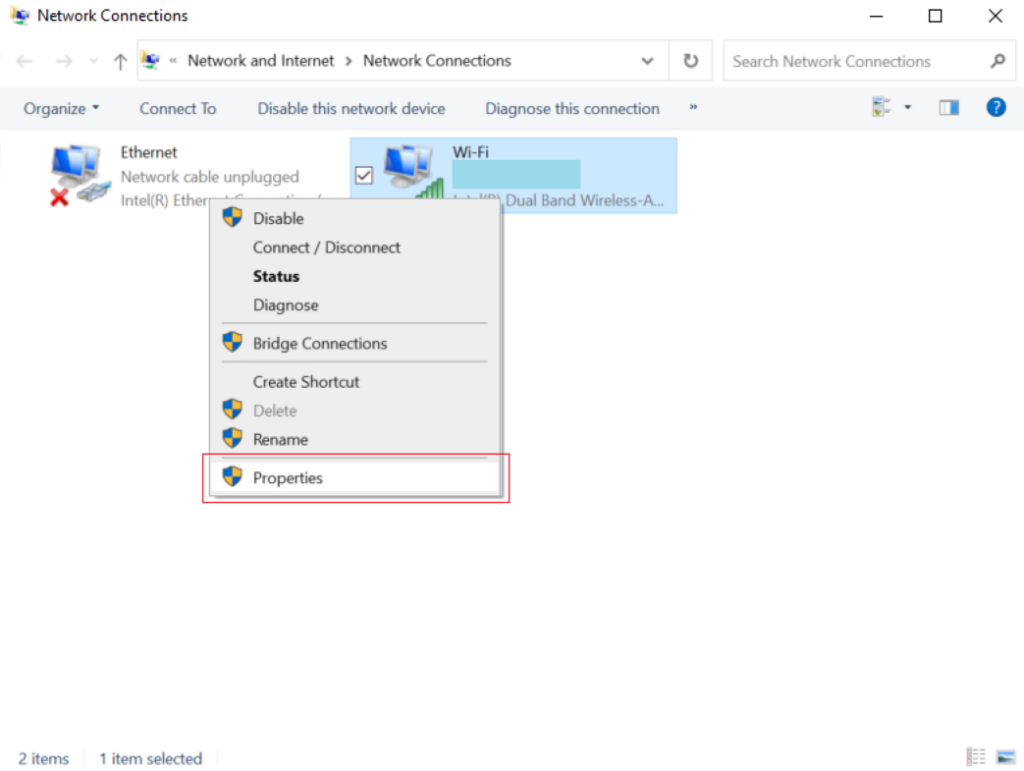
4.) From the context menu that appears, select the ‘Properties’ option.
Please note that at this stage, you may be prompted to provide an administrator password. If you do not have the necessary permissions, it is advisable to reach out to your IT department or computer administrator for assistance.
5.) Double-click on the ‘Internet Protocol Version 4 (TCP/IPv4)’ option from the list. This action will open a new window.
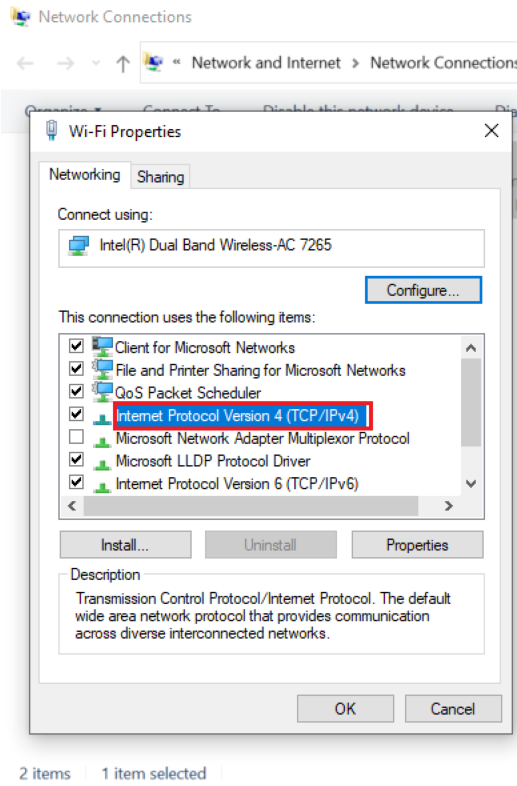
6.) In the internet protocol version window, you will see two options. Firstly, check the ‘Obtain an IP address automatically’ box.
Set DNS server addresses
7.) Next, check the ‘Use the following DNS server addresses’ box.
8.) Type in the preferred DNS server address you obtained from the public DNS servers in the designated fields.
For example, Cloudflare’s public DNS address is 1.1.1.1, while Google’s public DNS addresses are 8.8.8.8 and 8.8.4.4.
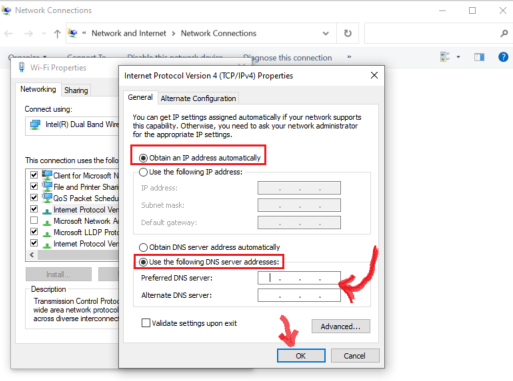
9.) Finally, click the ‘OK’ button at the bottom of the window to save the changes.
By following these steps, you can alternate server addresses by choosing to obtain an IP address automatically or by manually entering the addresses you obtained from a public server.
After making changes to the alternate DNS server address, it is recommended to restart your computer. This allows the changes to take effect and helps in resolving the error.
Once your computer has restarted, visit your website to check if the error has been resolved.
You can also use the command prompt window for configuration.
5 steps to configure with command prompt:
- Open the Command Prompt: Press the Windows key + R to open the Run dialog box. Type “cmd” and press Enter to open the Command Prompt.
- View Current Settings: Type the following commands and press Enter to view your current settings: ipconfig /all

- Identify the Network Adapter: Look for the network adapter you want to configure the settings for. It is usually labeled as “Ethernet adapter” or “Wireless adapter” followed by the adapter name.
- Configure Server Addresses: To set server addresses for the identified adapter, use the following command: netsh interface ipv4 set dns name=”YOUR_ADAPTER_NAME” static DNS_SERVER_ADDRESS

Replace “YOUR_ADAPTER_NAME” with the actual name of your network adapter and “DNS_SERVER_ADDRESS” with the desired server address. You can specify multiple servers by separating them with a space.
5. Verify DNS Configuration: To ensure the changes have taken effect, you can run the following command to display the configured settings: netsh interface ipv4 show DNS

That’s it! You have now configured server addresses for your network adapter using the Command Prompt. Make sure to close and reopen any browsers or applications that rely on internet connectivity to ensure the changes are applied.
Set the following DNS server addresses on MAC:
- Select the Apple icon located in the toolbar.
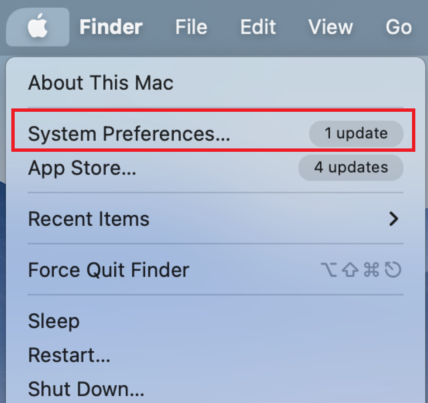
2. Click on the ‘System Preferences’ option in the dropdown menu.
By following these steps, you can access the ‘System Preferences’ menu on your Mac.
3. Click on the ‘Advanced’ button.
A popup window will appear. Follow the next steps within this window:
4. Open the ‘DNS’ tab, located at the top of the window.
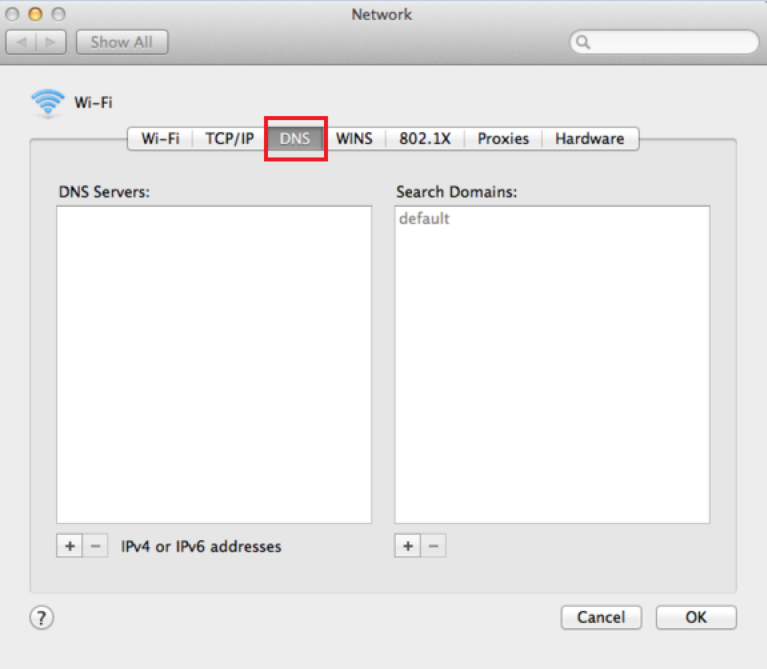
5. At the bottom-left corner, you will find a ‘+’ button. Click on it.
By clicking the ‘+’ button, you can add a preferred DNS server with the default address ‘0.0.0.0’.
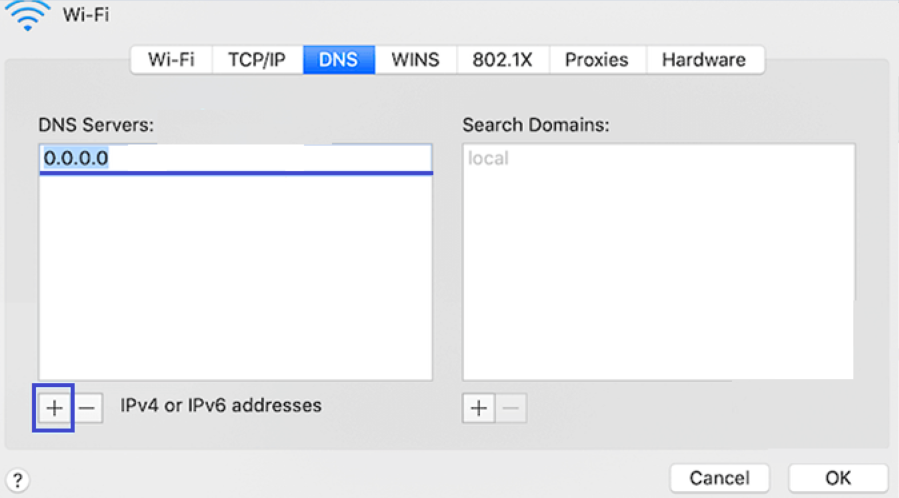
6. Replace the default address with the numbers corresponding to the public DNS server you want to use.
For instance, the Cloudflare public DNS address is ‘1.1.1.1’, while the Google public DNS addresses are ‘8.8.8.8’ and ‘8.8.4.4’.
After entering the desired DNS addresses on the ‘DNS’ tab, click on the ‘OK’ button. This action will take you back to the previous popup window.
In the previous popup window, simply click on the ‘Apply’ button to save the changes you made to the server settings.
7. By clicking the ‘Apply’ button, your changes will be applied and saved.
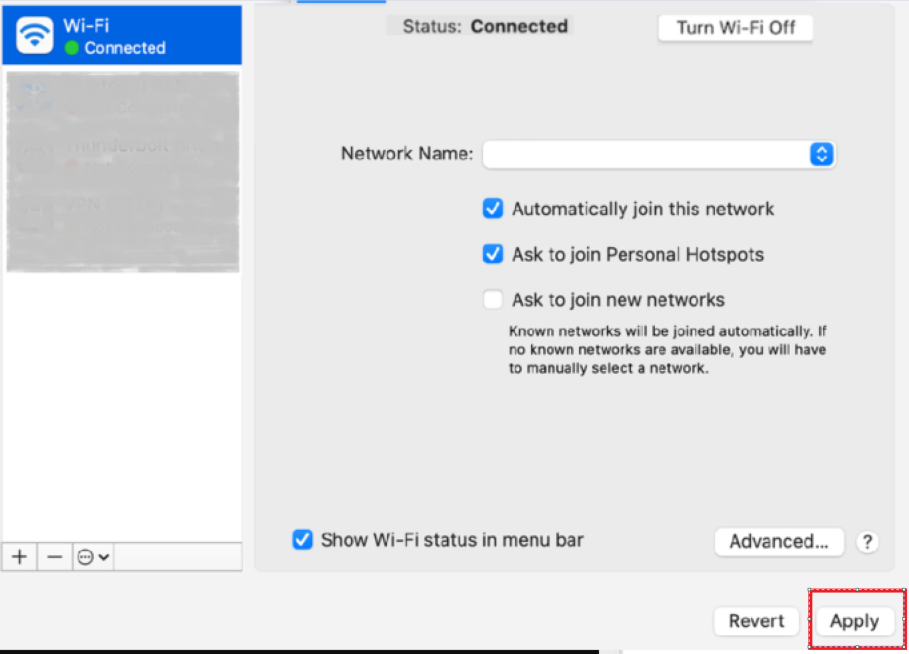
Remember to restart your computer and then proceed to visit your site to check if the error has been resolved.
#5 Clear your DNS cache
Similar to your web browser, your computer also stores the IP address of websites you visit in its DNS cache. This helps to speed up future visits by avoiding repetitive IP address lookups.
However, over time, the DNS cache can become outdated, leading to the ‘DNS server not responding’ error on your site. This can occur when you change your site’s domain name or migrate it to a new WordPress host.
To resolve this issue, you can flush your DNS cache, which essentially clears the stored DNS information in the operating system. This can help eliminate the ‘DNS server not responding’ error.
For detailed instructions on how to clear your cache, please refer to our comprehensive guide. It provides step-by-step instructions to help you through the process.
What causes the DNS server error?
The ‘DNS server not responding’ error in WordPress can occur due to several reasons:
Internet Connection Issues
If your connection is disrupted or experiencing connectivity problems, it can lead to a server error. Ensure that your internet router is connected, stable, and properly configured.
DNS Server Unavailability
The DNS server assigned by your internet service provider (ISP) may be unavailable or experiencing downtime. This can prevent your computer from resolving domain names to the IP address.
Incorrect DNS Settings
Incorrectly configured settings on your computer or within your WordPress setup can result in DNS server errors. This includes incorrect server addresses or misconfigured DNS records.
Browser Issues
Sometimes, the error may be specific to your web browser. Issues with the browser’s cache, extensions, or settings can interfere with DNS resolution, leading to the error.
Firewall or Antivirus Restrictions
Overly strict firewall or antivirus settings may block DNS requests or interfere with the communication between your computer and the DNS server, causing the error.
DNS Cache Problems
Outdated or corrupted DNS cache on your computer can result in DNS server errors. The cached DNS information may not match the actual IP address, leading to connection issues.
DNS Propagation Delay
When you make changes to your domain’s DNS settings, such as updating nameservers or adding new records, it takes time for these changes to propagate across the internet. During this propagation period, some users may experience DNS server errors.
8 tips to avoid DNS server unavailable error
To avoid DNS issues in WordPress, consider implementing the following practices:
1.) Choose a Reliable DNS Provider
Select a reputable and reliable DNS provider for your domain. Opt for providers known for their stability, security, and performance.
2.) Keep DNS Records Up to Date
Regularly review and update your DNS records to ensure they accurately reflect your website’s current configuration, including the IP address, subdomains, and mail server settings.
3.) Use TTL Wisely
Time-to-Live (TTL) determines how long DNS records are cached by resolvers. Set an appropriate TTL value that balances caching efficiency and the ability to quickly propagate changes.
4.) Implement DNS Redundancy
Consider using multiple DNS servers to provide redundancy. This helps mitigate the impact of a single DNS server failure and improves overall DNS availability.
5.) Monitor DNS Performance
Utilize DNS monitoring tools or services to track DNS response times and identify potential issues promptly. This enables you to take timely action and ensure optimal DNS performance.
6.) Regularly Backup DNS Settings
Maintain backups of your settings, including zone files and configuration records. This ensures you can quickly restore your DNS configuration if any issues arise.
7.) Keep Domain Registration Information Updated
Maintain accurate and up-to-date contact information in your domain registrar’s records. This ensures you receive important notifications regarding your domain and settings.
8.) Stay Informed about DNS Best Practices
Keep yourself informed about DNS best practices and emerging trends. Regularly review industry resources and stay updated on DNS security and performance practices.
By following these guidelines, you can minimize the risk of DNS-related issues and help ensure a smooth and reliable operation of your WordPress website.
Conclusion
Getting this particular error in WordPress can be frustrating, but with the right troubleshooting steps, it is possible to resolve the issue and restore normal website functionality.
By checking your internet, switching web browsers, disabling firewalls or antivirus programs, changing the following server addresses, and flushing DNS cache, you can tackle the common causes of this error.
Follow the steps we have provided for you above, and we hope you get the issue resolved.
Remember, troubleshooting DNS-related issues requires a systematic approach and an understanding of the underlying causes.
Frequently Asked Questions
To make your DNS server available:
1. Check your internet connection.
2. Verify DNS server settings.
3. Restart networking devices.
4. Disable firewall or antivirus programs temporarily.
5. Flush DNS cache.
6. Contact your DNS provider if the issue persists.
A DNS server for Wi-Fi is a server that translates domain names (e.g., www.example.com) into their corresponding IP address.
When you connect to a Wi-Fi network, your device relies on the DNS server to resolve domain names and establish internet connectivity.
The DNS server acts as a directory that helps your device locate the correct IP address associated with the website you want to access.
It plays a crucial role in translating human-readable domain names into machine-readable IP addresses, allowing you to browse the internet and access websites seamlessly.