WordPress Clear Cache: Step-by-step guide [2023]
- What is catching in WordPress?
- Why is clearing the cache important?
- Clear cache in the browser
- Clearing cache with plugins
- Clearing cache by hosting company
- Clear with WordPress firewall plugins
- Clear DNS cache
- What if nothing works?
- Conclusion
Performing tasks like WordPress clear cache regularly is important to help remove any unnecessary data stored on your site and improve the speed and performance of your WordPress website.
If you’ve ever made changes to your WordPress website and found that they don’t show up right away, it may be because of caching.
Caching saves a copy of your site’s content in different places, like your web browser, hosting server, or caching plugins.
Clearing the WordPress cache is often the first troubleshooting step recommended to fix this issue, and in this article, we’ll show you how to properly clear the WordPress cache.
What is WordPress cache?
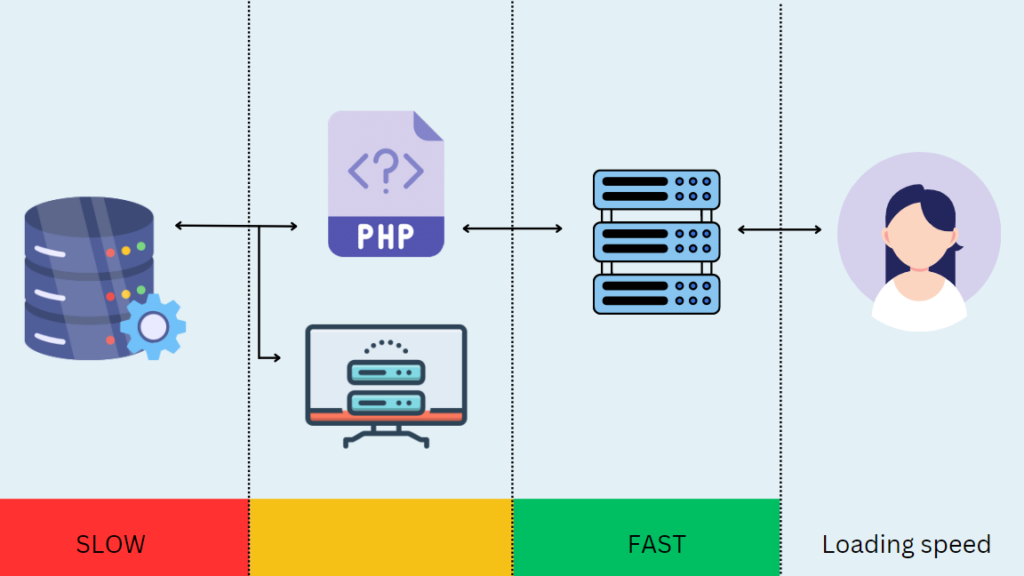
It refers to the temporary storage of frequently accessed data. For instance images, scripts, and other website content, that is stored on your website or browser in order to speed up page loading times.
When a website is visited, the cached data is used instead of fetching the data again from the server, resulting in faster page load times.
Caching is an important feature for optimizing WordPress site speed and performance, but it can also sometimes cause issues if the cache needs to be cleared or updated.
How to cache in WordPress?
There are different ways for WordPress caching, but the most common method is to use a WordPress caching plugin, like WP Rocket or WP Super Cache plugin.
These caching plugins allow you to control what content is cached, how long it’s cached, and when it’s cleared.
Your hosting provider may also offer built-in caching solutions. For example, managed WordPress hosting companies like WP Engine have their own caching system, while hosts like Bluehost and SiteGround provide caching features to their users.
If you use a web application firewall, such as Sucuri or Cloudflare, to enhance your WordPress website’s security, it may also include a caching system to speed up your site and reduce downtime.
In addition, modern web browsers automatically store cached versions or cache files of web pages, which means that if you’ve recently visited a website, your browser may display a cached version of the page instead of loading the updated version.
Why is it important to clear cache in WordPress?
Simply, because visitors can see the most up-to-date version of your website.
When you make changes to your site, like updating content or changing its design, the old version of the page may still be stored in the cache.
If a visitor tries to access your site, they may see the old version instead of the updated one, which can be frustrating for them and can impact your website’s credibility.
Clearing your website cache can also help improve your website’s performance. Over time, the cache can become cluttered with outdated files and data, which can slow down your website’s loading speed.
By clearing the cache, you can free up space and improve your website’s speed and responsiveness.
With that being said, let’s dive in!
Step 1: Clearing browser cache
To see the most recent version of a website, it’s important to clear your web browser cache. Many web browsers store static content, such as stylesheets, JavaScript, and images, to speed up page loading times.
However, this can sometimes result in older versions of pages being displayed even after changes have been made.
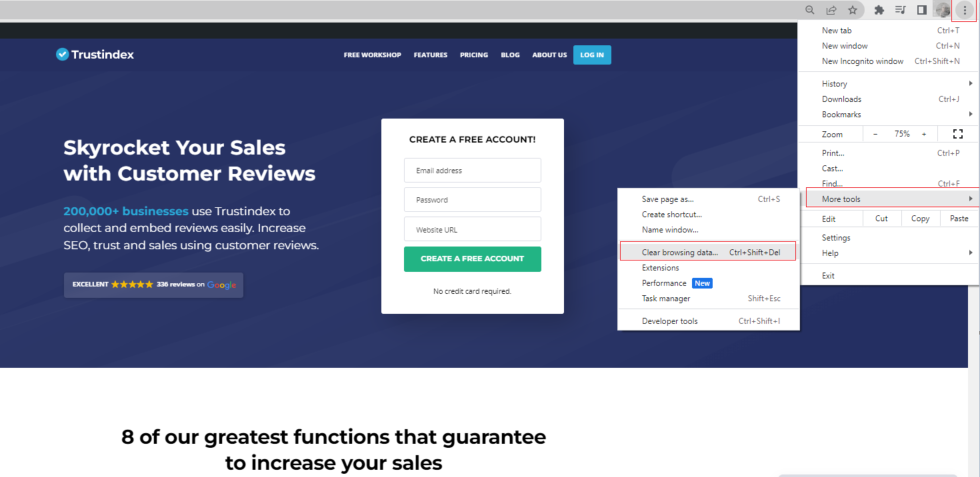
To clear your browser cache in Google Chrome, start by clicking on the menu icon in the top right corner of the browser. From there, select “More Tools” and then “Clear Browsing Data”.
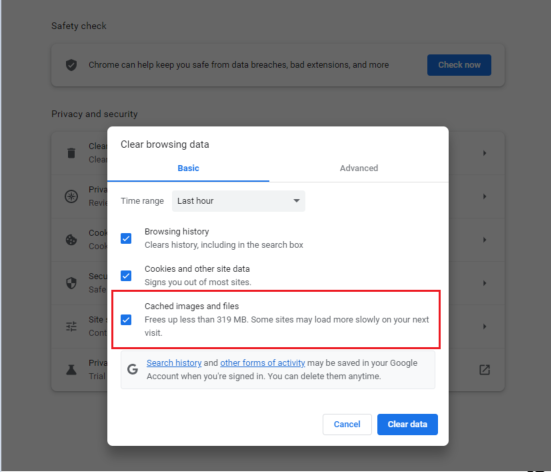
After these steps, a pop-up window will appear in Google Chrome where you can select the specific content you want to remove from your browser cache.
Be sure to check the box labeled “Cached images and files,” and then click the “Clear browsing data” button.
Congratulations! You have now cleared your Google Chrome browser cache. You can go to your WordPress website to check if it’s loading the updated version of your site.
However, if the changes you made are still not visible, don’t worry.
In the following sections, we will cover additional methods to clear the WordPress cache, so you can troubleshoot the issue and get your website back on track.
Step 2: Clear Cache in WordPress with Caching Plugin
You’ll want to clear cache in WordPress with WordPress caching plugins if you use them on your website.
To help you out, I’ve put together a guide on how to clear the cache with some of the most commonly used WordPress plugins.
1.) WP Rocket clear cache
WP Rocket is widely regarded as the leading WordPress caching plugin on the market.
One of its standout features is its ability to automatically build your WordPress cache in the background, ensuring that your users are always served a cached site version.
In addition, WP Rocket offers a simple one-click solution to clear cached files. To do so, navigate to the Settings » WP Rocket section and click the ‘Clear Cache’ button on the plugin dashboard.

WP Rocket will proceed to clear all the cached files for you now.
2.) Clear with WP Super Cache plugin
Another widely used plugin to cache in WordPress is WP Super Cache. It provides a quick and simple way to clear all cached content in one go.
To do this, navigate to Settings » WP Super Cache in your WordPress admin dashboard and then click on the ‘Delete Cache’ button located in the ‘Delete Cached Pages’ section.
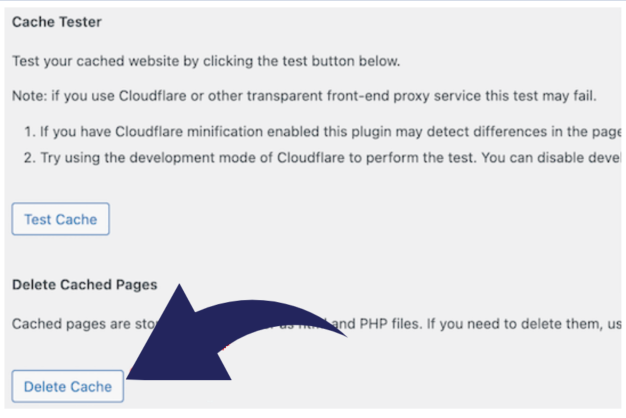
WP Super Cache plugin will now clear all the cached files from your WordPress site.
3.) W3 Total Cache clearing
If you’re using W3 Total Cache, to cache in WordPress, you can easily clear all caches with just one click.
To do this, navigate to Performance » Dashboard and simply click on the ’empty all caches’ button. This will remove all cached files from your website.
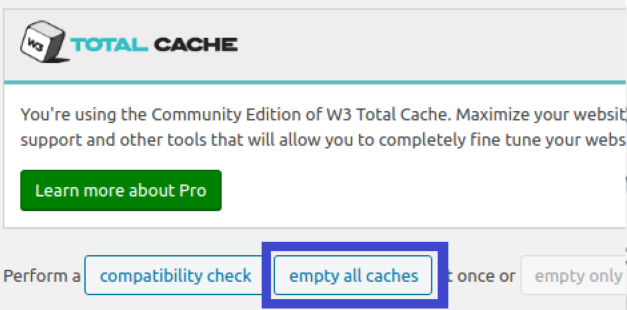
After clicking the button in the W3 Total Cache the plugin will proceed to delete all cached content from your site.
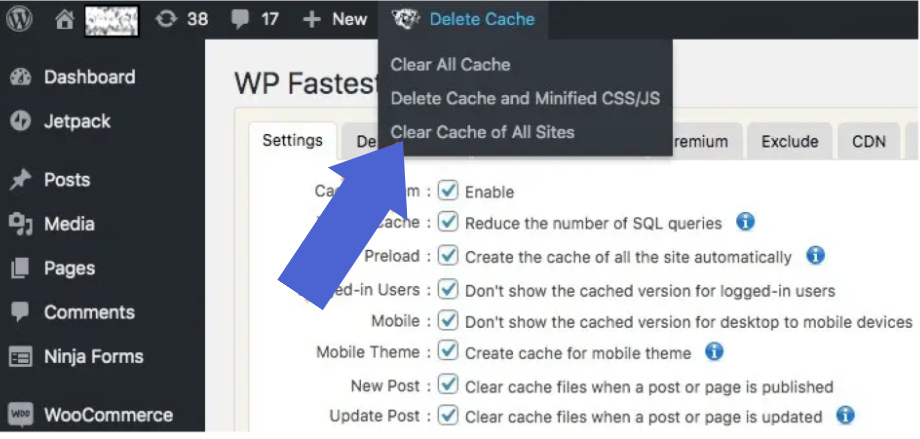
4.) WP Fastest Cache
WP Fastest Cache is a popular WordPress caching plugin that helps improve website speed and performance. It works by generating static HTML files from your dynamic WordPress site and caching them for faster delivery to visitors.
WP Fastest Cache also has features like minification and compression of HTML, CSS, and JavaScript files to further reduce page loading times.
Clearing the cache in WordPress with this plugin is straightforward. From your WordPress admin dashboard, navigate to Settings » WP Fastest Cache and click the ‘Delete Cache’ button in the ‘Delete Cache’ section.
Alternatively, you can set up automatic cache clearing based on specific intervals or events.
5 Short steps to cache manually with WordPress caching plugins
- Choose a cache plugin or solution that’s suitable for your website’s platform and server environment.
- Install and activate the caching plugin or solution on your website.
- Configure the caching plugin or solution settings according to your preferences and needs.
- Test your website’s performance and speed using a web page speed test tool, and make adjustments to your caching settings as needed.
- Monitor your website’s caching performance over time, and continue to fine-tune your caching settings to maintain optimal performance.
Step 3: WordPress cache clearing with your hosting provider
Several WordPress hosting providers offer built-in caching options to optimize the speed of the WordPress site.
To clear the cache of your WordPress website hosted on one of the most popular WordPress hosting providers, follow these steps.
The difference between server cache vs browser cache
Browser cache is a type of caching that happens on the client side, meaning it’s handled by the user’s web browser.
When a user revisits a site, their browser can retrieve cached data instead of downloading it from the server again, speeding up page load time and reducing data transferred.
On the other hand, server cache happens on the server side, meaning it’s handled by the web server or the host. When a user requests a web page, the server checks if there is a cached version of the page available.
If so, under server cache, the server sends a cached site to the user instead of generating a new page.
1.) WordPress cache cleaning with WP Engine
WP Engine, a leading managed WordPress hosting company, offers its own caching solution for users, eliminating the need for a caching plugin.
If you’ve made modifications to your site that aren’t visible, you can clear the WP Engine cache directly from your WordPress dashboard.
To do this, click on the ‘WP Engine’ menu item in the WordPress admin bar, choose the ‘Caching’ option, and then click the ‘Clear all caches’ button.
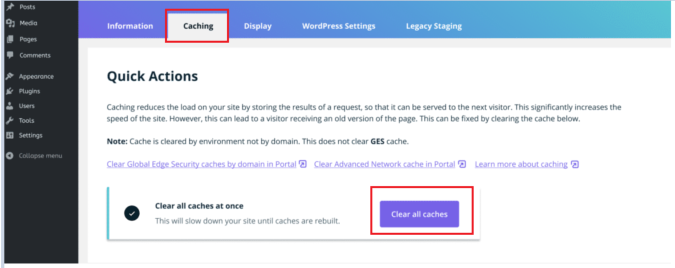
Once you hit the button in the WP Engine cache settings, the hosting provider will automatically remove all stored caches associated with your WordPress webpage.
2.) Clear your WordPress cache with Bluehost
Bluehost, a top WordPress hosting provider officially endorsed by WordPress, includes a caching solution that instantly enhances your site’s performance and speed.
Clearing your WordPress cache with Bluehost is a piece of cake.
Once you’re logged in to your WordPress dashboard, locate the ‘Settings’ >> ‘Performance’ in the top admin toolbar, make sure you have the right settings and click ‘Clear Everything’.
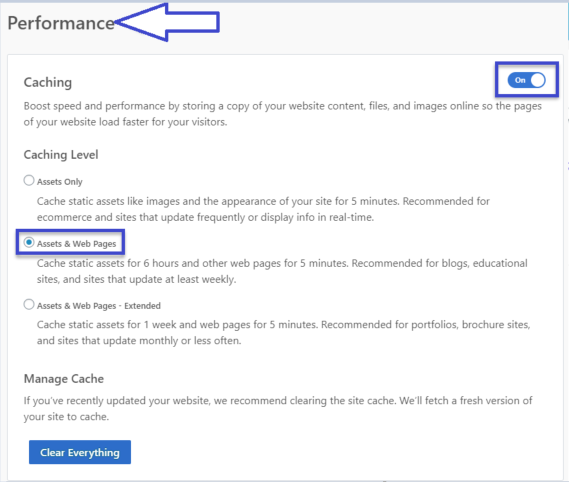
The host will clear all your WordPress cache.
3.) Delete cache with SiteGround
SiteGround, a renowned WordPress provider, offers an integrated caching solution to enhance your website’s speed and performance.
You can clear SiteGrounds WordPress cache from both your hosting account control panel and the WordPress dashboard.
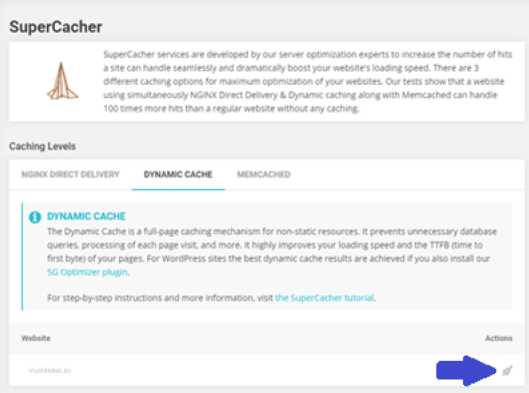
To clear your WordPress site’s cache from the SiteGround control panel, login to your hosting account dashboard and navigate to Speed » Caching under the site tool section.
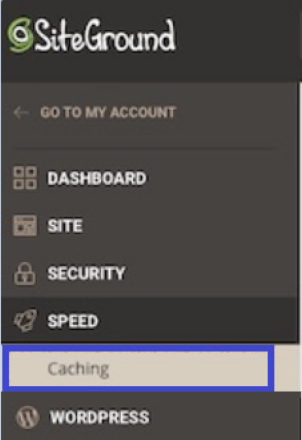
From there, choose the ‘Dynamic Cache’ menu option, then click on the menu icon next to your domain name and select ‘Flush Cache’ from the drop-down menu.
Step 4: Clear your WordPress cache with Firewall plugins
In case you’re using a WordPress firewall such as Sucuri to safeguard your site, you’ll need to clear another layer of caching.
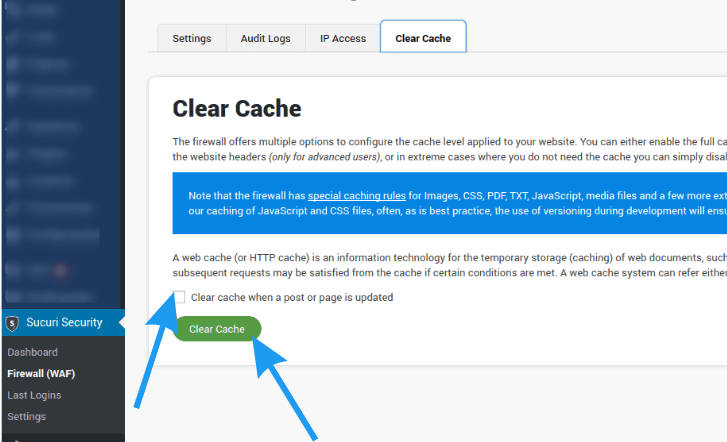
To clear your Sucuri cache, navigate to Sucuri, Firewall (WAF) in your WordPress admin panel.
From there, select the ‘Clear Cache’ option and click on the ‘Clear Cache’ button.
Bonus step: Clear your DNS cache
To clear your DNS cache, you can follow these steps:
- For Windows users, open the Command Prompt by pressing the Windows key + R on your keyboard, type “cmd” in the Run dialog box, and then hit Enter. For Mac users, open Terminal from the Applications folder.
- In the Command Prompt or Terminal, type the command specific to your operating system:
- For Windows users, type “ipconfig /flushdns” and hit Enter.
- For Mac users, type “sudo killall -HUP mDNSResponder” and hit Enter. You will be prompted to enter your computer’s administrator password.
- Wait a few moments for the command to complete and the DNS cache to clear.
- Close the Command Prompt or Terminal window.
After clearing your DNS cache, you may need to refresh your browser or restart your computer for the changes to take effect and see the cached data.
Have you tried everything and still no changes?
After making changes to your WordPress website, it’s possible that you may not see the updated content immediately due to the delay in updating cache data and the server cache.
There are a few solutions to address this issue. Firstly, you can clear the cache using the methods mentioned earlier to trigger an update.
Secondly, you can switch to a different browser or try refreshing the page. Although this may not always resolve the issue.
If the problem persists, it’s advisable to contact your hosting provider for further support.
Conclusion
Caching is a crucial aspect of optimizing your WordPress website’s speed and performance. It reduces the load on your server and makes your site load faster for your visitors. We discussed different types of caching, including server cache, browser cache, and CDN cache.
We also covered how to clear the cache for various caching solutions, including popular WordPress plugins like WP Super Cache, W3 Total Cache, and WP Rocket, as well as caching solutions provided by hosting companies like Bluehost, SiteGround, and WP Engine.
Remember, clearing the cache may be necessary when you make changes to your website to ensure that the updated content is visible to your visitors.
By understanding how caching works and how to manage it, you can improve your website’s performance and provide a better user experience.
Frequently Asked Questions
To clear the cache in WordPress, you have two options: using a caching plugin or manual clearing.
If you use a caching plugin like WP Super Cache or W3 Total Cache, go to the plugin’s settings page to clear the cache.
Alternatively, you can manually delete cache files from the server using FTP or your hosting control panel’s file manager. Additionally, clearing your browser cache ensures you see the latest website version.
Clearing the cache enhances website performance and ensures visitors view the latest content. Keep in mind that cache clearance may temporarily slow down page load times as the cache rebuilds.
Yes, it is recommended to clear the cache on your WordPress website periodically, especially after making changes or updates to your site. Clearing the cache ensures that your visitors see the most up-to-date version of your website and can help improve website speed and performance.
To clear your WordPress cache without plugins:
Clear your browser cache (Ctrl+Shift+Delete or Command+Shift+Delete).
Temporarily deactivate caching plugins.
Update permalinks in WordPress settings.
Request your hosting provider to clear the server cache.
By following these steps, you can clear your WordPress cache without plugins.
Using a caching plugin in WordPress can enhance performance and speed. The plugin generates static versions of your pages, serving them to users instead of regenerating them for each request. This reduces server load and accelerates site speed.
However, caching is not a universal remedy for all performance issues. Consider optimizing images and selecting a dependable web hosting provider to further improve your site’s speed.