How to Create a WordPress Staging Site – Beginners Guide [2023]
- What is a WordPress staging site?
- Create a WordPress staging site easily
- Why set up a WordPress staging site?
- Conclusion
Are you looking to create a WordPress staging site for your website but don’t know where to begin?
A WP staging site is like a test site where you can make changes and updates to your website without affecting the live version.
It’s a safe way to experiment before making changes that will be visible to your visitors.
In this simple guide, we’ll walk you through the process of creating a staging environment for your WordPress site.
We’ll cover a few different methods, and the best part is that most of them require just a few clicks.
So, let’s get started!
What is a WordPress staging site?
A staging site is an exact copy of your live website that you can use to test changes before making them live.
It’s a helpful tool to avoid mistakes and ensure your live website remains intact.
In the past, setting up a WordPress staging site was complicated and required technical expertise.
However, things have changed, and now even non-technical users can easily create a staging site.
Many users used to install WordPress on their local computers to test changes before uploading them to the live server.
However, this approach can lead to issues if the local environment differs from the live server.
To avoid such problems, it’s better to set up a staging site directly on your web hosting server.
This way, you ensure that the staging environment matches the configuration of your live site.
Now, let’s explore how to set up a staging site for your WordPress website.
How to create WordPress staging sites easily
There are different ways to create a staging site for your WordPress site, and the easiest option is to use your hosting provider’s built-in staging feature.
Many top WordPress hosting companies offer a 1-click staging site setup, making it effortless to create a staging environment for your website.
If your website is hosted with one of these popular hosting providers, you can take advantage of this feature without any complications.
However, if your hosting provider doesn’t offer built-in staging, don’t worry!
There are still solutions available to help you create a WordPress staging site using a plugin or even setting it up manually.
Whether you have access to a hosting provider’s WP staging feature or need to rely on plugins or manual methods, you can create a staging site to safely test and make changes to your WordPress site before going live.
Create a staging site using Bluehost

Bluehost is highly regarded as one of the top WordPress hosting companies, and they provide a convenient 1-click staging site solution included with all their plans.
1.) To get started with Bluehost’s WP staging feature, simply log in to your WordPress site’s dashboard. From there, navigate to the Bluehost > Staging site.
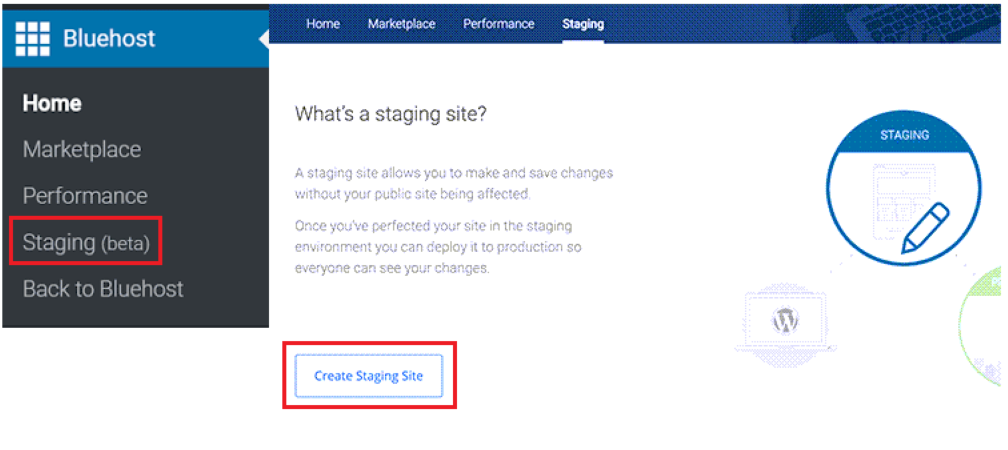
2.) After accessing Bluehost’s staging site wizard, you’ll need to click on the ‘Create Staging Site’ button to proceed with the setup process.
The web host will then begin setting up the WP staging environment for your website.
Once the process is complete, you will receive a success message confirming the successful creation of your staging site URL.

3.) To access your staging website, simply click on the radio button next to the Staging site option in Bluehost.
Once switched, you will notice a prominent button displayed at the top of the screen, indicating that you are now working on the staging website.
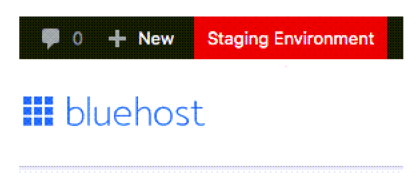
This visual cue serves as a reminder that any changes or modifications made will apply to the WP staging site rather than your live production site.
Deploy to live site
1.) When you are prepared to apply the changes made in the staging environment to your live site, navigate to Bluehost and click on the Staging site.

On the Staging page, you’ll notice a drop-down menu labeled “Deployment Options” next to your staging website.
This menu allows you to choose whether to deploy only the files, only the database or deploy all changes made in the staging environment.
2.) If you’re unsure about which option to select, you can simply click on the ‘Deploy All Changes’ button to proceed with deploying all changes.
A popup window will appear, asking you to confirm your intention to deploy the staging site to the live production site.
3.) To proceed, click on the ‘Yes! Let’s Deploy’ button.

Once you initiate the deployment process, the web host will begin transferring your new staging site to the live WordPress site.
The duration of the staging process may vary depending on the size of your website.
During the deployment, you will notice a pop-up window displaying the progress.
Once the deployment is complete, the pop-up will automatically disappear, and you will be greeted with a success message indicating that the WordPress staging site has been successfully deployed to the live site.
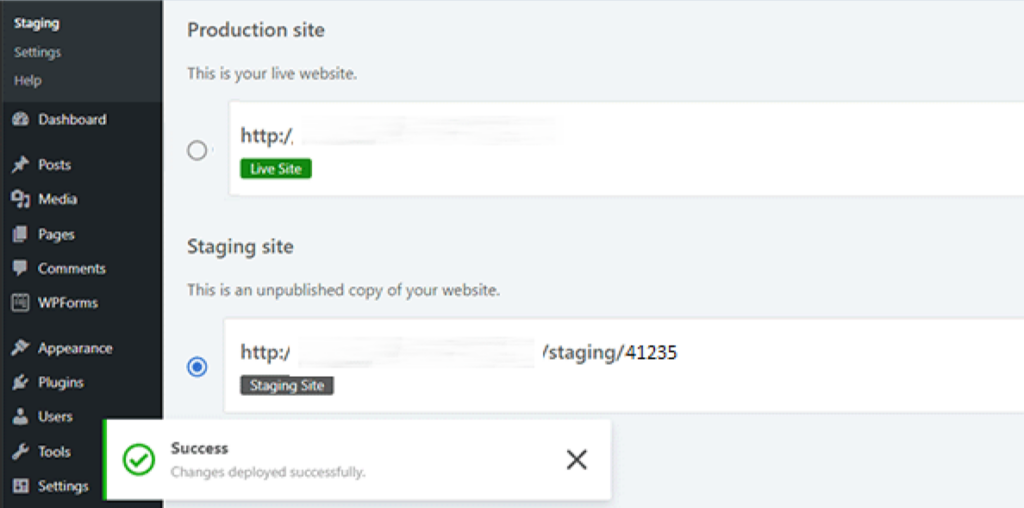
To view the changes you made in the staging environment on your live website, simply switch back to the live site by clicking on the radio button next to the Production site URL.
Clone production site
When you switch between the production and staging sites, it’s important to note that any changes you make there will not automatically sync with your staging website.
If you wish to continue testing and making changes on your staging website in the future, you will need to create a duplicate of your live site.
1.) To do this, navigate to the Bluehost » Staging site and locate the ‘Clone to staging’ button.
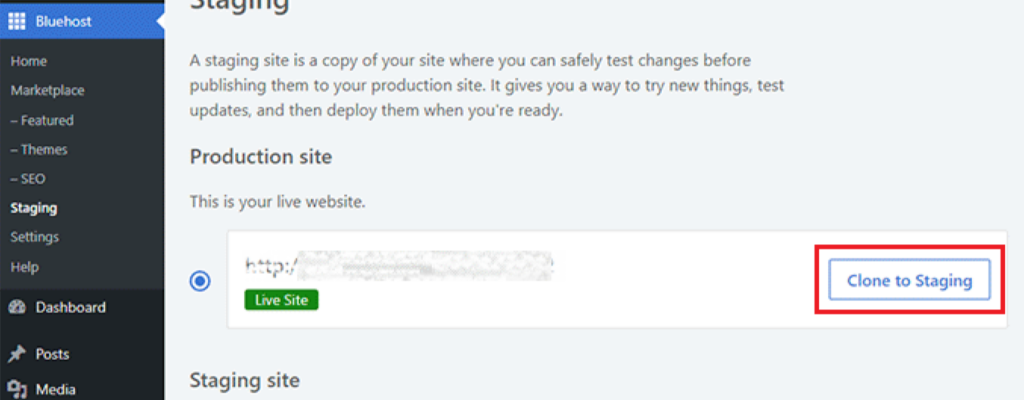
Bluehost will initiate the process of cloning the latest changes from your live website to the staging site.
Create staging site using SiteGround
SiteGround is a reputable WordPress hosting company that provides a convenient 1-click staging feature with their GrowBig and GoGeek plans.
If your website is hosted with SiteGround, follow these steps to set up a staging website.
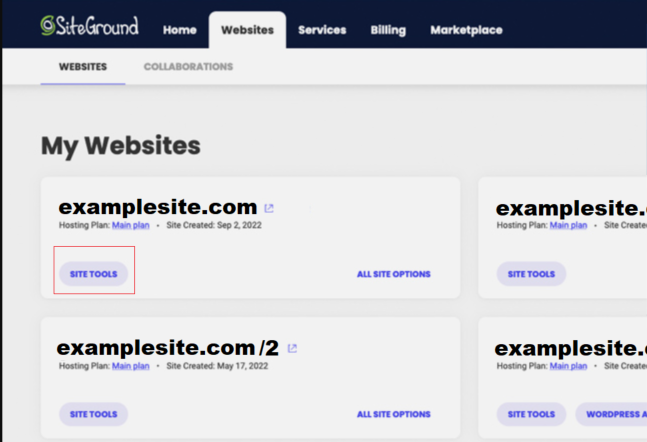
1.) Log in to your SiteGround dashboard and navigate to the Websites tab.
2.) Select the specific website and look for the Site Tools option below your website.
3.) Look for WordPress menu > Staging option and click on it.
4.) On the Staging page, select the specific website for which you want to create a staging copy, then provide a name for your staging site copy, which will help you identify it later on.
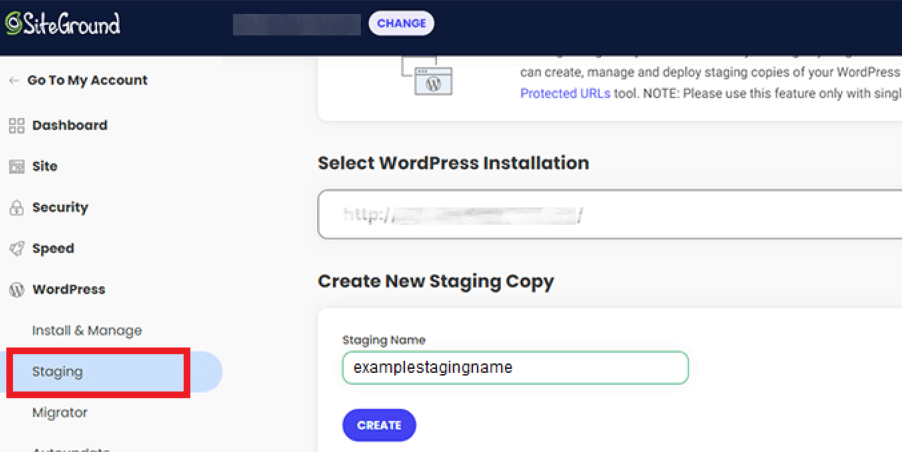
5.) Click the ‘Create‘ button on SiteGround’s Staging page, then SiteGround will start the process of creating a staging copy of your WordPress website.
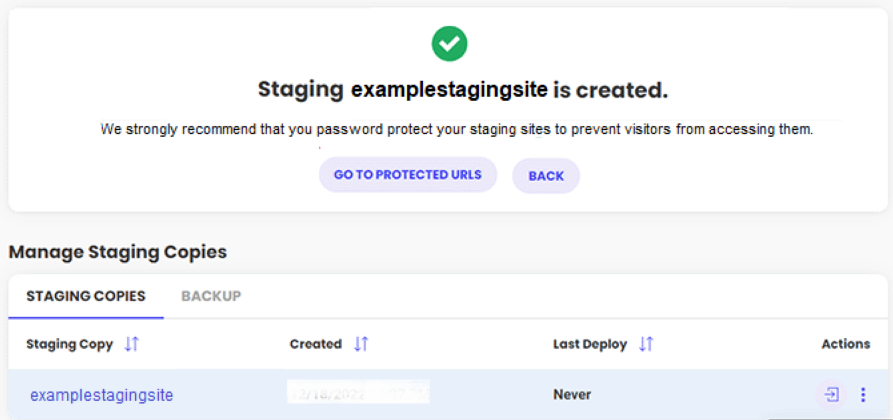
6.) Once the staging copy is successfully created, you will need to click on the ‘Go to protected URLs’ button.
This step is important as it allows you to password-protect your staging website, ensuring that it remains private and accessible only to authorized individuals.
7.) Click the ‘Go to protected URLs‘ button, then on this screen, you will find that SiteGround has automatically filled in the URL and path for your staging website.
To proceed, you need to enter the username and password of your choice, which will be used to protect and restrict access to your staging site.
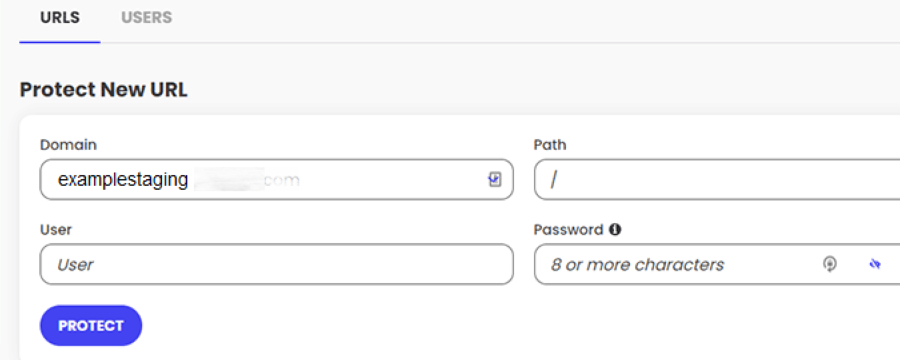
8.) Once you have entered your desired username and password to protect your staging site, click on the “Protect” button to save your settings.
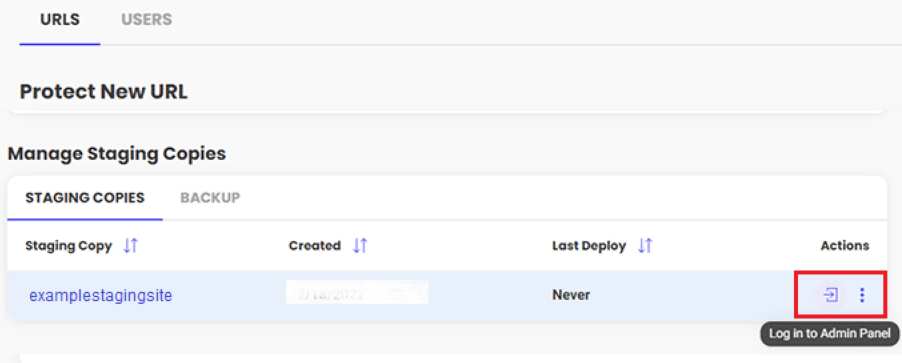
After saving the settings, you can navigate back to the WordPress » Staging site in your SiteGround dashboard.
9.) Click on ‘login to Admin panel’ and start experimenting to make sure everything works as expected before applying the changes to your WordPress website.
Deploy staging site changes to live site
Once you have tested your changes on the staging website and are ready to merge them with your live website, SiteGround makes the process easy.
1.) Simply navigate to the WordPress » Staging menu in the left column of your SiteGround dashboard.
2.) From there, click on the three-dot menu next to your staging site under the ‘Manage Staging Copies‘ section.
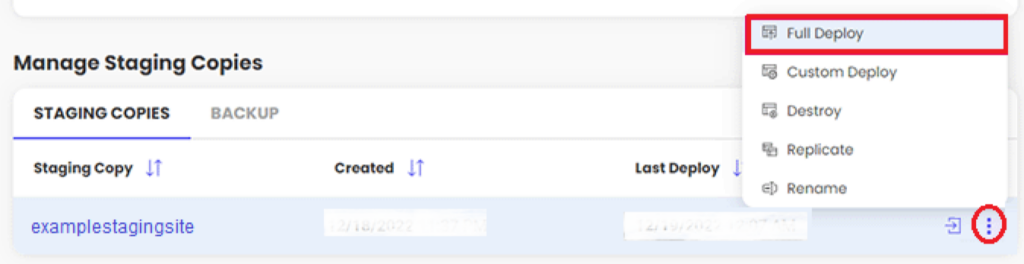
In the menu that appears, you will find two deployment options: ‘Full Deploy’ and ‘Custom Deploy’.
The ‘Full Deploy’ option merges everything from the staging website to your live website, while the ‘Custom Deploy’ option allows you to selectively choose which files or data to merge.
3.) If you’re unsure about the specific files or data to merge, it is recommended to choose the ‘Full Deploy’ option.
After that SiteGround will proceed to copy the staging site to your live site.
Merge live site to staging site
While making changes to your live site, it’s important to note that they are not automatically copied to your staging sites.
To continue working on your staging site, you will need to repeat the process mentioned earlier to create a fresh WordPress staging environment.
Create a staging site using WP Engine
WP Engine is widely regarded as the leading managed WordPress hosting provider globally.
With managed WordPress hosting, you receive a personalized service for your WordPress site, where the hosting provider handles crucial aspects such as:
- updates,
- backups,
- security,
- and performance optimization.
WP Engine includes a convenient one-click staging solution with all their hosting plans.
1.) Log in to your WP Engine dashboard and navigate to the ‘Sites’ page within the dashboard. Select your specific website by clicking on it from the list.
This will take you to your website dashboard.
2.) Next, locate the ‘Add Staging‘ link in the left column or under your site name at the top.
Clicking on this link will allow you to initiate the process of adding a WordPress staging environment for your live site.
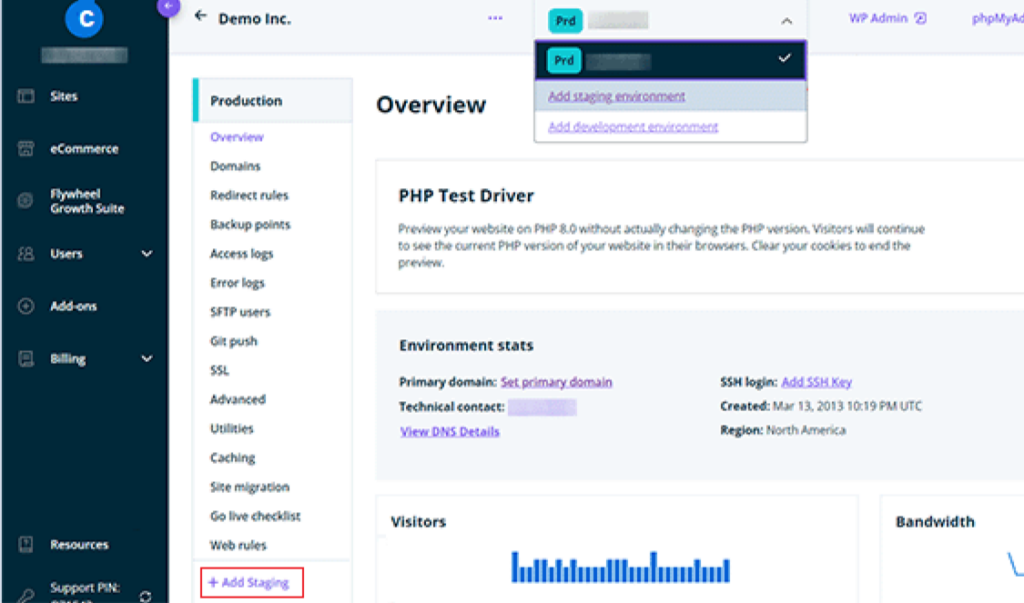
You will be prompted to choose how you would like to proceed with your staging environment.
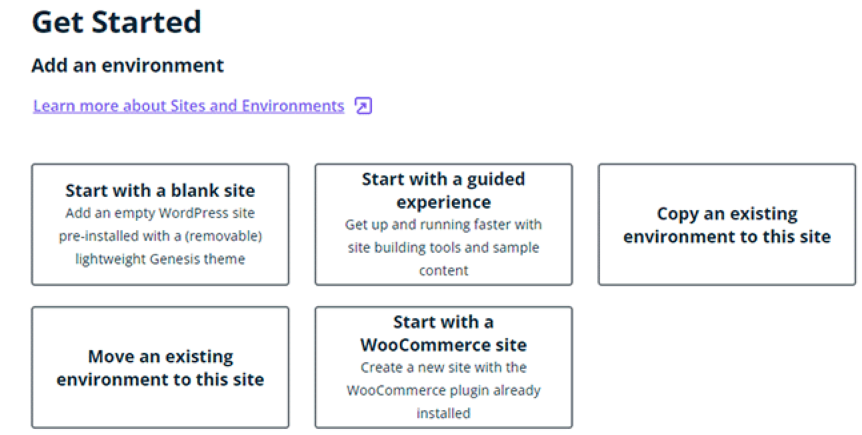
When setting up your staging environment with WP Engine, you will encounter various options to choose from.
Here’s an overview of what each option entails:
- ‘Start with a new blank site’: This creates a new, empty site without any existing content or configurations.
- ‘Start with a guided experience’: It sets up a new site with a guided experience, including demo content to help you get started.
- ‘Copy an existing environment to this site’: Copy an existing environment, such as your live or development site, to the staging environment.
- ‘Move an existing environment’: Move an existing environment, like the development environment, to the staging environment.
- ‘Start with a WooCommerce site’: This creates a new WordPress site with WooCommerce already installed for e-commerce functionality.
3.) To create a staging copy of your live website, you should select the ‘Copy an existing environment to this site’ option.
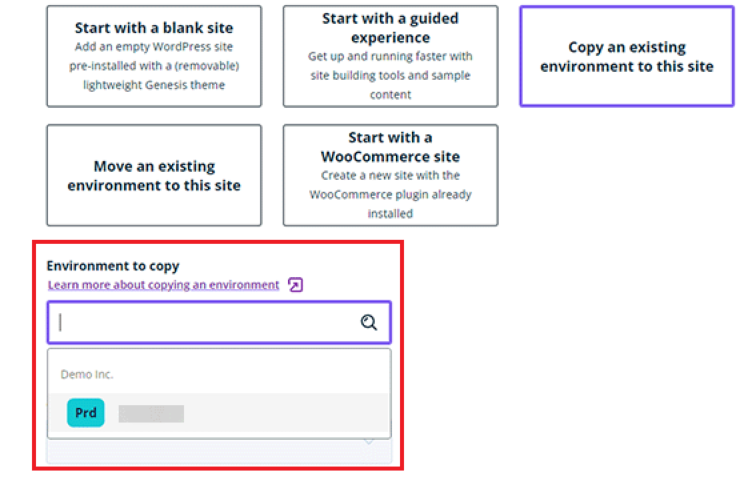
4.) Once you have selected the ‘Copy an existing environment to this site’ option, proceed by clicking on the ‘Next’ button.
Next, you will need to provide a name for your staging site.
This name will be used in the URL of your staging site, making it easy to identify and access.
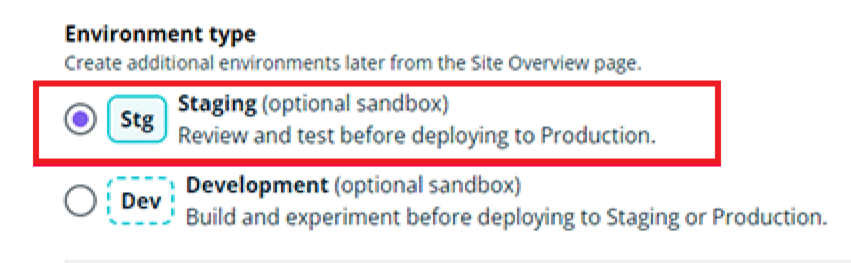
5.) After entering the desired name, choose ‘STG’ (short for staging) as the environment type.
6.) Click on the ‘Create Environment’ button to proceed.
WP Engine will create your staging site, and you will be redirected to the WP staging tab.
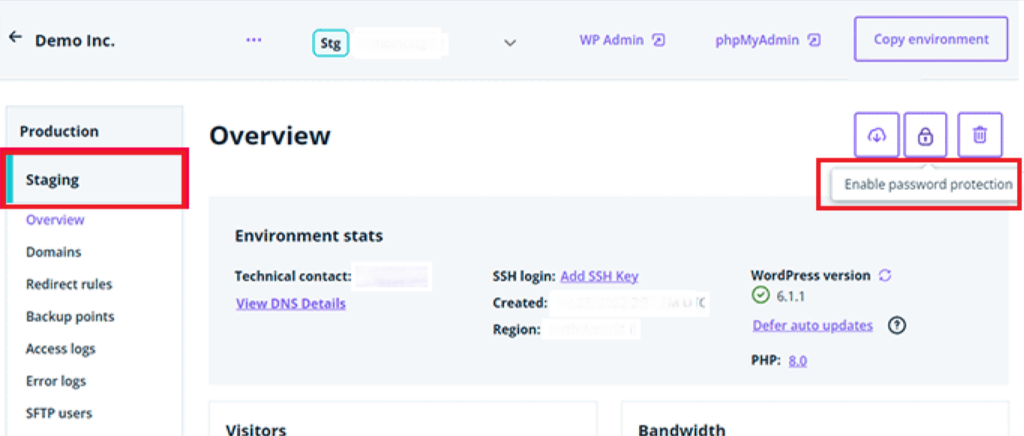
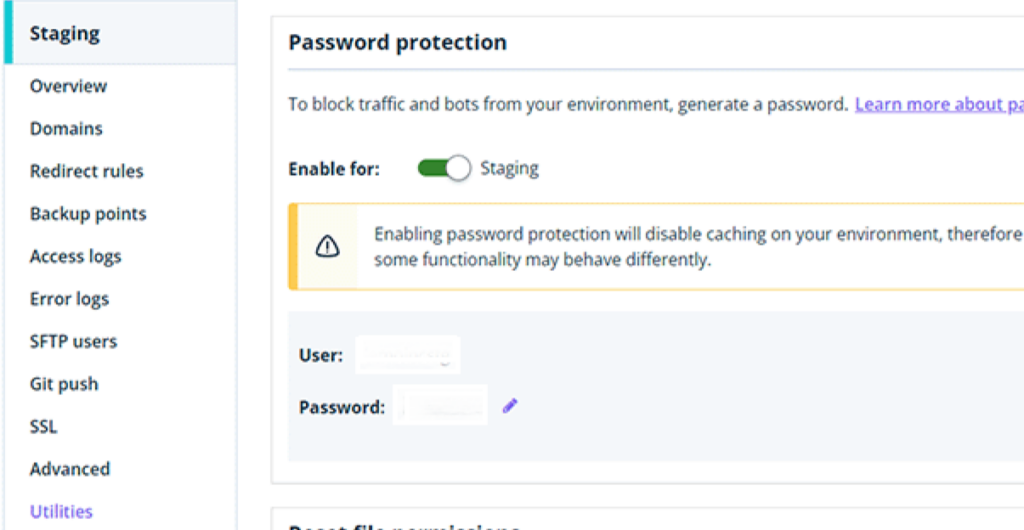
7.) Click on the Padlock button to enable password protection for your staging site.
8.) Then, switch to the ‘Utilities‘ tab to copy the staging site username and password.
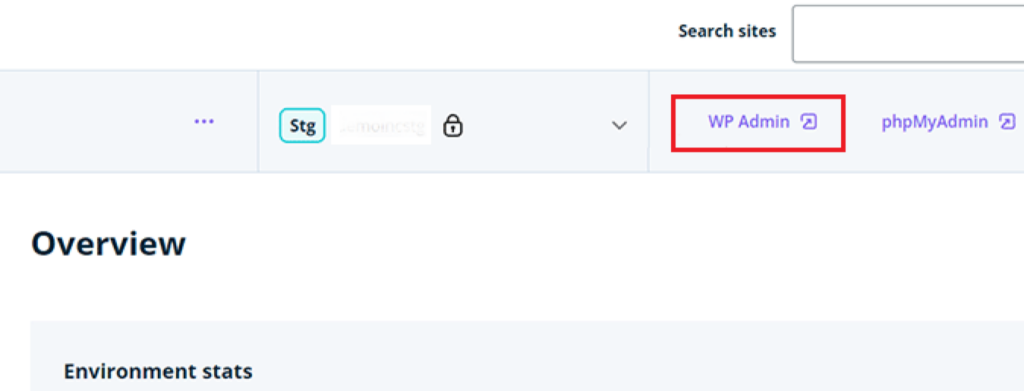
9.) Click on the ‘WP Admin’ button at the top to log in to your staging website.
From there, you can make changes, try out features, and test your staging website just like other WordPress sites.
Deploy changes from staging site to live website
To merge the changes made on your staging website to your live website, follow these simple steps:
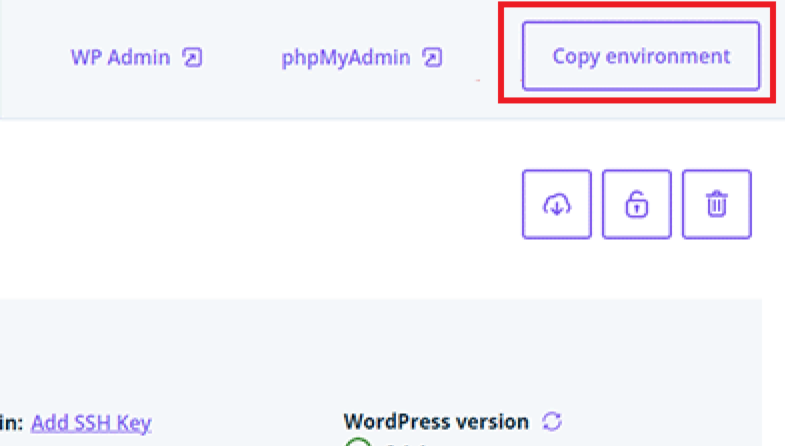
1.) Click on the ‘Copy Environment’ button then select your staging website as the source environment and your live or production website as the destination environment.
2.) Choose the specific elements you want to copy, such as all database tables and files, specific files and database tables, or only the file system.
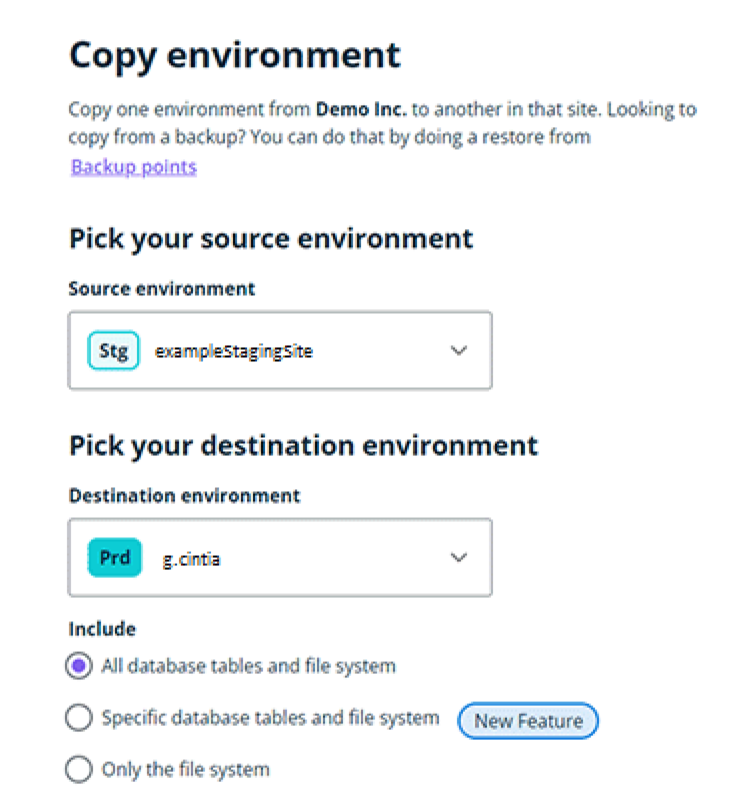
Note: If you select to copy everything, be aware that any data added to your live website after creating the staging environment will be overwritten. It’s advisable to create a backup of your live site before deploying changes from staging.
3.) Click on the ‘Review and Confirm’ button to proceed with the deployment. Please be patient as it may take some time to complete the copying process.
Once the deployment is finished, you will receive an email notification confirming the completion of the process.
Keep an eye on your email for updates and be sure to review the changes on your live website to ensure everything is working as expected.
Create a staging site with WordPress plugin
If your WordPress hosting provider doesn’t offer a built-in staging site feature, you can still create a staging website using a WP staging plugin. However, it’s important to consider the potential disadvantages of this method.
Using a plugin for staging may have limitations in terms of control over your staging server, which could affect the performance and results. Additionally, the plugin will store your staging site on its own servers, raising privacy and data protection concerns.
Moreover, some plugins may have known compatibility issues, so it’s essential to check their compatibility page to ensure your website can work seamlessly with the chosen WP staging plugin.
To create a staging WordPress site using a plugin, follow these steps:
1.) Install and activate the WP Stagecoach plugin (refer to our guide on how to install a WordPress plugin for detailed instructions).
2.) After activation, click on the WordPress staging plugin.
Once you’ve reached the plugin’s settings page, you can proceed with configuring the staging environment and managing your staging site using the options provided by the WP Stagecoach plugin.
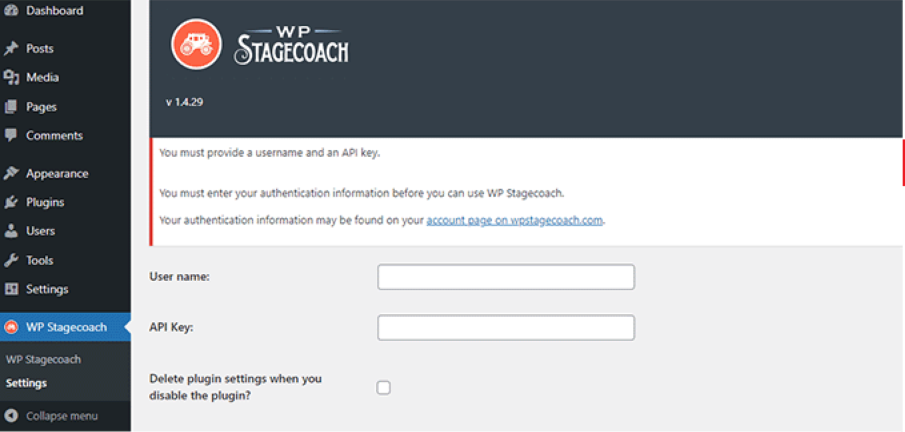
3.) Retrieve your WP Stagecoach username and API key from your account on the plugin website.
4.) Visit the WP Stagecoach » WP Stagecoach page again and choose a name for your staging site.
This name will also serve as the subdomain for your WordPress staging website.
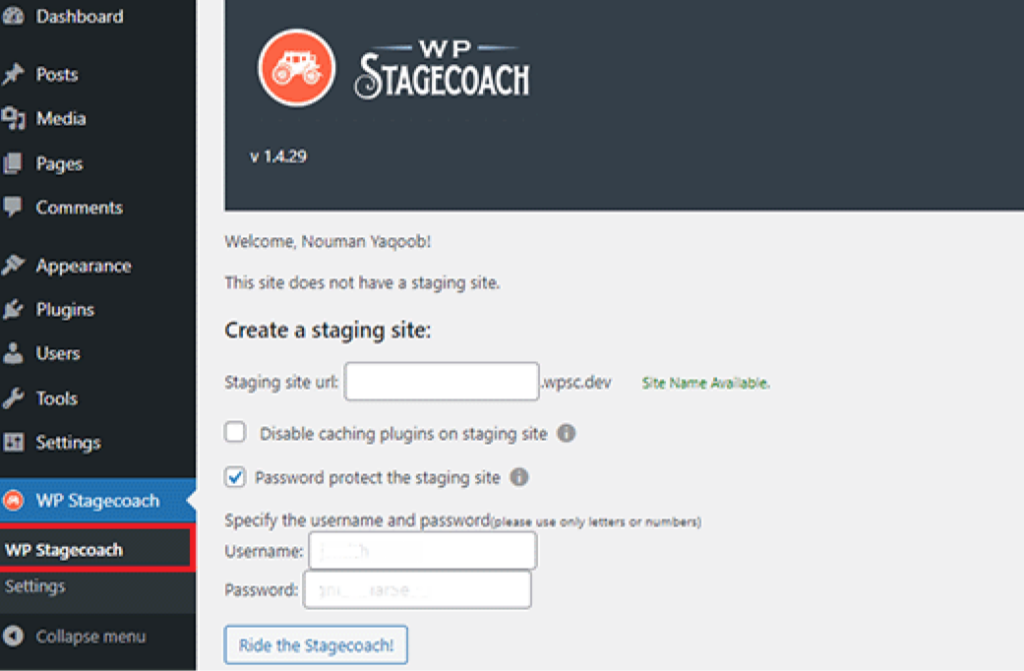
5.) Once you have enabled password protection, click on the ‘Ride the Stagecoach’ button to proceed with creating your staging site.
The WP Stagecoach plugin will now initiate the process of creating a backup for your WordPress files and database to export them for your staging site.
Please note that the duration of this process may vary depending on the size of your WordPress website.
Once the backup process is completed, you will be provided with the link to access your staging site, as well as the corresponding admin area.

Upon accessing your staging site, you will notice a prominent bright orange message displayed in the admin bar at the top.
This message serves as a clear indicator that you are currently working within the staging environment of your WordPress site.

Deploy staging site to live with WP Stagecoach
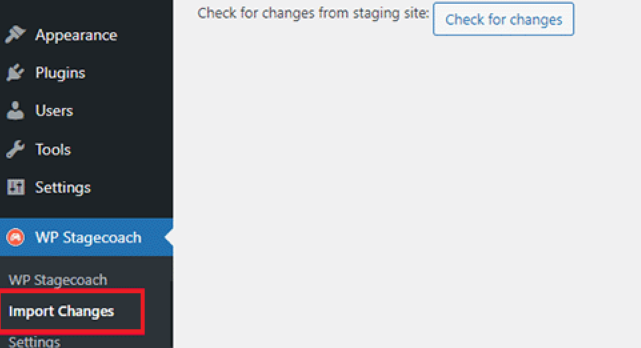
When you’re prepared to import the changes from your staging site to your live WordPress website, follow these steps:
1.) Navigate to the WP Stagecoach » Import Changes page in your WordPress admin area and click on the “Check for Changes” button.
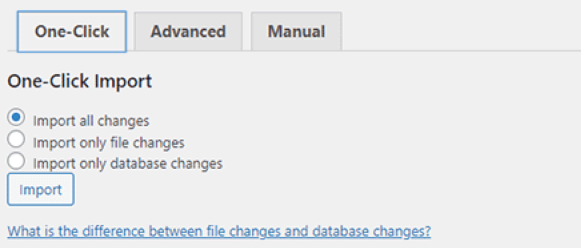
The plugin will then check for any modifications made on your staging site and present you with import options.
2.) You can select from three options: all changes, file changes, or database changes.
The plugin will display the progress of the import process and notify you once it is completed.
3.) Finally, you can test your live site to ensure that all changes have been successfully imported.
Create a WordPress staging site manually
Creating a staging site manually requires more advanced knowledge and involves additional work compared to other methods mentioned earlier.
It is suitable for experienced users who are comfortable with technical configurations.
However, please note that one downside of this method is that your website will experience temporary downtime when deploying changes from staging to the live server.
1.) Access your hosting account’s dashboard and locate the ‘Subdomains’ link under the domains section.
2.) Click on the ‘Subdomains’ link to proceed. Within settings, create a subdomain specifically for your WP staging site.
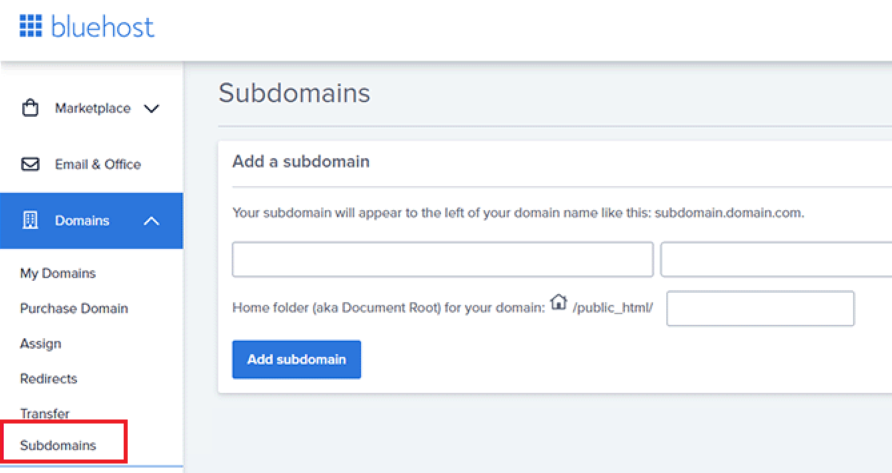
Please note that the following instructions are based on an example using Bluehost. Your hosting provider’s control panel may have a different appearance.
3.) Assign a name to your subdomain, such as “stagingexample.com,” in the provided field and click the “Create” button to add the subdomain to your hosting control panel.
Install the plugin:
Now, it’s time to install and activate the Duplicator plugin on your live WordPress site. If you require additional features, you can access the premium version of Duplicator from here.
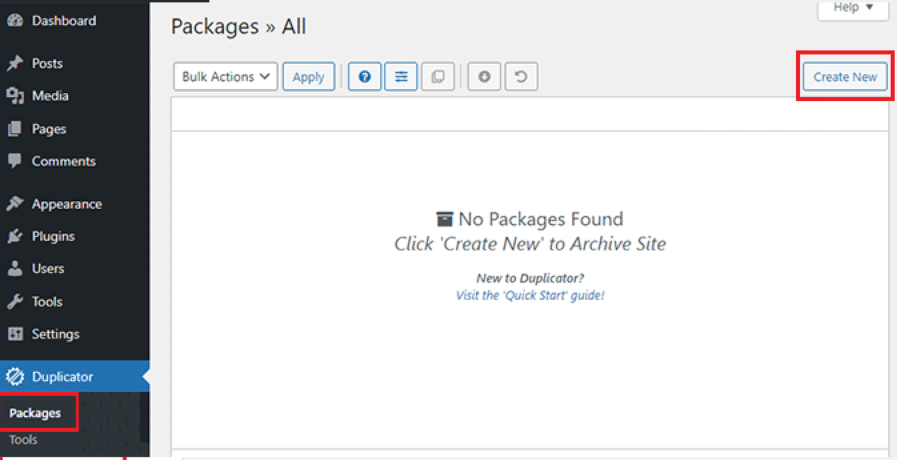
4.) Once the plugin is activated, navigate to the Duplicator menu and click on the “Create New” button under Packages to initiate the staging site creation process.
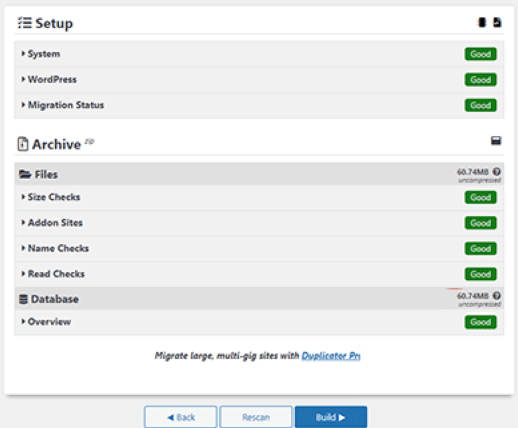
5.) Afterwards, click on the “Next” button to proceed. Duplicator will initiate the website duplicator wizard.
It will conduct a series of tests to ensure that everything is functioning properly.
6.) If all items are labeled as “Good,” proceed by clicking the “Build” button.
The Duplicator plugin will now begin generating a package for your WordPress site.
The duration of this process may vary depending on the size of your website.
Once completed, you will be presented with download options for the Installer and Archive package.
7.) To proceed, click the “Download Both Files” button, allowing you to save both files to your computer.
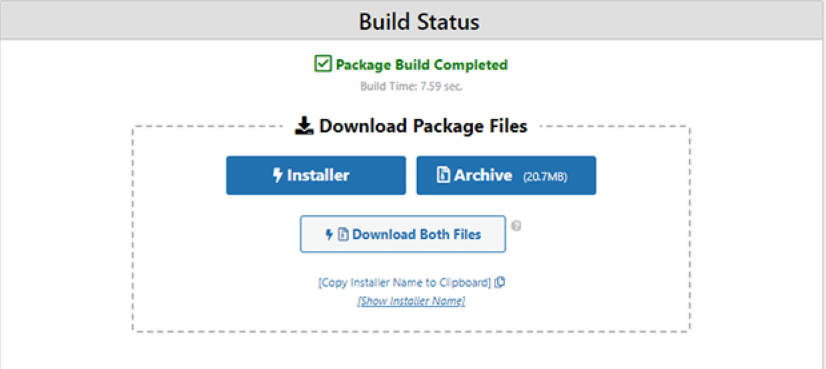
To proceed, you will need to upload both of these files to the file directory of the subdomain you previously created.
Also, your new staging site will require a fresh database.
Let’s create a fresh staging database:
1.) Access the control panel of your WordPress hosting account and locate the ‘MySQL Databases’ icon within the ‘Databases’ section.
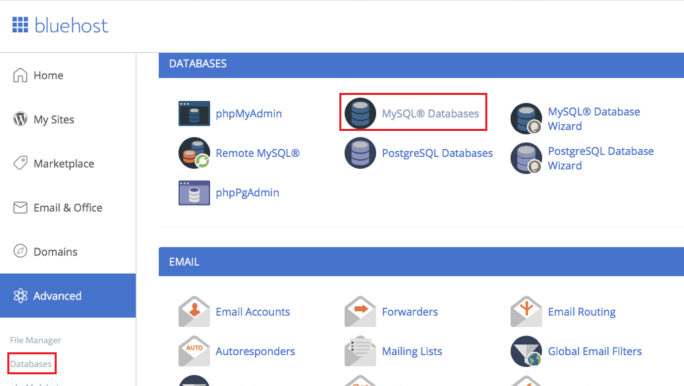
If you are using a hosting provider other than Bluehost, the appearance of your WordPress hosting environment may vary slightly.
However, don’t worry and simply look for the section related to databases.
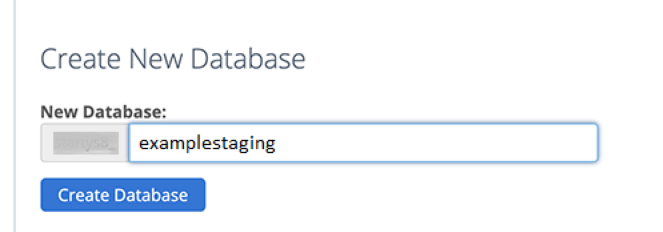
2.) On the following screen, enter a name for your database and click the “Create Database” button.
3.) Scroll down to the section labeled “MySQL Users” and provide a username and password for your newly created database user.
Afterward, grant this user permission to access and modify the database you created earlier.
4.) Scroll further down to the “Add user to database” section, select your database and the user you just created, and click the “Add” button to proceed.
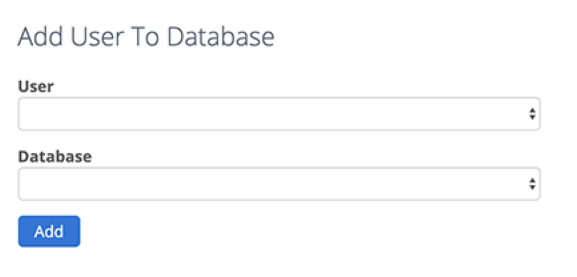
5.) Next, you will be prompted to choose the privileges for the user. Select the “All Privileges” checkbox, followed by clicking the “Make changes” button.
Your database is now prepared for use with your staging site.
6.) To proceed, open a new browser tab and enter the subdomain of your staging site using the following format:
https://yoursubdomain.example.com/installer.php
Remember to replace “yoursubdomain” with the actual subdomain you created, and “example.com” with your own domain name.
Install the plugin with installer wizard:
This action will initiate the Duplicator installer wizard.

In the “Setup” section, the installer will prompt you to provide your WordPress database information.
Typically, your host will be set as localhost. Then, you’ll need to enter the details of the database you created for your new domain name in the previous step.
7.) Click the “Validate” button to ensure that Duplicator can establish a connection to your database.
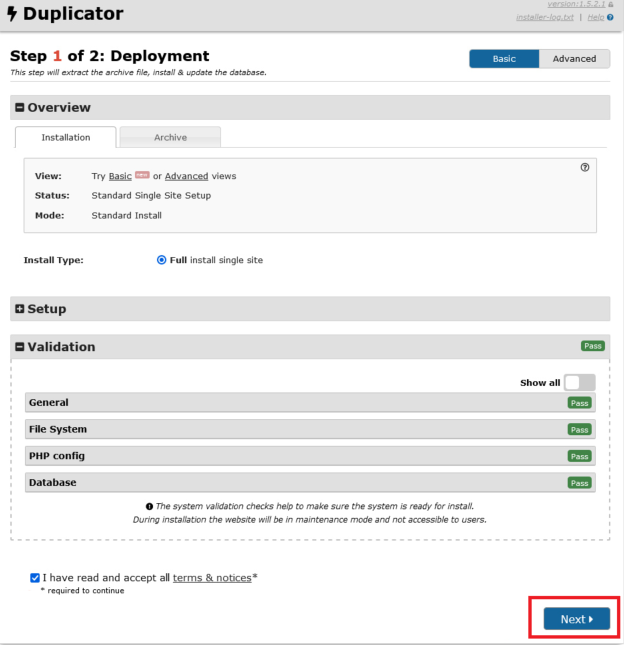
8.) After completing the previous step, click on the “Next” button to proceed.
Duplicator will then unpack your WordPress database and files, importing them to your staging site.
Once the process is finished, a success message will be displayed
After setting up your staging site, you can access the WordPress admin area of your website on the staging site by clicking on the “Admin Login” button.
9.) To add password protection to the subdomain, navigate to your hosting account’s cPanel dashboard and click on the “Directory Privacy” icon.
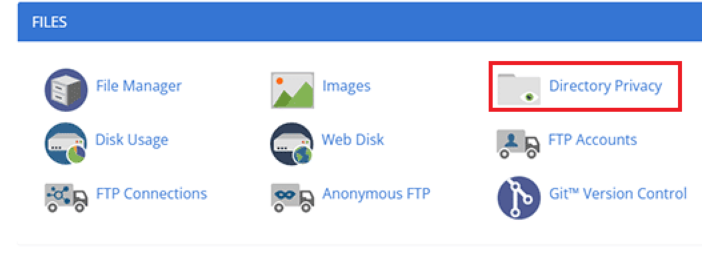
Select the folder corresponding to your subdomain and enable the “password protect this directory” option.
10.) Provide a name for this setting and enter a username and password for authentication.
Deploy staging site manually to live
When you’re ready to deploy changes from your staging site to the live server, follow the steps mentioned earlier.
Create a new Duplicator package on your staging site and download the Installer and Archive files to your computer.
Next, create a complete backup of your live site (you can also use the Duplicator WordPress backup plugin for this).
Delete all WordPress files and folders from your live website, which will result in your site being temporarily unavailable.
Finally, use the Duplicator installer wizard to import the staging site to the live server by following the instructions provided earlier.
Why set up a WordPress staging site?
It is highly recommended to create a staging site alongside a local development environment for several reasons.
Working on Specific Site Elements
With staging sites, you can make changes to specific elements of your website without affecting the live version.
This ensures that you can fine-tune and test updates without any impact on your visitors’ experience.
Dynamic Content Considerations
Staging allows you to handle dynamic content, such as comments, without freezing or losing time-based activity.
By keeping your staging sites separate, you can ensure that live site activity between staging and deployment is preserved.
Testbed for Server Configuration
While a local development environment can simulate a server setup, there’s no substitute for the live server itself.
A staging site provides an opportunity to test and evaluate how your existing site performs in a real server environment, giving you the chance to make necessary adjustments before impacting your visitors.
Testing New Functionality
A WP staging site enables you to test new functionality away from the public eye.
This is crucial for assessing traffic figures, bounce rate, and general analytics.
Moreover, you can update WordPress core, themes, and plugins while addressing any issues that may arise before implementing them on your live site.
Zero Downtime for Live Site
WP staging eliminates downtime for your live site during updates and changes.
This ensures that your staging server uptime remains high, benefiting both your server’s performance and your site’s overall metrics for search engines.
Efficient Resource Utilization
By using WP staging sites, you can optimize resource usage.
It helps reduce potential strain on your server and ensures a smoother experience for your visitors.
Additionally, it keeps your developers happy by providing a controlled and efficient workflow.
Create your WordPress staging environment today
While the manual method mentioned earlier may seem convenient, it poses significant risks that can potentially damage your site.
Therefore, we strongly advise against using this method unless absolutely necessary.
Instead, we recommend opting for a more reliable approach by choosing a reputable hosting provider like Bluehost, SiteGround, or WP Engine that offers built-in staging site features.
By leveraging the staging capabilities provided by these hosting providers, you can ensure a safer and smoother process for creating a staging environment.
This way, you can avoid potential errors and complications that may arise from the manual method.
We hope this article has provided you with valuable insights on how to easily set up a staging environment for your WordPress site.